Safety is paramount when charging your car battery; always ensure proper ventilation and correct polarity to prevent sparks and serious injury. Begin by connecting the red positive clamp, then the black negative or ground clamp, plugging in the charger only when securely attached. Disconnect in reverse—negative first—to safely and effectively restore your car’s power.
Ever experienced that gut-wrenching moment when you turn the key, and all you get is a disheartening click, or worse, absolute silence? We’ve all been there. A dead car battery is frustrating, often happening at the most inconvenient times. While calling for roadside assistance is always an option, knowing how to use a battery charger for your car can be a real game-changer. It empowers you to take control of the situation, save time, and even prevent future breakdowns.
But here’s the thing: messing with car batteries and electrical currents isn’t something to take lightly. There’s a right way and a wrong way to do it, and the wrong way can lead to damaged equipment, a ruined battery, or even personal injury. That’s why this guide isn’t just about the steps; it’s fundamentally about learning how to use a battery charger for your car safely. Think of me as your buddy, walking you through the process, sharing tips, and making sure you feel confident and secure every step of the way.
By the end of this post, you’ll not only understand the ins and outs of charging your car’s battery but also grasp the critical safety precautions that turn a potentially daunting task into a manageable one. We’ll demystify the different types of chargers, walk through the connection process, and cover what to do once your battery is charged. So, let’s dive in and equip you with the knowledge to bring your car back to life!
Key Takeaways
- Prioritize Safety: Always wear PPE and ensure good ventilation.
- Read Your Manual: Understand your specific charger’s features.
- Verify Polarity: Connect red to positive, black to negative/ground.
- Connect Smartly: Attach clamps *before* plugging in charger.
- Disconnect Safely: Unplug charger *before* removing clamps.
- Monitor Progress: Avoid overcharging; never leave unattended long.
Quick Answers to Common Questions
How do I safely connect a battery charger to my car?
Always connect the red (positive) clamp to your battery’s positive (+) terminal first, then the black (negative) clamp to a clean, unpainted metal part of your car’s chassis, away from the battery itself. This minimizes spark risk when using your car battery charger!
What settings should I use on my car battery charger?
Most car batteries are 12V, so select that setting. For amperage, a lower setting (e.g., 2-10 amps) is ideal for a gentle, thorough charge, while a higher setting can offer a quicker boost if needed.
How long does it typically take to charge a car battery?
Charging time varies based on the battery’s discharge level and your charger’s output. A completely dead battery could take 6-12 hours or more with a standard car battery charger, but a quick top-up might be much faster.
Can I charge my car battery while it’s still in the car?
Absolutely! Most people charge their car battery without removing it. Just ensure your ignition is off, all accessories are disconnected, and you have good ventilation when using your battery charger for car.
Is it safe to leave a car battery charger connected overnight?
If you have a modern “smart” or “trickle” battery charger for your car, yes, it’s generally safe as these chargers automatically monitor and maintain the charge. Older, non-smart chargers should be disconnected once the battery is full to prevent overcharging.
📑 Table of Contents
- Understanding Your Car’s Battery and Charger Types
- Essential Safety Precautions Before You Start
- Step-by-Step Guide: How to Connect and Charge Your Car Battery
- Monitoring the Charging Process and What to Expect
- When to Disconnect and Post-Charging Tips
- Troubleshooting Common Charging Issues and When to Seek Professional Help
Understanding Your Car’s Battery and Charger Types
Before you even think about connecting anything, it’s helpful to understand what you’re working with. Your car’s battery isn’t just a black box; it’s a vital component that powers everything from your starter motor to your radio when the engine is off. And just like there are different types of cars, there are different types of chargers designed for them.
The Basics of Your Car Battery
Most modern cars use a 12-volt lead-acid battery. This battery’s primary job is to provide a surge of power to crank the engine and then act as a stabilizer for the car’s electrical system once the alternator takes over. Over time, or with infrequent use, a battery can lose its charge. This discharge can be due to leaving lights on, extreme temperatures, or simply the battery reaching the end of its lifespan. Knowing this helps us understand the “why” behind learning how to use a battery charger for car maintenance.
Different Types of Car Battery Chargers
Not all chargers are created equal, and choosing the right one is crucial. Here’s a quick rundown of the most common types you might encounter:
- Trickle Chargers: These are basic chargers that deliver a slow, constant current (usually 1-2 amps). They’re good for maintaining a fully charged battery over long periods (like during winter storage), but they’re very slow for recharging a dead battery and can potentially overcharge if not monitored.
- Smart/Automatic Chargers: These are highly recommended for most users. They monitor the battery’s voltage and adjust the charging rate accordingly. They often have multiple stages (desulfation, bulk charge, absorption, float) and automatically switch to maintenance mode once the battery is full, preventing overcharging. This makes them ideal for anyone learning how to use a battery charger for car, as they add an extra layer of safety and convenience.
- Battery Maintainers: Similar to trickle chargers but even “smarter.” They are specifically designed for long-term connection to keep a battery at optimal charge without overcharging. They usually have a lower amperage output than smart chargers.
- Jump Starters: While not technically a charger (they don’t fully recharge a battery), portable jump starters provide a quick burst of power to start a dead car. You’ll still need to drive the car for a while to let the alternator recharge the battery, or follow up with a dedicated battery charger.
To help you visualize, here’s a simple comparison:
| Charger Type | Amperage Range | Best Use Case | Key Feature |
|---|---|---|---|
| Trickle Charger | 1-2 Amps | Long-term maintenance for fully charged batteries | Slow, constant current; basic |
| Smart/Automatic Charger | Up to 10-15 Amps | Recharging dead/low batteries; long-term maintenance | Multi-stage charging; automatic shut-off |
| Battery Maintainer | <1 Amp | Very long-term storage; prevents self-discharge | Ultra-low current; designed for indefinite connection |
| Jump Starter | High momentary Amps | Emergency starting of a dead car | Portable power pack; quick boost |
Battery Chemistry Matters
Most car batteries are flooded (wet cell), meaning they contain liquid electrolyte. However, some vehicles, especially those with start-stop technology or performance cars, might use Absorbent Glass Mat (AGM) or Gel Cell batteries. These battery types have different charging requirements. Many modern smart chargers have settings for “flooded,” “AGM,” and “gel” batteries. Always select the correct setting on your charger, as using the wrong one can damage your battery. This is a crucial part of learning how to use a battery charger for car without causing harm.
Essential Safety Precautions Before You Start
Safety isn’t just a suggestion when working with car batteries; it’s an absolute necessity. Batteries contain corrosive acid and can produce explosive hydrogen gas. Taking a few moments to prepare safely can prevent serious injury. My friend once overlooked these steps and ended up with a nasty chemical burn – a lesson learned the hard way that I don’t want you to repeat.
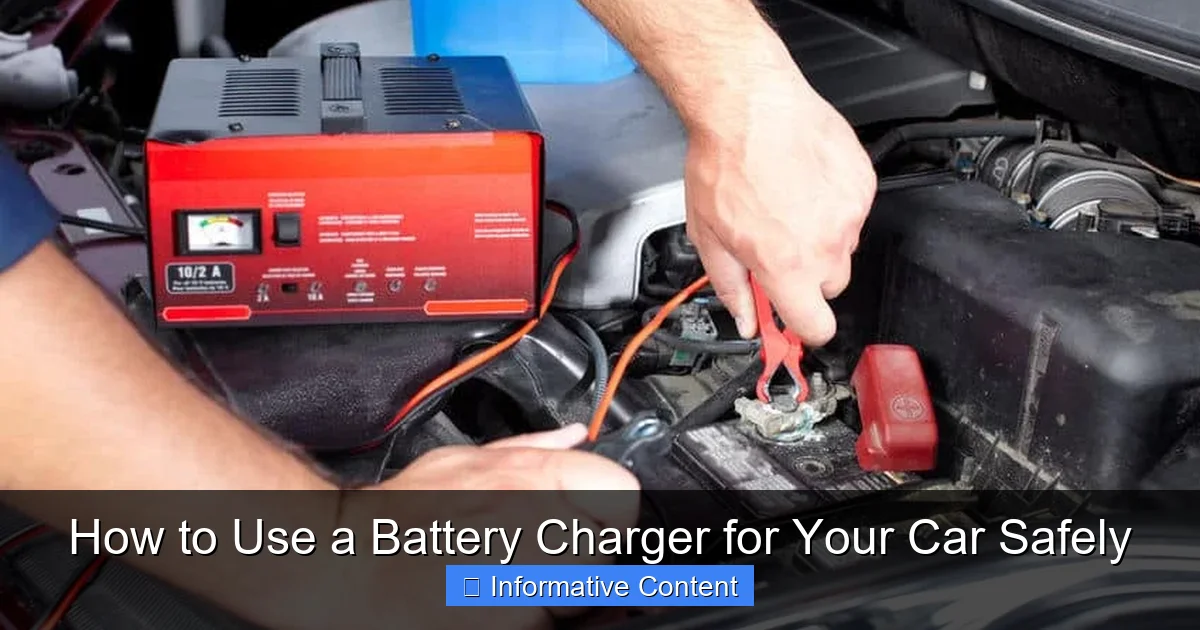
Visual guide about use car battery charger
Image source: evlithiumcharger.com
Personal Protective Equipment (PPE)
- Eye Protection: Always wear safety glasses or goggles. If the battery explodes or acid splashes, your eyes are extremely vulnerable.
- Gloves: Wear acid-resistant gloves (like rubber or nitrile) to protect your hands from battery acid.
- Old Clothes: Don’t wear your favorite shirt! Battery acid can easily ruin clothing.
Ventilation is Key
When a lead-acid battery charges, it produces hydrogen gas, which is highly flammable and explosive. This gas can accumulate in enclosed spaces. Always charge a car battery in a well-ventilated area. If you’re in a garage, open the garage door and any windows. Never charge a battery in a sealed room.
Location, Location, Location
- Flat, Stable Surface: If you’re charging the battery outside the car, place it on a flat, stable surface where it won’t tip over.
- Away from Flammables: Keep the battery and charger away from any sources of ignition like sparks, open flames, cigarettes, or anything flammable.
- Engine Off, Ignition Off: Ensure your car’s engine is completely off and the ignition is in the “off” position before connecting or disconnecting the charger.
- No Electronics: Turn off any car electronics (radio, lights, accessories) to prevent accidental drainage or damage during charging.
Reading Your Charger’s Manual
Every charger is a little different. Before you do anything else, take a few minutes to read your specific battery charger’s instruction manual. It will contain important safety warnings and detailed instructions unique to your model. This is perhaps the most overlooked, yet vital, step in truly understanding how to use a battery charger for car correctly.
Step-by-Step Guide: How to Connect and Charge Your Car Battery
Alright, you’ve got your safety gear on, you’re in a well-ventilated area, and you’ve skimmed your charger’s manual. Now, let’s get down to the actual process. This is the core of learning how to use a battery charger for car, so pay close attention to the order of operations.
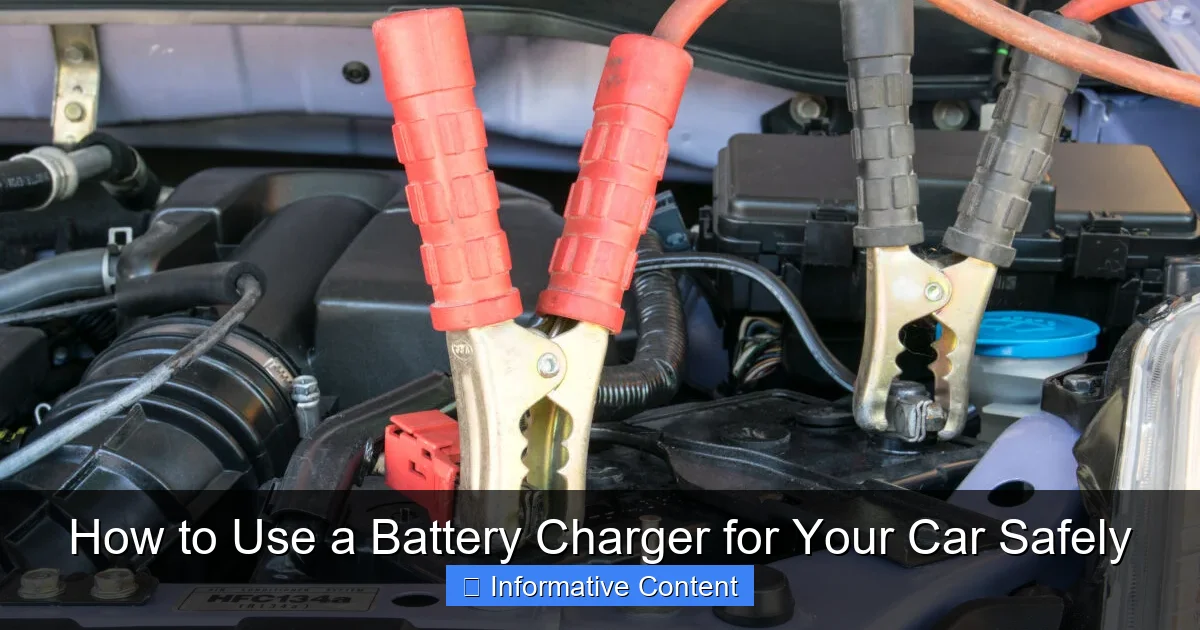
Visual guide about use car battery charger
Image source: vehiclescene.com
Locate and Inspect the Battery
- Locate: Open your car’s hood. The battery is usually prominently visible. In some newer cars, it might be in the trunk, under the back seat, or even tucked away under a plastic cover. Consult your car’s owner’s manual if you can’t find it.
- Inspect: Check the battery terminals for corrosion (a white or bluish powdery substance). If present, you’ll want to clean it before charging. Use a wire brush and a battery terminal cleaning solution (or a mixture of baking soda and water). Make sure to wear your gloves and eye protection while doing this. Also, check the battery casing for any cracks, leaks, or swelling, which could indicate a damaged battery that shouldn’t be charged.
Decide Whether to Disconnect
You have two main options:
- Charging In-Car: This is generally easier. Most modern smart chargers are safe to use with the battery still connected to the car’s electrical system, provided the car’s ignition is off and all accessories are off. This prevents loss of memory settings for your radio, clock, etc.
- Charging Out-of-Car: If the battery is severely corroded, leaking, or you simply prefer to charge it in a more open, controlled environment (like a workbench), you can remove it. Always disconnect the negative (-) cable first, then the positive (+). When reinstalling, connect the positive (+) first, then the negative (-).
For most routine charging, especially with a smart charger, charging in-car is perfectly fine and often preferred. This guide will focus on the in-car method, as it’s what most people will do when they learn how to use a battery charger for car.
Connecting the Charger
This is where precision matters. The order of connection is crucial to avoid sparks and potential explosions.
- Ensure Charger is Off/Unplugged: Before making any connections, ensure your battery charger is turned off and unplugged from the wall outlet.
- Connect Positive First: Take the red (positive, +) clamp from your charger and connect it securely to the positive (+) terminal of your car battery. The positive terminal is usually larger and marked with a plus sign.
- Connect Negative to a Ground (Car Chassis): Take the black (negative, -) clamp from your charger. Instead of connecting it directly to the negative (-) terminal of the battery (which can cause a spark near the battery, potentially igniting hydrogen gas), connect it to a clean, unpainted metal part of the car’s chassis or engine block, away from the battery and fuel lines. This is called a “good ground.” Some chargers may instruct you to connect to the negative terminal; always follow your specific charger’s manual if it differs.
Practical Tip: My mechanic friend always taught me, “Red to red, black to engine head.” It’s a simple rhyme but a good reminder!
Setting the Charger
Once connected, it’s time to prepare the charger.
- Plug In the Charger: Now, and only now, plug your battery charger into a standard electrical outlet.
- Select Settings: If your charger has settings (e.g., 6V/12V, battery type like AGM/Gel/Flooded, or charging rate like 2A/10A), select the appropriate ones for your car’s 12V battery and its specific chemistry. For a severely discharged battery, a higher amperage setting (e.g., 10A) will charge it faster, while a lower setting (e.g., 2A) is better for maintenance or a slower, deeper charge. When in doubt, start with a lower amperage or use the “auto” setting if available.
- Turn On the Charger: Finally, turn on the charger. Many smart chargers will automatically begin the charging process, displaying status indicators.
Monitoring the Charging Process and What to Expect
Once your charger is connected and running, it’s not a set-it-and-forget-it situation, especially if you’re using an older, non-smart charger. You’ll want to keep an eye on things.
Initial Charger Behavior
When you first turn on the charger, you’ll likely see indicator lights come on. Smart chargers often cycle through a series of diagnostics before beginning the actual charge. You might hear a fan kick in on higher-amperage chargers. These are all normal initial behaviors as the charger assesses the battery’s state.
How Long Will It Take?
This is the million-dollar question and depends on several factors:
- Battery Size (Amp-Hours): Larger batteries take longer.
- Depth of Discharge: A completely dead battery takes much longer than one that’s just a little low.
- Charger Output (Amps): A 10-amp charger will charge faster than a 2-amp charger.
As a rough guide:
- A lightly discharged 50 Ah battery might take 2-4 hours with a 10A smart charger.
- A completely dead 50 Ah battery could take 8-12 hours or even longer with a 10A smart charger.
- Using a 2A trickle charger on a dead battery could take 24-48 hours or more – which is why they’re not ideal for deep recharges.
Smart chargers will often indicate when the battery is fully charged (e.g., a “full” or “maintain” light). Learning how to use a battery charger for car effectively means understanding these timeframes.
Signs of a Healthy Charge
- Charger Status: Your smart charger’s indicator lights will progress through stages (charging, charged, float/maintain).
- No Overheating: The battery casing should feel only slightly warm, if at all. If it’s hot to the touch, something is wrong – disconnect immediately and seek advice.
- No Boiling: For flooded batteries, you might see tiny bubbles in the electrolyte, which is normal. However, violent bubbling (“boiling”) indicates overcharging and potential damage.
Avoiding Overcharging
Overcharging can damage your battery by boiling away the electrolyte (in flooded batteries), causing plate damage, and shortening its lifespan. This is where smart chargers shine! They automatically switch to a “float” or “maintenance” mode once the battery is full, delivering just enough current to keep it topped off without overcharging. If you’re using a basic trickle charger, you’ll need to monitor the voltage with a multimeter and disconnect once it reaches full charge (around 12.6-12.8 volts).
When to Disconnect and Post-Charging Tips
Your charger indicates the battery is full – congratulations! But just like connecting, disconnecting has a specific order to maintain safety.
Disconnecting the Charger Safely
This process is the reverse of connecting, and just as important for safety.
- Turn Off Charger: First, switch off the battery charger.
- Unplug Charger: Next, unplug the charger from the AC wall outlet.
- Disconnect Negative Clamp: Remove the black (negative, -) clamp from the car’s chassis or engine block.
- Disconnect Positive Clamp: Finally, remove the red (positive, +) clamp from the battery’s positive (+) terminal.
By following this order, you minimize the risk of sparks near the battery, which could ignite any residual hydrogen gas.
Reinstalling the Battery (if removed) and Starting Your Car
If you removed the battery for charging, reinstall it carefully. Remember the order for connection: positive (+) cable first, then negative (-) cable. Ensure all connections are tight. Once everything is secured, close the hood and try to start your car. It should crank vigorously and start right up!
Battery Maintenance Tips
Now that you know how to use a battery charger for car, here are some tips to keep your battery healthy:
- Keep Terminals Clean: Regularly check and clean battery terminals to prevent corrosion, which can impede current flow.
- Check Fluid Levels (Flooded Batteries): If you have a flooded battery with removable caps, periodically check the electrolyte levels. If low, top up with distilled water (never tap water!).
- Regular Charging for Infrequent Use: If you don’t drive your car often, connect it to a battery maintainer once a month or whenever it sits for extended periods to prevent discharge.
- Test Annually: Have your battery load-tested by a mechanic annually, especially as it ages (typically after 3-5 years).
Troubleshooting Common Charging Issues and When to Seek Professional Help
Sometimes, even after following all the steps on how to use a battery charger for car, things don’t go as planned. Don’t panic! Here are some common issues and what they might mean.
Charger Not Turning On/Working
- No Power: Check the wall outlet. Is it working? Is the extension cord (if used) in good condition? Is a GFCI outlet tripped?
- Blown Fuse: Some chargers have internal fuses. Consult your manual to see if yours does and how to check/replace it.
- Poor Connection: Ensure both positive and negative clamps are making solid contact with the battery terminals and ground point. Wiggle them a bit.
- Battery Too Dead: Some very “smart” chargers won’t start charging if the battery voltage is extremely low (e.g., below 2-3 volts). They might not “see” the battery. You might need a specialized charger with a “desulfation” or “repair” mode, or a manual charger to get a very low battery to accept a charge, but proceed with extreme caution.
Battery Not Holding a Charge
You’ve charged it, your car starts, but after a day or two, it’s dead again. This usually points to one of two problems:
- Parasitic Draw: Something in your car is drawing power even when the car is off. This could be a faulty interior light, an aftermarket alarm, or a malfunctioning electrical component. This often requires professional diagnosis.
- Failing Battery: Batteries have a limited lifespan (usually 3-5 years). If it’s old, it might not be able to hold a charge anymore, even if fully charged.
Overheating Battery/Charger
If your battery or charger feels excessively hot, immediately disconnect the charger. This is a sign of a serious problem. It could be:
- Internal Battery Short: The battery itself is faulty.
- Incorrect Charger Setting: Charging at too high an amperage for too long, or wrong battery type setting.
- Faulty Charger: The charger itself might be malfunctioning.
When to Replace the Battery
Even with proper charging, batteries don’t last forever. Look for these signs that it’s time for a replacement:
- Age: Most batteries last 3-5 years. If yours is older, its time might simply be up.
- Repeated Failures: If you constantly find yourself needing to recharge, even after a full charge, the battery is likely failing.
- Slow Cranking: The engine cranks slowly, especially on cold mornings, even after charging.
- Visual Signs: Swelling, cracks, or excessive corrosion that returns quickly are all signs of a dying battery.
When to Call a Mechanic
If you’ve tried to charge your battery, but your car still won’t start, or you suspect a deeper electrical issue, it’s time to call a professional. Complex electrical problems, persistent parasitic draws, or faulty alternators are best left to experienced mechanics. Don’t push your luck trying to fix something beyond your skill level; safety is always paramount.
Learning how to use a battery charger for car means understanding its limitations too. Sometimes, the problem isn’t just a dead battery, but a symptom of a larger issue.
Mastering how to use a battery charger for your car is a fantastic skill that boosts your confidence and prepares you for those unexpected moments. By following these comprehensive steps and prioritizing safety, you’re not just charging a battery; you’re taking proactive control of your vehicle’s maintenance. Remember, a little preparation and respect for the process go a long way in keeping you and your car running smoothly. So, keep these tips in mind, stay safe, and enjoy the peace of mind that comes with being prepared!
🎥 Related Video: How to charge 12v Car Battery
📺 CarHow
Its seen as good practice to connect the black wire second, and to connect it to some bare metal part in the engine.
Frequently Asked Questions
How do I safely connect a battery charger for my car?
Start by ensuring your car is off and in park, with the ignition keys removed. First, connect the positive (red) clamp of the battery charger to the positive (+) terminal on your car battery. Next, connect the negative (black) clamp to a clean, unpainted metal part of the engine block or car chassis, away from the battery, to minimize the risk of sparks near battery gases.
How long does it typically take to charge a car battery with a battery charger?
The charging time varies significantly based on your battery’s state of discharge, its ampere-hour (Ah) rating, and the output current of your specific battery charger for car use. A deeply discharged battery could take 12-24 hours or more with a standard charger, while a slightly low battery might be fully charged in a few hours. Most modern smart chargers will automatically stop charging once the battery reaches full capacity.
Can a battery charger for car batteries damage my car’s electronics?
When used correctly, a modern, high-quality battery charger for car use is designed to be safe and should not damage your car’s electronics. However, incorrect connection (such as reversing polarity) or using a very old, unregulated charger could potentially cause issues. Always follow the manufacturer’s instructions for both your car and the battery charger meticulously to avoid any risks.
What essential safety precautions should I take when using a battery charger for a car?
Prioritize safety by wearing eye protection (safety glasses or goggles) and heavy-duty gloves to protect against potential acid splashes or hydrogen gas. Ensure you are working in a well-ventilated area to disperse any hydrogen gas that may be produced during charging, and keep any sources of flame or sparks away from the battery. Always read your specific charger’s manual thoroughly before use.
When should I use a battery charger for my car, rather than jump-starting?
You should use a battery charger for your car when your battery is low or partially discharged but not completely dead, or for regular maintenance to extend its lifespan, especially if the car sits unused for periods. Jump-starting is a temporary fix for a dead battery to get the car running, but it doesn’t fully charge the battery and relies on the alternator to do the rest, which can put a strain on it.
Can I leave a smart battery charger for car attached indefinitely as a maintainer?
Yes, many modern “smart” battery chargers for car use are also designed to function as battery maintainers or trickle chargers. These intelligent devices monitor the battery’s voltage and automatically switch to a float or maintenance mode once fully charged, providing a low current to keep the battery topped up without the risk of overcharging. Always confirm this feature in your specific charger’s user manual before extended use.