Unplugging your car battery is a task anyone can learn, but it requires careful attention to safety and proper technique. This comprehensive guide walks you through gathering the right tools, identifying battery terminals, and the crucial step-by-step process, always emphasizing safety precautions like wearing protective gear and disconnecting the negative terminal first. Following these instructions ensures a safe and successful disconnection, whether for maintenance, storage, or replacement.
Ever found yourself needing to work on your car’s electrical system, replace a battery, or simply store your vehicle for an extended period? If so, knowing how to unhook a car battery safely and correctly is a fundamental skill. It might seem daunting at first, with all that power lurking under the hood, but don’t worry! This guide is here to walk you through every step, making it simple and straightforward.
Disconnecting your car battery isn’t just for mechanics; it’s a valuable piece of knowledge for any car owner. It helps prevent accidental electrical shorts during repairs, protects your vehicle’s electronics, and can even save your battery from draining if your car sits unused for a while. We’ll break down everything you need to know, from the essential safety precautions to the tools you’ll need, and a clear, easy-to-follow step-by-step process. By the end, you’ll feel confident tackling this task yourself!
Key Takeaways
- Safety First: Always prioritize safety by wearing appropriate personal protective equipment (PPE) like gloves and eye protection to guard against battery acid, electrical shock, and potential explosions.
- Gather Your Tools: Before starting, collect all necessary tools, including the correct wrench size (usually 10mm or 13mm), a wire brush for corrosion, and a battery terminal puller if needed.
- Identify Terminals Correctly: Locate and clearly distinguish between the negative (-) terminal (often black or marked with a minus sign) and the positive (+) terminal (often red or marked with a plus sign).
- Disconnect Negative First: The golden rule for unhooking a car battery is to always disconnect the negative terminal first. This prevents accidental short circuits and sparks if your wrench touches the vehicle’s metal frame.
- Disconnect Positive Second: After securing the negative cable away from the battery, proceed to disconnect the positive terminal. This completes the power isolation from your vehicle.
- Secure Cables Safely: Once both terminals are loose, ensure the cables are tucked away so they cannot accidentally touch the battery posts or any metal parts of the car.
- Reconnection in Reverse: When it’s time to reconnect, always attach the positive terminal first, followed by the negative terminal, reversing the disconnection order.
Quick Answers to Common Questions
Can I unhook a car battery without special tools?
Yes, you can often unhook a car battery with just a basic wrench that fits the terminal nuts (usually 10mm or 13mm). However, having a wire brush for corrosion and safety gear like gloves and eye protection is highly recommended.
What happens if I disconnect the positive terminal first?
Disconnecting the positive terminal first significantly increases the risk of an accidental short circuit. If your wrench touches the positive terminal and then simultaneously touches any metal part of the car’s frame, it will create a direct short, causing sparks, potential burns, and damage to the electrical system.
How long should I wait after unhooking the battery before touching anything?
Once both terminals are disconnected and secured away from the battery posts, the electrical system is isolated, and you can generally proceed immediately. There’s no specific waiting period required after physical disconnection.
Will unhooking my car battery drain its charge?
No, unhooking your car battery actually prevents it from draining. When connected, even with the car off, tiny electrical draws (like the clock or computer memory) can slowly drain the battery over time. Disconnecting it isolates the battery, preserving its charge.
What should I do if I get battery acid on my skin?
If you get battery acid on your skin, immediately flush the affected area with copious amounts of water for at least 15 minutes. If symptoms persist or the exposure is severe, seek medical attention promptly.
📑 Table of Contents
Safety First: The Golden Rule of Battery Disconnection
Before you even think about touching your car battery, let’s talk about safety. This isn’t just a suggestion; it’s absolutely crucial. Car batteries contain corrosive acid, produce explosive hydrogen gas, and deliver a powerful electrical current. Ignoring safety can lead to serious injury or damage. So, let’s gear up and understand the risks.
Personal Protective Equipment (PPE)
Think of this as your superhero costume for battery work. You wouldn’t go into battle without protection, and working with a car battery is no different. Here’s what you absolutely need:
- Safety Glasses or Goggles: Battery acid can splash, and sparks can fly. Eye protection is non-negotiable to prevent severe eye damage.
- Heavy-Duty Gloves: Chemical-resistant gloves (like thick rubber or nitrile) are a must. They protect your hands from battery acid and provide some insulation from electrical shocks.
- Old Clothes: Wear long sleeves and pants made of sturdy material that you don’t mind getting dirty or damaged. Acid can eat through fabric.
- No Jewelry: Remove all metal jewelry – rings, watches, bracelets, necklaces. Metal conducts electricity, and a short circuit from jewelry can cause severe burns or even weld the jewelry to your skin.
Understanding Battery Hazards
Knowing what you’re up against helps you stay safe:
- Battery Acid: Lead-acid batteries contain sulfuric acid, which is highly corrosive. It can cause severe chemical burns to skin and eyes, and damage clothing. If you get acid on yourself, flush immediately with plenty of water for at least 15 minutes and seek medical attention.
- Electrical Shock: While a car battery’s 12 volts might seem low, it can still deliver a high amperage current. Accidental short circuits can cause sparks, severe burns, or even start a fire. Always avoid touching both terminals at the same time or touching a terminal with a metal tool that is also touching the car’s frame.
- Explosion Risk: Batteries emit hydrogen gas, which is highly flammable and explosive, especially when charging or being jump-started. Sparks from tools, open flames, or even static electricity can ignite this gas, leading to a battery explosion. Work in a well-ventilated area and avoid any sources of ignition.
Vehicle Safety
Before you even open the hood, make sure your car is ready:
- Park Safely: Park your car on a level surface, away from traffic and other distractions. Engage the parking brake firmly.
- Turn Off Everything: Ensure the engine is off, the ignition is off, and all accessories (lights, radio, climate control) are turned off. This prevents any unexpected electrical draw or system activation.
- Remove the Key: For modern cars, it’s a good idea to remove the key from the ignition or place it far away. This prevents accidental starting or electrical system activation.
- Ventilation: Work in a well-ventilated area to disperse any hydrogen gas that might be present around the battery.
Gathering Your Gear: What You’ll Need
Having the right tools for the job makes all the difference. Not only does it make the process easier, but it also helps ensure your safety. Here’s a checklist of what you’ll typically need to unhook a car battery.
Visual guide about How to Unhook a Car Battery
Image source: autofot.com
Essential Tools
These are the core items that will help you safely disconnect your car battery:
- Wrenches: You’ll likely need a combination wrench or a socket wrench with the correct size socket. Most battery terminals use 10mm or 13mm nuts, but some might be 1/2 inch or 5/8 inch. It’s a good idea to have a small set of common sizes available.
- Wire Brush: Battery terminals often get corroded. A wire brush (specifically a battery terminal brush, often conical) is excellent for cleaning off any white, blue, or green powdery build-up.
- Battery Terminal Puller (Optional but helpful): Sometimes, battery terminals can be incredibly stubborn and stuck. A specialized puller can safely separate a stuck terminal from the battery post without damaging either.
- Terminal Spreader (for top post batteries): If your battery has top posts, you might find the cable clamp is very tight. A terminal spreader can gently widen the clamp for easier removal.
Safety Gear Checklist
We already covered this, but it bears repeating. Don’t skip these!
- Safety Glasses/Goggles
- Heavy-Duty Gloves
- Old Clothes (long sleeves/pants)
Optional but Helpful Items
These aren’t strictly necessary for disconnection but can make the job smoother or help with battery maintenance:
- Battery Terminal Cleaner Spray: After brushing, a specialized spray can help neutralize any remaining acid residue.
- Battery Terminal Protectors/Grease: These are applied during reconnection to prevent future corrosion.
- Memory Saver Tool: If your car has a lot of electronic memory (radio presets, engine computer settings), a memory saver plugs into your car’s OBD-II port or cigarette lighter to provide a small amount of power, retaining these settings while the main battery is disconnected.
- Baking Soda and Water Mixture: A paste of baking soda and water can be used to neutralize spilled battery acid. Keep some handy just in case.
Locating and Identifying Your Battery Terminals
Now that you’re geared up and ready, let’s find that battery and figure out which wire is which. Correct identification is critical for your safety!
Common Battery Locations
While most batteries are under the hood, some manufacturers get creative:
- Under the Hood: This is the most common spot, usually on one side of the engine bay, or sometimes near the firewall.
- In the Trunk: Many luxury cars, sports cars, or vehicles with limited under-hood space place the battery in the trunk. This often helps with weight distribution.
- Under the Back Seat: Less common, but some vehicles (like certain BMWs or Volkswagens) might hide the battery here.
- Under the Floorboard: Very rare, but possible in some vans or SUVs.
If you can’t find your battery, check your car’s owner’s manual. It will show you exactly where it is.
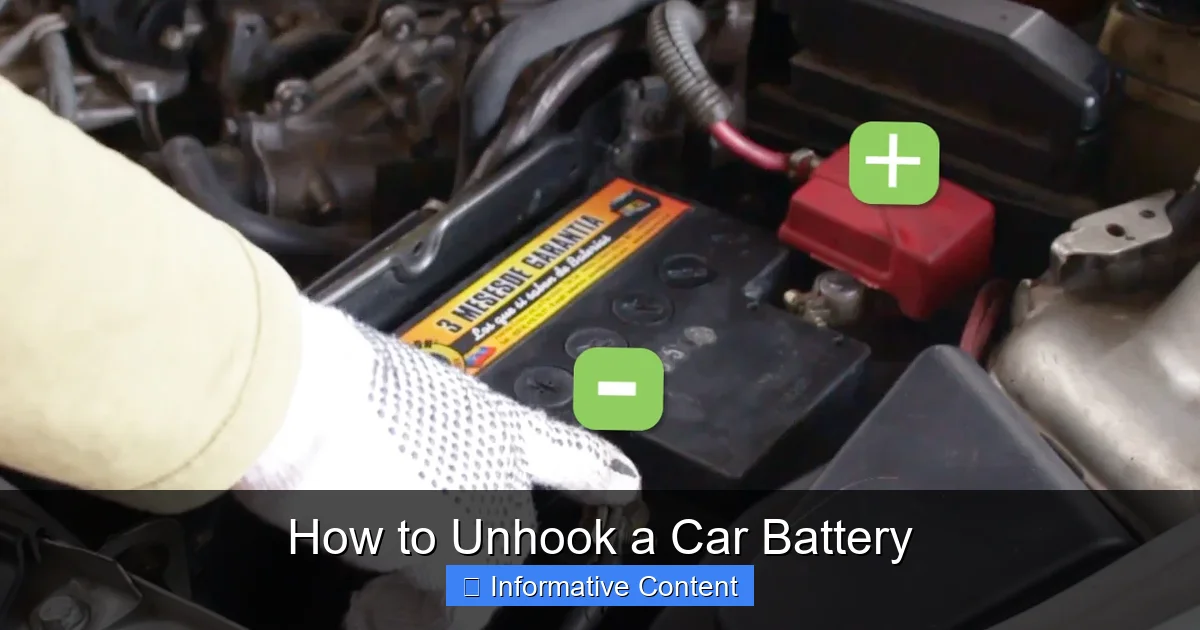
Positive (+) vs. Negative (-) Terminals
This is the most critical identification step. You need to know which terminal is which before you touch anything. Luckily, there are universal indicators:
- Positive Terminal (+): This terminal is almost always marked with a “POS” or a plus sign (+). The cable attached to it is usually RED.
- Negative Terminal (-): This terminal is typically marked with a “NEG” or a minus sign (-). The cable attached to it is usually BLACK, but it can sometimes be green or another color. The negative cable often connects directly to the car’s engine block or frame.
Always double-check both the markings on the battery and the cable colors. Some batteries might have a red cap over the positive terminal as an extra visual cue.
The Importance of Polarity
Understanding polarity is why we disconnect in a specific order. The car’s chassis (metal frame) is generally connected to the negative terminal. If you were to accidentally touch your wrench to the positive terminal AND the car’s metal frame simultaneously, you’d create an instant short circuit. This causes a shower of sparks, can damage your car’s electrical system, and can seriously burn you. By disconnecting the negative terminal first, you essentially “break” this circuit, making it much safer to then handle the positive terminal.
The Step-by-Step Process: How to Unhook a Car Battery
Okay, you’re safe, you have your tools, and you’ve identified the terminals. Now, let’s get down to the actual process of how to unhook a car battery.
Step 1: Prepare Your Vehicle
- Ensure your car is parked on a level surface with the parking brake engaged.
- Turn off the engine, ignition, and all accessories.
- Remove the key from the ignition or place it out of reach.
- Open the hood (or access panel) and locate the battery.
- Put on your safety glasses and gloves.
Step 2: Disconnect the Negative Terminal FIRST
This is the golden rule! Remember why: to prevent accidental short circuits.
- Locate the negative (-) terminal. It’s usually marked with a minus sign and has a black cable.
- Using the correct size wrench (typically 10mm or 13mm), loosen the nut on the negative terminal clamp. You don’t need to remove the nut entirely, just loosen it enough for the clamp to slide off the battery post. Turn the wrench counter-clockwise.
- Once loose, carefully twist and lift the negative cable clamp straight up off the battery post. If it’s stuck, you might need a battery terminal puller.
- Important: Once the negative cable is off, move it completely away from the battery. Tuck it into a secure spot where it cannot accidentally touch any part of the battery or the car’s metal frame. You can even wrap it in a rag for extra protection.
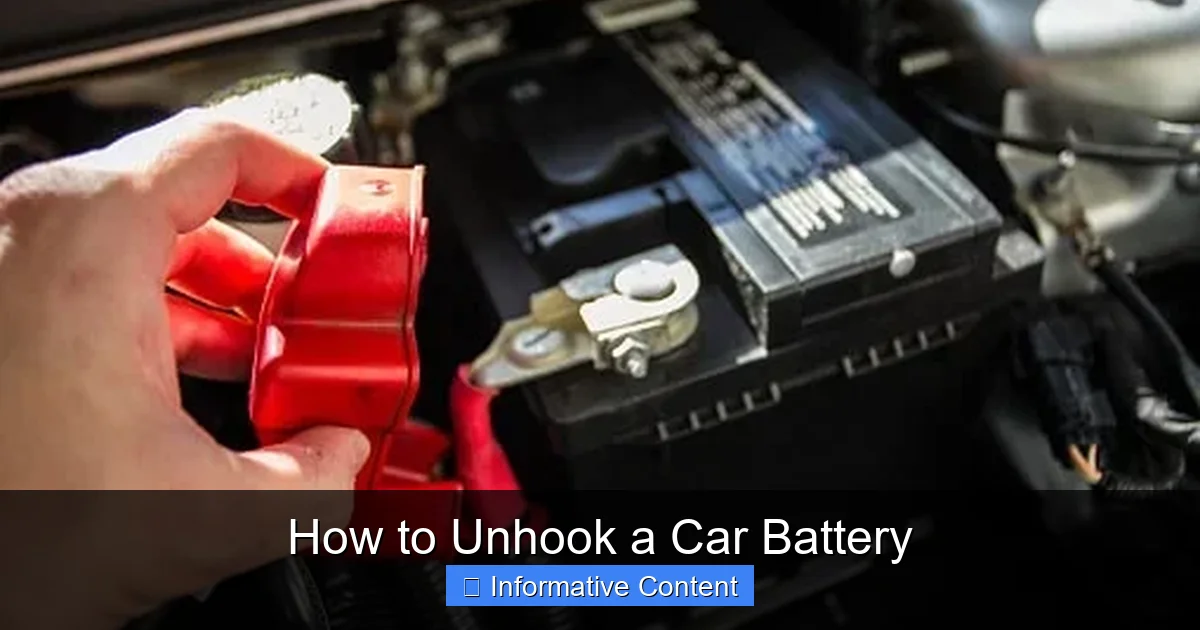
Step 3: Disconnect the Positive Terminal
Now that the negative cable is safely out of the way, it’s safe to disconnect the positive terminal.
- Locate the positive (+) terminal. It’s usually marked with a plus sign and has a red cable.
- Using your wrench, loosen the nut on the positive terminal clamp. Again, counter-clockwise to loosen.
- Carefully twist and lift the positive cable clamp straight up off the battery post.
- Move this cable away from the battery as well, ensuring it won’t accidentally reconnect.
Step 4: Secure the Cables
Double-check that both the negative and positive cables are completely clear of the battery posts and any metal components of the car. They should be secure enough not to fall back onto the battery. At this point, your battery is completely isolated from the car’s electrical system.
Step 5: (Optional) Remove the Battery Hold-Down and Battery
If your goal is to remove the battery entirely (for replacement or deep cleaning), you’ll need to deal with the battery hold-down mechanism. This is usually a clamp or strap that secures the battery in place to prevent it from moving around while driving.
- Identify the hold-down: It could be a clamp across the top, a strap, or bolts at the base.
- Loosen or remove the hold-down.
- Carefully lift the battery out of its tray. Batteries are very heavy, so lift with your legs, not your back, or ask for help.
Important Considerations and Troubleshooting Tips
Even with the best instructions, you might encounter a few quirks. Here are some common situations and how to handle them.
Dealing with Corroded Terminals
Corrosion (that white, blue, or green powdery substance) is very common. It’s actually a byproduct of acid fumes reacting with the metal. Not only does it look messy, but it can also prevent a good electrical connection and make it harder to remove the cables.
- Before Disconnecting: If there’s heavy corrosion, wear your gloves and glasses. You can apply a baking soda and water paste to the corrosion. The acid will react with the baking soda, causing it to fizz and neutralize the acid. Let it sit for a few minutes, then rinse with water.
- During Disconnection: After loosening the nuts, use a wire brush (a specialized battery terminal brush is best) to scrub away any remaining corrosion from both the battery posts and the inside of the cable clamps. A clean connection is a good connection.
Memory Savers and Electrical System Reset
Disconnecting the battery will cut power to your car’s computer system. This means:
- Radio Presets: You’ll likely lose your radio station presets.
- Clock: The clock will reset.
- Engine Computer (ECU): The ECU might lose its “learned” engine parameters, which could cause your car to run a little rough or idle slightly differently for the first few miles after reconnection. It will relearn over time.
- Anti-Pinch Windows/Sunroof: Some cars require you to “re-learn” the auto up/down function for windows or sunroofs after a battery disconnection. Check your owner’s manual for these specific procedures.
If you want to avoid losing these settings, you can use a memory saver tool. This plugs into your car’s diagnostic port (OBD-II) or a 12V power outlet and provides a small amount of power to maintain these memories while the main battery is disconnected.
What to Do If a Terminal is Stuck
Sometimes, corrosion or just general tightness can make a terminal clamp extremely difficult to remove. Don’t force it excessively, as you could damage the battery post or the cable.
- Wiggle and Twist: After loosening the nut, try gently wiggling and twisting the clamp while pulling upwards.
- Terminal Puller: This is where a battery terminal puller shines. It applies even pressure to lift the clamp without damaging it.
- Penetrating Oil (Use with Caution): A very small amount of penetrating oil might help, but be extremely careful not to get it on the battery case or posts, as it could react with the plastic or interfere with electrical contact. Clean thoroughly afterward.
Reconnecting Your Battery (Briefly)
While this article is about unhooking, it’s good to know the reconnection process is simply the reverse, with one critical difference in order:
- Attach the positive (+) cable first. Tighten it securely.
- Attach the negative (-) cable second. Tighten it securely.
- Apply battery terminal grease or protectors to prevent future corrosion.
- Secure the battery hold-down.
Always double-check that terminals are tight and secure. Loose connections can lead to poor performance or even arcing and sparks.
Conclusion
Learning how to unhook a car battery is a truly empowering skill for any car owner. It’s a simple task when done correctly, but it absolutely demands respect for the power and potential hazards involved. Remember, safety isn’t just a recommendation; it’s a non-negotiable step to protect yourself and your vehicle.
By following these clear steps – always wearing your PPE, identifying terminals correctly, and disconnecting the negative terminal first – you can confidently tackle this maintenance task. Whether you’re replacing a faulty battery, performing electrical repairs, or preparing your car for storage, you now have the knowledge and confidence to do it safely and effectively. Keep these tips handy, and happy motoring!
🎥 Related Video: How to Disconnect and Reconnect the Car Battery
📺 FIX MY CAR
Thank You for your Donation: https://www.paypal.com/donate/?hosted_button_id=TQ2UTNS5WDC46 SUBSCRIBE So We Can …
Frequently Asked Questions
How often should I unhook my car battery for maintenance?
You don’t typically unhook your car battery for routine maintenance unless you’re cleaning corrosion from the terminals. It’s usually done when replacing the battery, performing electrical work, or storing the car for an extended period to prevent parasitic drain.
Can unhooking my battery fix electrical problems?
Sometimes, unhooking and reconnecting your battery can act as a “hard reset” for your car’s computer (ECU), potentially resolving minor, temporary electrical glitches or error codes. However, it’s not a solution for underlying mechanical or serious electrical issues.
Is it safe to unhook a battery in the rain?
It’s generally not recommended to unhook a car battery in the rain or any wet conditions. Water can conduct electricity, increasing the risk of electrical shock or short circuits. Always try to work in a dry, well-lit environment.
Do I need to clean the battery posts before reconnecting?
Yes, absolutely. Before reconnecting, ensure both the battery posts and the inside of the cable clamps are clean and free of corrosion. A clean connection ensures proper electrical flow and helps prevent future corrosion buildup.
What if my car has two batteries?
Some vehicles, especially diesel trucks or some high-performance cars, have two batteries. The general principle of disconnecting the negative first still applies to each battery individually. Consult your owner’s manual for the specific disconnection procedure for your dual-battery system, as there might be a primary and secondary battery.
Will unhooking the battery affect my car’s security system?
Yes, unhooking the battery will typically disable your car’s alarm and security system. When you reconnect the battery, the alarm might go off, or you might need to re-arm it using your key fob or a specific procedure outlined in your owner’s manual.