Knowing how to test a car battery is a crucial skill for any car owner, saving you from unexpected breakdowns and costly repairs. This comprehensive guide will walk you through various testing methods, including using a multimeter and a load tester, alongside essential safety precautions. You’ll learn to interpret the results and determine if your battery needs a charge, further testing, or a full replacement, empowering you to maintain your vehicle’s reliability.
Imagine this: You’re running late for an important appointment, you hop into your car, turn the key, and… nothing. Just a sad, clicking sound, or worse, complete silence. It’s a common and incredibly frustrating scenario that most drivers have faced at least once. Often, the culprit is a dying car battery. But what if you could spot the signs of trouble *before* you’re stranded? What if you knew exactly how to test a car battery yourself, giving you the power to prevent these frustrating moments?
Learning how to test a car battery is not just for mechanics; it’s a valuable skill for any car owner. It empowers you to take control of your vehicle’s maintenance, saving you time, money, and a whole lot of stress. In this comprehensive guide, we’ll walk you through everything you need to know about checking your car battery, from gathering the right tools to interpreting the results. We’ll break down the different methods – from a simple voltage check to a more thorough load test – making it easy for you to understand and perform these tests at home. So, grab a cup of coffee, and let’s dive into how to keep your car starting strong, every single time.
Key Takeaways
- Regular Testing Prevents Breakdowns: Proactively testing your car battery can help you identify issues before they leave you stranded, ensuring reliable vehicle starts.
- Safety is Paramount: Always wear protective gear (gloves, eye protection) and ensure good ventilation when working with car batteries to avoid injury from acid or electrical hazards.
- Tools for the Job: A digital multimeter is excellent for a basic voltage check, while a dedicated load tester provides a more accurate assessment of a battery’s true health under stress.
- Multimeter Test Interpretation: A fully charged battery should read around 12.6 volts. Readings below 12.4 volts suggest a need for charging, and anything below 12.0 volts often indicates a failing battery.
- Load Test for Accuracy: A load test simulates real-world starting conditions, revealing if a battery can deliver sufficient current. It’s the best way to confirm a battery’s capacity and health beyond just its voltage.
- Hydrometer for Serviceable Batteries: For batteries with removable caps, a hydrometer can measure the specific gravity of the electrolyte, offering insight into the charge level of individual cells.
- Act on Results: Depending on your test results, you might need to clean terminals, recharge the battery, or consider a full replacement to ensure your vehicle starts reliably every time.
Quick Answers to Common Questions
How often should I test my car battery?
It’s a good idea to test your car battery at least twice a year, typically before winter and before summer, as extreme temperatures are harsh on batteries. You should also test it if you notice any signs of weakness.
Can a fully discharged car battery be saved?
Sometimes, yes. A deeply discharged battery can often be recharged, especially with a smart charger that has a reconditioning mode. However, if it’s been fully discharged multiple times or left discharged for a long period, it may have permanent damage and might not hold a charge effectively.
What is “surface charge” and why does it matter when testing?
Surface charge is a temporary voltage boost a battery gets right after being driven or charged. If you test immediately, this can give a falsely high reading. Letting the battery rest for 15-20 minutes allows this charge to dissipate, giving you a more accurate reading of its true state.
Will my car start if the battery reads exactly 12.0 volts?
While 12.0 volts technically means 50% charge, it’s often not enough to reliably start your car, especially in cold weather or if your engine requires significant cranking power. It’s best to charge the battery if it’s at this level.
Is it safe to test a car battery without disconnecting it from the car?
Yes, for a simple voltage check with a multimeter or a load test, it’s generally safe to test the battery while it’s still connected to the car. Just ensure the car is off and all accessories are turned off. However, if you are performing other maintenance or replacing the battery, disconnecting the negative terminal first is always recommended for safety.
📑 Table of Contents
- Why Bother Learning How to Test a Car Battery?
- Safety First: Essential Precautions When Testing Your Car Battery
- Tools You’ll Need to Test a Car Battery
- How to Test a Car Battery with a Multimeter (Voltage Test)
- How to Test a Car Battery with a Load Tester (The Real Deal)
- How to Test a Car Battery with a Hydrometer (For Serviceable Batteries)
- Beyond the Test: Interpreting Results and Next Steps
- Conclusion
Why Bother Learning How to Test a Car Battery?
You might be thinking, “My car starts fine, why should I care about how to test a car battery?” That’s a fair question! But proactive maintenance is always better than reactive repairs. Your car battery is the heart of your vehicle’s electrical system, responsible for starting the engine and powering various components when the engine is off. It’s a critical component, and like all components, it has a lifespan.
Most car batteries last between 3 to 5 years, but this can vary depending on driving habits, climate, and maintenance. Extreme temperatures, frequent short trips, and leaving accessories on can all shorten a battery’s life. By learning how to test a car battery regularly, you can:
- Prevent unexpected breakdowns: Identify a weak battery before it leaves you stranded.
- Save money: Catch issues early, potentially extending battery life through charging, or replacing it before it damages other electrical components.
- Ensure reliability: Enjoy peace of mind knowing your car will start when you need it most.
- Understand your vehicle better: Gain valuable knowledge about your car’s electrical system.
Common Signs of a Weak Battery
Before you even pull out your testing tools, your car might be trying to tell you something. Look out for these common warning signs:
- Slow engine crank: The engine turns over sluggishly when you try to start it.
- Dim headlights or interior lights: Especially noticeable when the engine isn’t running.
- Dashboard warning light: A battery-shaped icon might illuminate.
- Corrosion on battery terminals: A white or bluish powdery substance indicates poor connection and potential issues.
- Foul smell: A sulfur or rotten egg smell could indicate a leaking or overcharging battery.
- Age: If your battery is over 3 years old, it’s a good candidate for a check-up.
Safety First: Essential Precautions When Testing Your Car Battery
Before you even think about how to test a car battery, it’s crucial to prioritize safety. Car batteries contain sulfuric acid, which is corrosive, and they produce explosive hydrogen gas. Electricity is also dangerous. Taking the right precautions can prevent injuries and damage to your vehicle.
Gather Your Personal Protective Equipment (PPE)
- Safety Glasses or Goggles: Essential to protect your eyes from battery acid splashes or sparks.
- Gloves: Acid-resistant gloves (like rubber or nitrile) will protect your hands from corrosive acid.
- Old Clothes: Wear clothes you don’t mind getting dirty or potentially damaged by acid.
Work Environment & General Safety
- Ventilation: Always work in a well-ventilated area. Hydrogen gas released by batteries is highly flammable and can accumulate in confined spaces.
- No Smoking or Open Flames: Keep all sources of ignition (cigarettes, lighters, sparks, open flames) away from the battery.
- Remove Jewelry: Metal jewelry can conduct electricity, leading to burns or short circuits if it accidentally touches the battery terminals.
- Keep Hands Clear: Avoid touching battery terminals with bare hands, even if wearing gloves, if you can.
- Neutral Gear and Parking Brake: Ensure your car is in neutral (manual) or park (automatic) with the parking brake engaged.
- Turn Off Accessories: Make sure all lights, radio, and other accessories are off to prevent draining the battery further or causing unexpected power surges.
Tools You’ll Need to Test a Car Battery
You don’t need a full mechanic’s workshop to learn how to test a car battery, but a few key tools will make the process safe and accurate.
Essential Tools for Basic Testing
- Digital Multimeter/Voltmeter: This is the most common and affordable tool for a basic voltage check. Make sure it has a DC voltage setting.
- Battery Terminal Brush: Useful for cleaning corrosion off the battery terminals, ensuring good contact for accurate readings.
- Wrenches (optional, but helpful): To loosen terminal clamps if cleaning is needed.
Advanced Tools for Comprehensive Testing
- Battery Load Tester: This is the best tool for accurately determining the overall health of your battery. It simulates the load of starting your engine, revealing if the battery can maintain sufficient voltage under stress.
- Hydrometer: Used to measure the specific gravity of the electrolyte in *serviceable* (non-sealed) batteries. Less common for modern, maintenance-free batteries.
How to Test a Car Battery with a Multimeter (Voltage Test)
The multimeter test is your first line of defense when learning how to test a car battery. It’s quick, easy, and gives you a good indication of your battery’s charge level.
Step 1: Prep Your Battery and Multimeter
First, ensure your car has been turned off for at least 15-20 minutes. This allows the battery to shed any “surface charge” which can give a falsely high reading. If you just drove the car, the alternator might have recently charged the battery, skewing the results. Disconnect any chargers if the battery was recently on one.
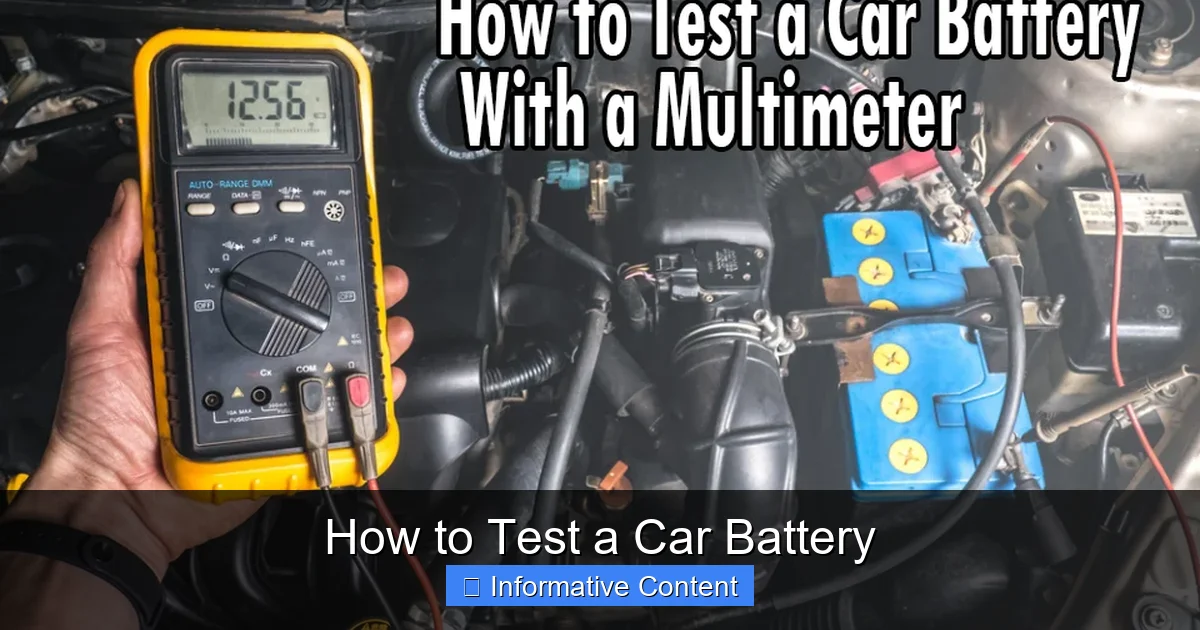
Visual guide about How to Test a Car Battery
Image source: shedheads.net
Set your digital multimeter to measure DC voltage (V with a straight line, often labeled “V=” or “DCV”). Choose a range that includes 12 volts, typically 20V DC.
Step 2: Connecting the Multimeter
- Locate your car battery. It’s usually under the hood, but sometimes it’s in the trunk or under a rear seat.
- Identify the positive (+) and negative (-) terminals. The positive terminal is usually larger and marked with a plus sign; the negative terminal with a minus sign.
- Connect the red (positive) lead from your multimeter to the positive (+) terminal of the battery.
- Connect the black (negative) lead from your multimeter to the negative (-) terminal of the battery. Make sure you get a good, firm connection.
Step 3: Interpreting the Voltage Reading
The voltage reading will appear on your multimeter’s screen. Here’s what the numbers typically mean for a 12-volt car battery:
- 12.6 – 12.8 volts: This indicates a fully charged and healthy battery. Great news!
- 12.4 – 12.5 volts: The battery is at about 75% charge. It’s not terrible, but it might be time to consider charging it, especially if the weather is getting cold.
- 12.0 – 12.3 volts: The battery is at 50% charge or less. It definitely needs a full charge. At this level, you might start experiencing slow cranks.
- Below 12.0 volts: This usually indicates a deeply discharged or failing battery. It likely needs to be charged and retested, or replaced entirely.
Important Tip: A multimeter only tells you the battery’s static charge. It doesn’t tell you how well the battery can hold that charge under stress. For that, you need a load test.
How to Test a Car Battery with a Load Tester (The Real Deal)
While a multimeter gives you a good initial idea, learning how to test a car battery thoroughly requires a load tester. A load tester puts the battery under a controlled “load” (similar to starting your engine) to see if it can maintain sufficient voltage and current output. This is a much more accurate assessment of your battery’s true health and its ability to start your car.
Step 1: Preparing for the Load Test
Ensure the battery is fully charged before performing a load test. A partially charged battery will always perform poorly under a load test, giving you a misleading result. If your multimeter test showed below 12.4 volts, charge your battery completely first.
Also, ensure the battery terminals are clean and free of corrosion. Use a battery terminal brush if needed.
Step 2: Performing the Load Test
Different load testers might have slightly different procedures, so always refer to your specific tool’s instructions. However, the general steps for most handheld testers are:
- Connect the Tester: Attach the red (positive) clamp of the load tester to the positive (+) battery terminal. Attach the black (negative) clamp to the negative (-) battery terminal.
- Set the Load: Many load testers have a button or switch to apply the load. Follow the manufacturer’s instructions. For standard car batteries, the load is typically applied for about 10-15 seconds.
- Monitor Voltage: While the load is applied, watch the voltage reading on the tester’s display.
Step 3: Interpreting the Load Test Results
This is where the load test shines in helping you learn how to test a car battery effectively.
- Healthy Battery: During the 10-15 second load test, a healthy 12-volt battery should maintain a voltage of 9.6 volts or higher. If it drops below this threshold, especially rapidly, it indicates a weak or failing battery.
- CCA Rating Check (if your tester supports it): Some advanced load testers can also measure the battery’s Cold Cranking Amps (CCA) performance. Compare this reading to the CCA rating printed on your battery (e.g., 600 CCA). If the tested CCA is significantly lower (e.g., 20-30% less) than the rated CCA, the battery is losing its capacity.
If your battery voltage drops significantly below 9.6 volts during the load test, even after being fully charged, it’s a strong indicator that the battery is nearing the end of its life and should be replaced.
How to Test a Car Battery with a Hydrometer (For Serviceable Batteries)
This method is less common today because most modern car batteries are “maintenance-free” and sealed, meaning you can’t access the electrolyte. However, if you have an older or serviceable battery with removable caps, a hydrometer can provide valuable insights into the charge level of individual cells.
Step 1: Safety and Preparation
As always, wear your safety glasses and gloves. Ensure good ventilation. Carefully remove the battery cell caps. If the fluid level is low, top it up with distilled water to the fill line before testing.
Step 2: Performing the Hydrometer Test
- Draw Sample: Squeeze the hydrometer bulb, insert the nozzle into the first battery cell, and release the bulb to draw up enough electrolyte to make the float suspended.
- Read Specific Gravity: Read the number on the float at the level of the electrolyte. This is the specific gravity.
- Return Electrolyte: Squeeze the bulb to return the electrolyte to the cell.
- Repeat: Repeat this process for each cell.
Step 3: Interpreting Specific Gravity Readings
Specific gravity indicates the concentration of sulfuric acid in the water, which directly correlates to the cell’s charge. Here’s a general guide:
- 1.265 – 1.299: Fully charged cell.
- 1.230 – 1.260: 75% charged.
- 1.190 – 1.220: 50% charged.
- 1.150 – 1.180: 25% charged.
- Below 1.150: Discharged.
The key here is consistency. All cells should have readings within 0.050 of each other. A difference greater than this (e.g., one cell at 1.280 and another at 1.150) indicates a “dead cell,” meaning the battery is failing and needs replacement, even if other cells are charged.
Beyond the Test: Interpreting Results and Next Steps
Now that you know how to test a car battery using different methods, what do the results tell you, and what should you do next?
If Your Battery is Good (Multimeter: 12.6V+, Load Test: 9.6V+ maintained)
Fantastic! Your battery is healthy. To keep it that way:
- Regular Checks: Continue to check its voltage every few months.
- Keep Terminals Clean: Inspect for corrosion and clean with a battery terminal brush if necessary.
- Ensure Secure Connections: Make sure the battery cables are tightly secured to the terminals.
- Maintain Charge: If you don’t drive frequently, consider a trickle charger or battery maintainer to keep it topped off.
If Your Battery Needs a Charge (Multimeter: 12.0V-12.4V, or it failed a load test but was not fully charged)
A low voltage doesn’t always mean a dead battery; it might just be discharged. Try charging it:
- Use a Battery Charger: Connect a smart charger or trickle charger according to its instructions. Allow it to charge fully.
- Re-Test: After a full charge and letting the battery rest for an hour, re-test using both the multimeter and load tester. If it now passes, great! If it still fails, the battery might be sulfated or internally damaged.
- Check Charging System: If your battery repeatedly discharges, it might not be the battery itself but your car’s charging system (alternator). This would require a separate test, often done with a multimeter while the engine is running.
If Your Battery is Failing (Multimeter: below 12.0V consistently, Load Test: drops below 9.6V, Hydrometer: dead cell)
It’s time for a replacement. A failing battery will eventually leave you stranded. Here’s what to do:
- Purchase a New Battery: Make sure to get one that matches your vehicle’s specifications (size, CCA, terminal orientation).
- Proper Disposal: Car batteries contain hazardous materials. Take your old battery to an auto parts store or a recycling center that accepts them. Most places will even offer a core refund when you buy a new one.
Conclusion
Knowing how to test a car battery is a simple yet powerful skill that can save you from inconvenient breakdowns and unexpected repair bills. By understanding the signs of a weak battery, using the right tools, and interpreting the results correctly, you empower yourself to take proactive steps in maintaining your vehicle’s reliability. Whether you use a basic multimeter for a quick check or a load tester for a comprehensive assessment, regular battery testing is a cornerstone of good car maintenance. So, take the plunge, grab your tools, and keep your vehicle’s heart beating strong for many miles to come!
🎥 Related Video: How to Test a Car Battery with a Multimeter
📺 ChrisFix
How to check a car battery using a multimeter. Does your car not start, do you have dim headlights or interior lights, does the …
Frequently Asked Questions
What is the ideal voltage for a healthy car battery?
A fully charged and healthy 12-volt car battery should ideally read between 12.6 to 12.8 volts when tested with a multimeter after sitting for a while. Anything consistently below 12.4 volts suggests the battery needs charging or further inspection.
Can a cold climate affect my car battery’s performance and test results?
Yes, cold climates significantly impact battery performance. Cold reduces a battery’s cranking power and its ability to accept a charge, making it harder for your engine to start. Test results in very cold weather might show slightly lower voltages, even for a healthy battery.
What’s the difference between a car battery tester and a multimeter?
A multimeter measures voltage and other electrical properties but doesn’t put a load on the battery. A dedicated car battery tester (or load tester) applies a controlled electrical load to the battery, simulating engine cranking, to more accurately assess its ability to hold voltage under stress, making it a more comprehensive test of battery health.
How do I know if my alternator or battery is the problem?
If your car battery repeatedly dies even after being fully charged, the problem might be your alternator. To check, start your car and test the battery voltage while the engine is running; a healthy alternator should show a reading of around 13.8 to 14.5 volts. If it’s still around 12 volts, your alternator might be failing.
Is it possible for a car battery to test “good” but still fail to start the car?
Yes, it is possible. A battery might show good static voltage (e.g., 12.6V) but lack the necessary Cold Cranking Amps (CCA) to turn over the engine, especially if it’s very cold or the engine is large. This is why a load test is often more indicative of a battery’s true ability to start a vehicle than just a voltage check.
What is battery sulfation and how does it affect battery testing?
Battery sulfation occurs when lead sulfate crystals build up on the battery plates, often due to undercharging or prolonged disuse. This buildup reduces the battery’s capacity to hold a charge and deliver current. A sulfated battery might show a good voltage reading initially but will quickly drop under a load test and won’t hold a charge effectively.