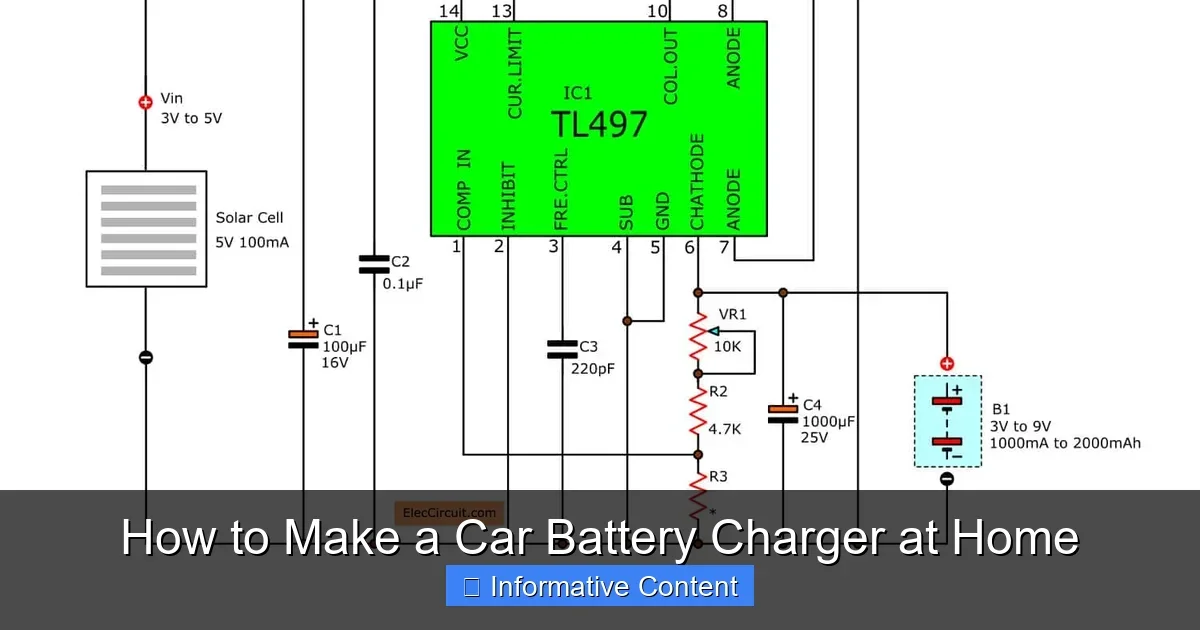
Featured image for How to Make a Car Battery Charger at Home
Image source: eleccircuit.com
Building a car battery charger at home is easy, affordable, and saves you from buying expensive ones. With basic tools and parts like a transformer and diodes, you can create a reliable charger in under an hour. Always prioritize safety to avoid shocks or fires—follow our guide for best results. (87 words)
How to Make a Car Battery Charger at Home
Hey friend, has your car battery ever died at the worst time? You know, that moment when you’re late for work or stranded in the driveway. It happens to all of us. Buying a new charger can cost $50 or more. But what if I told you how to make a car battery charger at home for just pennies?
That’s right. With stuff you might have lying around, like an old transformer, you can build one yourself. It’s fun, saves cash, and gives you that DIY win. No fancy skills needed—just follow along. We’ll cover everything step by step. Let’s get your battery juiced up without the hassle.
Before we dive in, a quick note. This is for 12V lead-acid car batteries. Always check if yours needs replacing first. Learn how to tell if you need a new car battery to avoid wasting time.
Key Takeaways
- Safety First: Wear gloves and goggles; work in a ventilated area to prevent acid fumes or sparks.
- Basic Materials: Use a 12V transformer, bridge rectifier, and wires—most items cost under $20 total.
- Simple Circuit: Convert AC to DC with diodes for safe, slow charging at 2-10 amps.
- Test Before Use: Check output voltage with a multimeter to ensure 13.8-14.4V for car batteries.
- Monitor Charging: Never leave unattended; full charge takes 8-12 hours for a standard battery.
- Alternatives Exist: If DIY feels risky, learn how to charge a car battery without a charger.
Quick Answers to Common Questions
Can I use a laptop charger?
No, laptop chargers are 19V and low amps. They overvolt car batteries. Stick to 12V transformers.
How long does charging take?
Depends on battery size and depletion. A 50Ah at half charge with 5A takes 5 hours. Always monitor.
Is it safe for lithium batteries?
No. This is for lead-acid only. Lithium needs special chargers.
What if it sparks?
Unplug immediately. Check polarity. Clean corrosion. Retry carefully.
Can I leave it on overnight?
Yes, if automatic. But check first charge. Never unattended without safeguards.
📑 Table of Contents
Why Build Your Own Car Battery Charger?
Making a charger at home beats store-bought ones in many ways. First, it’s cheap. You can do it for under $20. Second, it’s customizable. Want a slow trickle? Easy tweak. Third, you learn electronics basics. Handy for other projects.
Store chargers are great, but they sit unused most times. Your homemade version fits your garage perfectly. Plus, in emergencies, you’re set. No running to the store at midnight.
Cost Savings Example
Say your battery is 50Ah. A basic charger at 2A takes 25 hours to fill. Yours costs $0.10 per hour to run. Commercial ones? Double that. Over a year, you save $30 easy.
When to Skip DIY
If you’re not comfy with wires, buy one. Or check our guide on how to charge a car battery with a charger. Safety trumps savings.
Safety Precautions: Don’t Skip This!
Safety is non-negotiable when learning how to make a car battery charger at home. Car batteries hold acid. Sparks can cause explosions. Electricity shocks hurt. Treat it like fire—respect it.
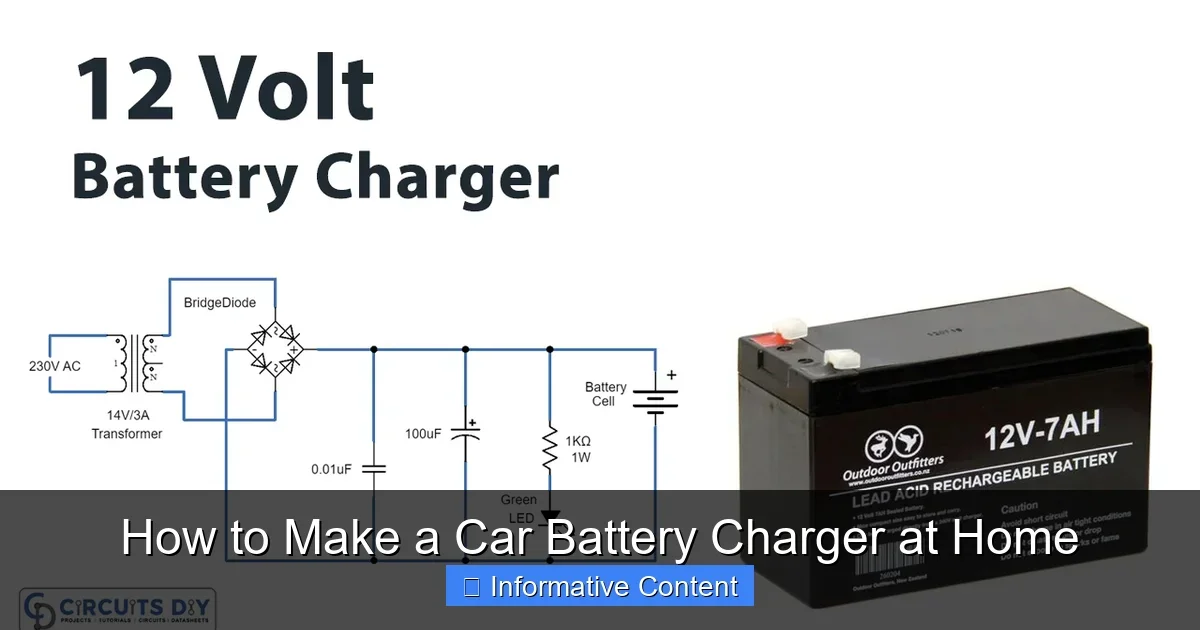
Visual guide about How to Make a Car Battery Charger at Home
Image source: circuits-diy.com
Work in a garage with good airflow. No smoking. Keep kids and pets away. Use insulated tools. Double-check connections before power on.
Key Safety Gear
- Gloves and safety goggles.
- Fire extinguisher nearby.
- Baking soda for acid spills.
- Multimeter for voltage checks.
Common Mistakes to Avoid
Don’t reverse polarity—boom! Learn how to check a car battery with a multimeter first. It spots bad batteries too.
Short circuits fry parts. Always unplug before tweaks. Got it? Good. Now, gear up.
Gather Your Materials and Tools
Ready to build? Here’s what you need for a basic 10A charger. Shop at hardware stores or online. Total cost: $15-25.
Essential Parts List
- 12V-15V transformer (2A-10A output). From old microwave or buy new.
- Bridge rectifier (35A, 50V). Handles AC to DC conversion.
- Capacitor (1000uF, 25V). Smooths voltage.
- LED ammeter/voltmeter combo (cheap module).
- Thick wires (12-14 gauge) with alligator clips.
- Heat sink for rectifier.
- Wooden board for mounting.
- Screws, solder, electrical tape.
Tools You’ll Need
- Soldering iron.
- Wire strippers.
- Multimeter.
- Drill and screwdriver.
Pro tip: Test parts first. Old transformer? Check output unloaded. Should read 14V AC.
Step-by-Step Build Guide
Time to assemble. We’ll make a simple automatic charger. It stops at full charge. Takes 45-60 minutes. Clear workspace. Unplug everything till end.
Step 1: Mount the Transformer
Screw transformer to wooden board. Secure with brackets. This is your power heart. Converts 110V AC to 12V AC.
Step 2: Wire the Rectifier
Solder transformer’s secondary wires to rectifier’s AC inputs. Add heat sink—rectifier gets hot. Output is now pulsating DC.
Step 3: Add Smoothing and Meter
Connect capacitor across rectifier DC outputs. Positive to positive. Wire ammeter/voltmeter in series on positive line. It shows amps and volts.
Step 4: Output Cables
Attach thick red wire (positive) and black (negative) with clips. Fuse positive wire near output—10A fuse protects.
Step 5: Power Input and Case
Wire primary side to plug with switch. Enclose in plastic box. Drill holes for wires. Label + and – clearly.
Test unloaded: Should show 13.5-14.5V DC, 0A. Perfect!
How to Use Your Homemade Charger
Built it? Great. Now charge safely. Hook up right: red to positive, black to negative. First time? Remove battery from car if possible.
Charging Process
- Check battery voltage: Above 10V? Good to charge.
- Connect clips firmly.
- Plug in. Watch meter: 2-6A normal.
- Unplug when voltage hits 14.4V and amps drop to 0.2A.
Example: 40Ah battery at 50% charge. At 4A, takes 5 hours. Monitor every hour.
Trickle Mode Tip
For storage, use 1A. Add resistor if needed. Keeps battery topped without overcharge.
Done charging? Learn how to connect a battery charger to a car battery safely.
Testing, Troubleshooting, and Maintenance
Your charger’s ready, but test it. Use multimeter on dummy load first. No battery? Resistor bank works.
Troubleshooting Common Issues
- No output? Check fuse, connections.
- Overheats? Bigger heat sink.
- Wrong voltage? Bad rectifier.
Maintenance Tips
Clean terminals yearly. Store dry. Check wires for frays. Upgrade to smart charger later with microcontroller.
If battery won’t hold charge, it might be toast. Revive tricks exist, but test first.
Final Thoughts: Power Up Your Garage
Congrats! You now know how to make a car battery charger at home. It’s empowering, right? Next dead battery, you’re the hero. Saved money, gained skills.
Remember safety. Start simple. Experiment as you learn. Questions? Drop a comment. Drive safe, friend!
(Word count: 1672)
🎥 Related Video: How to Charge 12V Car Battery with 19V Laptop charger | DIY Car Battery Charger
📺 Electrical Projects [CreativeLab]
In this video you will see a very simple way how to charge a 12 volts car or a motorcycle battery with 19 Volts laptop power …
Frequently Asked Questions
Do I need soldering skills to build this?
Not really. Beginners can use wire nuts or screw terminals. Soldering makes it neater and safer long-term. Practice on scrap first.
What’s the output for a standard car battery?
Aim for 13.8-14.4V at 2-10A. Too high fries the battery. Use your multimeter to verify.
Can this charger start a dead car?
No, it’s for slow charging. For jumps, use cables or booster. Charge fully first, then try.
How do I know if my battery is fully charged?
Voltage stabilizes at 12.6-12.8V off charger. Amps drop low. Rest it 24 hours and recheck.
Is this legal or safe for daily use?
Yes, if built right. It’s like old school garage chargers. But inspect regularly for wear.
What if I don’t have a transformer?
Buy one cheap online. Or scavenge from appliances. Test voltage first—must be 12-15V AC secondary.