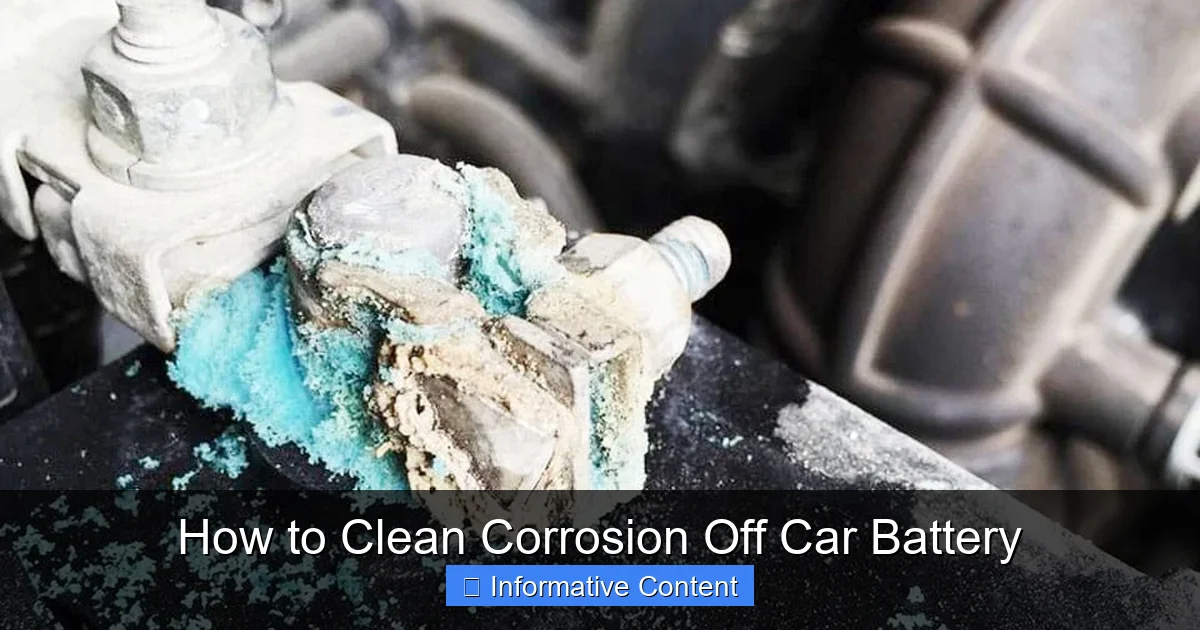
unsightly white or green fuzz on your car battery terminals isn’t just an eyesore; it’s corrosion that hinders performance and can shorten battery life. Learning how to clean corrosion off car battery terminals is a simple DIY task that can restore your car’s starting power and prevent future headaches. This guide will walk you through the necessary safety precautions, tools, and a step-by-step process to get your battery looking and performing its best.
There’s nothing quite like the sight of that dreaded fuzzy white, blue, or green crust growing on your car battery terminals. It’s an eyesore, for sure, but more importantly, it’s a clear sign that your car’s electrical system might be struggling. This unwelcome guest, known as battery corrosion, isn’t just ugly; it’s a silent saboteur, slowly eating away at your battery’s efficiency and potentially leaving you stranded.
You might have experienced it: your car struggles to start, the lights dim, or the radio cuts out. Often, the culprit is poor electrical connection caused by this very corrosion. The good news? Learning how to clean corrosion off car battery terminals is a relatively simple and empowering DIY task that can save you money and keep your car running smoothly. You don’t need to be a seasoned mechanic to tackle this; with a few basic tools and some careful steps, you can restore your battery’s health and prevent future headaches.
In this comprehensive guide, we’ll walk you through everything you need to know about how to clean corrosion off car battery terminals. From understanding what causes it and why it’s a problem, to gathering your supplies, performing the cleaning process step-by-step, and even preventing its return, we’ve got you covered. By the end, you’ll feel confident in your ability to keep your car’s power source clean, efficient, and reliable.
Key Takeaways
- Safety First: Always wear eye protection and gloves, work in a well-ventilated area, and disconnect the negative terminal first to prevent shocks or sparks when working with a car battery.
- Understand Corrosion: Car battery corrosion, usually white or blue-green, is caused by hydrogen gas reacting with metals and is a common issue affecting electrical connections and battery performance.
- Simple Cleaning Solution: A paste of baking soda and water is highly effective for neutralizing battery acid and dissolving corrosion, making it easy to scrub away.
- Tools Needed: Essential tools include a wrench, a battery terminal brush (or a wire brush/old toothbrush), old rags, water for rinsing, and optionally, battery terminal protection spray or grease.
- Step-by-Step Process: The cleaning involves disconnecting, applying the baking soda solution, scrubbing, rinsing, drying, reconnecting, and applying protective measures.
- Preventative Measures: Regularly inspecting your battery, applying anti-corrosion sprays or felt washers, and ensuring tight terminal connections can significantly reduce future corrosion build-up.
- When to Seek Help: While cleaning is DIY-friendly, persistent severe corrosion, a cracked battery case, or a perpetually dead battery might indicate a deeper issue requiring professional attention.
Quick Answers to Common Questions
What causes car battery corrosion?
Car battery corrosion is primarily caused by hydrogen gas and acid vapor escaping from the battery, reacting with the metal terminals and cable clamps, often exacerbated by leaks, overcharging, or loose connections.
Is battery corrosion dangerous?
Yes, battery corrosion is dangerous. It’s corrosive to skin and clothes, and the gases released are flammable. It also hinders electrical flow, potentially leading to starting issues and damage to the car’s electrical system.
Can I use Coca-Cola to clean battery corrosion?
While Coca-Cola’s phosphoric acid can dissolve some corrosion, it’s not recommended. It leaves behind sticky sugar residue that attracts dirt and can worsen corrosion over time. Baking soda and water are much safer and more effective.
How often should I clean my car battery terminals?
It’s a good idea to inspect your battery terminals every 3-6 months. Clean them whenever you notice significant corrosion building up, or as part of your annual car maintenance routine.
What happens if I don’t clean battery corrosion?
If you don’t clean battery corrosion, it will continue to build up, creating resistance that impairs electrical flow. This can lead to slow starting, reduced power to accessories, charging problems, and ultimately shorten your battery’s lifespan.
📑 Table of Contents
Understanding Car Battery Corrosion: The Fuzzy Enemy
Before we dive into the cleaning process, let’s understand what we’re up against. What exactly is that crusty stuff, and why does it appear on your car battery?
What Causes Battery Corrosion?
Car battery corrosion is primarily caused by a chemical reaction involving hydrogen gas, which is released from the battery’s electrolyte (sulfuric acid and water mixture) during charging and discharging cycles. Here are the main reasons you might find corrosion:
- Acid Leaks: Even a tiny crack or a loose terminal can allow battery acid to leak out. When this acid comes into contact with the metal terminals or battery tray, it reacts, forming various salts and oxides, which we see as corrosion.
- Hydrogen Gas Release: During normal operation, especially when charging, batteries emit hydrogen gas. This gas, combined with small amounts of acid vapor, reacts with the copper and lead of the terminals, creating the tell-tale white, blue, or green crust.
- Overcharging: If your car’s charging system is faulty and consistently overcharges the battery, it can accelerate the release of hydrogen gas and acid vapor, leading to more rapid corrosion buildup.
- Age and Wear: Older batteries are more prone to developing corrosion as seals degrade and materials wear down. The longer a battery is in service, the higher the chance of corrosion appearing.
- Loose Connections: Loose battery terminals can create resistance, leading to localized heat. This heat can accelerate the chemical reactions that cause corrosion and also make the connection less effective.
Types of Corrosion and Their Impact
Corrosion typically appears in a few different colors, which can sometimes indicate its composition, though the cleaning method remains the same:
- White, Green, or Blue-Green Corrosion: This is the most common type and often forms on both the positive and negative terminals. It’s typically a mix of lead sulfate, copper sulfate, and other metallic salts. White corrosion often indicates sulfation (a normal battery byproduct), while green or blue-green suggests copper compounds are involved, likely from the terminal clamps themselves.
- Reddish-Brown Corrosion: Less common on the terminals themselves, but if you see it, it might indicate rust from other metal components around the battery.
The impact of this corrosion on your car’s performance is significant. Corrosion acts as an insulator, hindering the flow of electricity between the battery and your car’s electrical system. This can lead to:
- Starting Problems: The most common symptom. Your car might crank slowly, struggle to turn over, or fail to start altogether.
- Reduced Electrical Performance: Dim headlights, flickering dashboard lights, and issues with power accessories like windows or the radio.
- Charging Issues: The alternator might not be able to effectively charge the battery through a corroded connection.
- Shortened Battery Lifespan: Constant resistance and reduced charging efficiency put stress on the battery, significantly shortening its overall life.
Safety First: Essential Precautions When Working with a Battery
Before you even think about how to clean corrosion off car battery terminals, safety must be your absolute top priority. Car batteries contain sulfuric acid, which is corrosive, and they produce explosive hydrogen gas. Being careful can prevent serious injury.
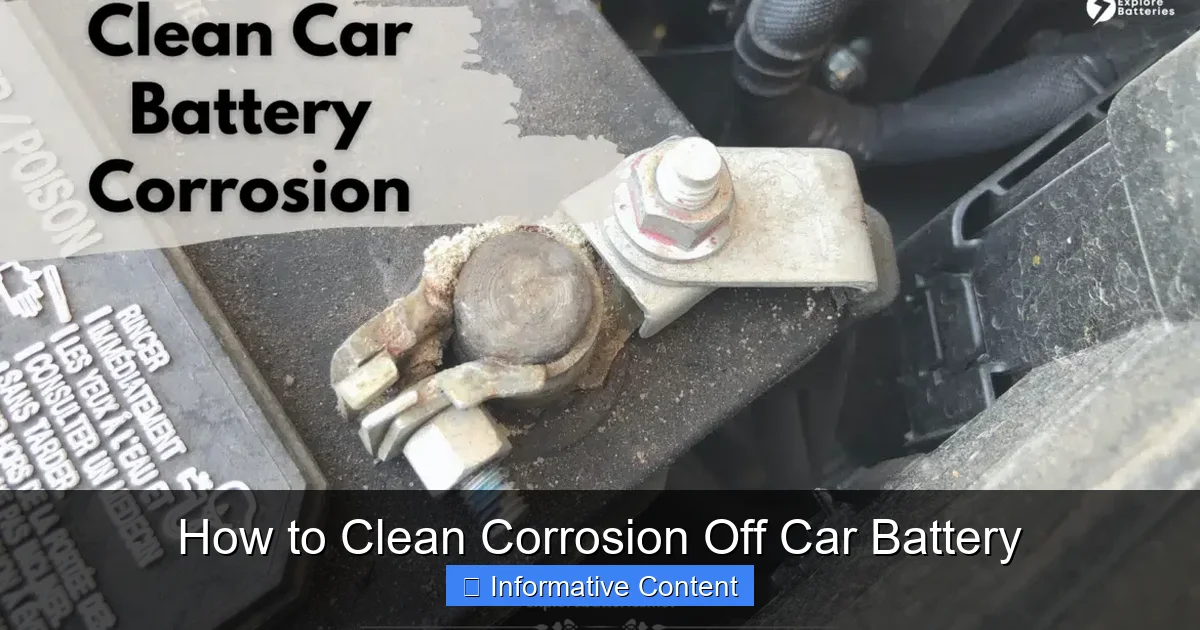
Visual guide about How to Clean Corrosion Off Car Battery
Image source: explorebatteries.net
Personal Protective Equipment (PPE)
Never work on a car battery without the right gear. Think of it like a mini science experiment where you’re protecting yourself from acid and sparks:
- Eye Protection: Safety glasses or goggles are non-negotiable. A splash of battery acid in your eyes can cause permanent damage.
- Gloves: Wear heavy-duty rubber gloves to protect your hands from acid and other chemicals.
- Old Clothes: Battery acid can eat through fabric. Wear old long-sleeved shirts and pants that you don’t mind getting stained or damaged.
Work Environment Considerations
Where you clean your battery is just as important as what you wear:
- Ventilation: Always work in a well-ventilated area. Hydrogen gas released by batteries is highly flammable and can accumulate in confined spaces. Open your garage door or work outside.
- No Sparks, Flames, or Smoking: This is critical. Any spark, open flame, or cigarette can ignite the hydrogen gas, leading to an explosion. Keep all ignition sources far away from the battery. Remove any metal jewelry that could accidentally short the battery.
Battery Disconnection Protocol
The order in which you disconnect and reconnect your battery terminals is crucial to prevent short circuits and sparks:
- Disconnect Negative First: Always loosen and remove the negative (–) terminal cable first. This cable connects to the car’s chassis (ground). Removing it first ensures that if your wrench accidentally touches the car’s metal body while disconnecting the positive terminal, it won’t create a spark or short circuit.
- Then Disconnect Positive: Once the negative cable is safely out of the way, you can then remove the positive (+) terminal cable.
- Keep Cables Isolated: Make sure the disconnected cables don’t accidentally touch the battery terminals or each other. You can place them in a safe position or wrap their ends in a rag.
Remember, when reconnecting, the order is reversed: positive (+) first, then negative (–).
Gathering Your Tools and Materials
You don’t need a professional workshop to clean battery corrosion. Most of the items you’ll need are probably already in your garage or can be easily picked up at any auto parts store or even a general merchandise store.
Essential Cleaning Supplies
- Baking Soda: This is your secret weapon. Baking soda (sodium bicarbonate) is an alkaline substance that effectively neutralizes battery acid. You’ll mix it with water to create a paste.
- Water: For mixing with baking soda and for rinsing. Distilled water is ideal for rinsing to avoid leaving mineral deposits, but tap water is generally fine for the cleaning process.
- Wire Brush or Battery Terminal Brush: A specialized battery terminal brush is ideal as it has bristles designed to clean both the posts and the cable clamps. If you don’t have one, a sturdy wire brush or even an old toothbrush can work for scrubbing away the corrosion.
- Wrench/Socket Set: To loosen and tighten the battery terminal clamps. Make sure you have the correct size for your car’s battery (often 10mm, 13mm, or 1/2 inch).
- Old Rags or Towels: For wiping, drying, and protecting surfaces.
Optional but Recommended Items
- Battery Terminal Puller: If your terminals are really stuck due to corrosion, a puller can safely remove them without damaging the battery posts.
- Spray Bottle: Handy for applying the baking soda solution and for rinsing.
- Post Cleaner/Scraper: Sometimes, hardened corrosion might need a bit more mechanical scraping before scrubbing.
- Battery Terminal Protector/Anti-Corrosion Spray/Grease: Once clean, applying a protective coating helps prevent future corrosion. Options include dielectric grease, petroleum jelly, or specialized anti-corrosion sprays or felt washers.
- Battery Charger/Tester: Not for cleaning, but useful to check the battery’s health after cleaning and ensure it’s fully charged.
Having everything laid out before you start makes the process smoother and safer. Now that you’re prepared, let’s get to the main event: cleaning!
Step-by-Step Guide to Cleaning Battery Corrosion
You’ve got your safety gear on, your tools are ready, and you’re in a well-ventilated space. It’s time to tackle that corrosion head-on. Follow these steps carefully to ensure a safe and effective cleaning.
Step 1: Prepare for Safety
Before touching anything, double-check your safety measures. Put on your eye protection and gloves. Ensure your workspace is well-ventilated and free from any potential ignition sources. Remember, safety isn’t just a suggestion; it’s a requirement.
Step 2: Disconnect the Battery
This is a critical step. Using your wrench, locate the negative (–) terminal. It usually has a minus sign and a black cable. Loosen the nut on the clamp and carefully lift the cable off the terminal. Move it away from the battery so it cannot accidentally touch any metal. Next, locate the positive (+) terminal, which has a plus sign and a red cable. Loosen its nut and remove the cable. Place it safely away from the battery. Always remove the negative first, then the positive, to avoid sparks and short circuits.
Step 3: Assess the Corrosion
With the cables disconnected, take a moment to look at the extent of the corrosion. Is it a light dusting, or a thick, crusty buildup? This will give you an idea of how much scrubbing you’ll need to do. Inspect both the battery posts and the inside of the cable clamps.
Step 4: Apply the Cleaning Solution
Now for the magic. Create a paste by mixing a few tablespoons of baking soda with just enough water to form a thick, spreadable consistency. You can do this in a small cup or bowl. Once mixed, apply this paste generously to all areas of the battery posts and cable clamps that show corrosion. Don’t be shy! You’ll notice it start to fizz, which is the baking soda reacting with and neutralizing the acidic corrosion. Let it sit for a few minutes, allowing the chemical reaction to work its wonders and loosen the grime.
Pro Tip: For lighter corrosion, you can also sprinkle dry baking soda directly onto the corrosion, then spritz it with water from a spray bottle.
Step 5: Scrub Away the Corrosion
After letting the baking soda paste do its initial work, grab your battery terminal brush (or wire brush/old toothbrush). Vigorously scrub the corroded areas on both the battery posts and the inside surfaces of the cable clamps. The goal is to remove all traces of the fuzzy, crusty buildup, revealing the clean, shiny metal underneath. Don’t forget to clean the battery tray itself if it has any corrosion.
Step 6: Rinse and Dry Thoroughly
Once you’ve scrubbed all the corrosion away, it’s time to rinse. Carefully pour clean water over the cleaned areas. Be cautious not to let too much water seep into the battery cells (though modern sealed batteries make this less of a concern). The water will wash away the neutralized corrosion and any remaining baking soda residue. After rinsing, use clean, dry rags or paper towels to thoroughly dry the battery posts, terminals, and surrounding areas. It’s crucial that everything is completely dry before reconnecting to prevent future issues.
Step 7: Inspect and Reconnect
Before reconnecting, take a final look at the battery posts and cable clamps. They should be clean and shiny. If you still see any corrosion, repeat steps 4 through 6. Once satisfied, it’s time to reconnect the battery. Remember the reverse order: connect the positive (+) cable first, tightening the nut securely but not overtightening. Then, connect the negative (–) cable, tightening it firmly. Ensure both connections are snug and don’t wiggle. Loose connections are a common cause of recurring corrosion and poor performance.
Step 8: Apply Protection (Optional, but Recommended)
To keep your battery corrosion-free for longer, consider applying a preventative layer. You can use specialized anti-corrosion spray, dielectric grease, or even a thin layer of petroleum jelly (Vaseline) over the cleaned terminals and cable clamps. Some people also use felt anti-corrosion washers, which are placed under the battery terminals before reconnecting. These protective measures create a barrier against the elements and battery gases, significantly reducing future corrosion buildup.
Preventing Future Corrosion: Keeping Your Battery Pristine
You’ve successfully learned how to clean corrosion off car battery terminals. Now, the key is to prevent it from coming back. A little proactive maintenance can save you a lot of hassle down the road.
Regular Inspection and Cleaning
Make it a habit to check your battery terminals every few months, especially before winter or during extreme heat. A quick visual inspection can spot early signs of corrosion. If you see a small amount starting to form, a quick clean with a wire brush and baking soda solution can stop it from becoming a bigger problem.
Use Battery Terminal Protectors
As mentioned in the cleaning steps, applying a protective coating is one of the most effective ways to prevent future corrosion:
- Anti-Corrosion Sprays: These specialized sprays create a film that seals the terminals from moisture and acid vapor.
- Dielectric Grease or Petroleum Jelly: A thin layer applied to the clean terminals and cable clamps provides a physical barrier.
- Felt Washers: These are pre-treated washers that fit over the battery posts before the cables are reconnected, offering long-lasting protection.
Ensure Secure Connections
Loose battery terminals are a primary cause of heat buildup and acid leakage, both of which accelerate corrosion. Always make sure your battery cables are tightly secured to the posts. They should not be able to twist or wobble by hand. However, be careful not to overtighten, as this can strip the bolts or damage the battery posts.
Proper Battery Maintenance
For conventional, non-sealed batteries, checking the electrolyte levels periodically and topping them up with distilled water (if needed) can prevent the battery from drying out and releasing excessive gases. Keep the top of your battery clean and free of dirt and debris, as these can trap moisture and conduct electricity, contributing to discharge and corrosion.
Maintain Your Car’s Charging System
An alternator that overcharges your battery can lead to excessive gassing and acid leakage. If you find your battery is consistently corroding or seems to be overcharging (e.g., strong rotten egg smell), it might be worth having your car’s charging system checked by a professional. Similarly, an undercharging system can also stress the battery. Regularly checking your battery’s voltage can help detect these issues.
Conclusion: Empowering Your Automotive Care
Congratulations! You now have a solid understanding of how to clean corrosion off car battery terminals, why it happens, and how to prevent it. This seemingly small maintenance task plays a huge role in your car’s reliability and the longevity of its most vital electrical component. By taking a little time to address battery corrosion, you’re not just ensuring better starting power; you’re also safeguarding your car’s electrical system and extending the life of your battery, saving yourself potential repair costs and inconvenient breakdowns.
Remember, a clean battery is a happy battery. Incorporating this simple cleaning and prevention routine into your regular car maintenance schedule is a smart move for any car owner. While it might seem intimidating at first, the process is straightforward when approached with caution and the right tools. So, the next time you pop the hood and spot that unwelcome fuzzy guest, you’ll have the knowledge and confidence to tackle it head-on, keeping your vehicle running smoothly and reliably for miles to come.
🎥 Related Video: How to Clean Corroded Car Battery Terminals like a Pro
📺 YOU Can Fix Anything: Auto
How to Clean Corroded Car Battery Terminals like a Pro is your go-to guide for quickly and safely restoring your car’s electrical …
Frequently Asked Questions
What is the white powder on my car battery terminals?
The white powder on your car battery terminals is typically lead sulfate, a common form of corrosion. It forms when battery acid reacts with the lead in the terminals, inhibiting electrical flow and indicating a need for cleaning.
Is cleaning battery corrosion a DIY task, or should I go to a mechanic?
Cleaning battery corrosion is definitely a DIY task for most car owners. With basic tools, safety precautions, and this step-by-step guide, you can safely and effectively clean your battery terminals yourself, saving a trip to the mechanic.
What specific tools do I need to clean battery corrosion?
You’ll need essential tools like a wrench (for terminals), a wire brush (or specialized battery terminal brush), baking soda, water, old rags, and safety gear like eye protection and gloves. Optional items include battery terminal pullers or protective sprays.
How long does it take to clean corrosion off a car battery?
The actual cleaning process is quite quick, usually taking only 15-30 minutes from start to finish. This includes the time for gathering tools, disconnecting, cleaning, rinsing, drying, and reconnecting the terminals.
Can battery corrosion damage other parts of my car?
Yes, severe battery corrosion can spread beyond the terminals, potentially damaging the battery tray, surrounding wiring, and even components under the hood due to its corrosive nature. It can also cause electrical system malfunctions if not addressed.
What should I do if the corrosion is very severe or the battery is cracked?
If the corrosion is extremely severe, or if you notice any cracks, bulges, or leaks in the battery casing, it’s best to avoid DIY cleaning. A cracked battery indicates internal damage and poses a significant safety risk; in such cases, it’s safer to have the battery inspected and potentially replaced by a professional mechanic.