Keeping your car battery clean is vital for its performance and longevity. Corrosion on battery terminals can hinder power flow, leading to starting problems and reduced battery life. This guide provides a safe, step-by-step approach to how to clean car battery terminals and prevent future build-up, ensuring your vehicle starts reliably every time.
How to Clean Car Battery
Hey there, fellow car enthusiast! Have you ever gone to start your car, only to be met with a slow crank or, worse, nothing at all? It’s a frustrating experience, and often, the culprit isn’t a dead battery, but a dirty one. Specifically, that crusty, often colorful build-up you see on your battery terminals? That’s corrosion, and it’s a real saboteur of your car’s electrical system.
Cleaning your car battery might sound like a job best left to the pros, but I promise you, it’s a straightforward task you can absolutely do yourself. Not only will it save you a trip to the mechanic, but it will also give you a deeper understanding of your vehicle. More importantly, learning how to clean car battery terminals effectively can extend the life of your battery, improve your car’s starting performance, and even prevent more serious electrical issues down the road. Ready to get your hands a little dirty (safely, of course!) and give your car battery the TLC it deserves? Let’s dive in!
Key Takeaways
- Safety First: Always wear protective gear (gloves, eye protection) and ensure proper ventilation before attempting to clean your car battery.
- Disconnect Safely: Remember to disconnect the negative terminal first, then the positive, to prevent accidental short circuits or sparks.
- Simple Cleaning Solution: A paste made from baking soda and water is an effective and safe solution for neutralizing and scrubbing away battery corrosion.
- Thorough Rinse and Dry: After scrubbing, rinse the terminals with clean water and dry them completely to prevent new corrosion and ensure proper electrical connection.
- Prevent Future Buildup: Apply a protective layer like petroleum jelly or an anti-corrosion spray to the cleaned terminals to significantly reduce the chances of future corrosion.
- Regular Inspection: Make checking your battery terminals for corrosion a part of your routine car maintenance to catch issues early and extend battery life.
Quick Answers to Common Questions
How often should I clean my car battery?
It’s a good idea to visually inspect your battery terminals every 3-6 months. If you notice any corrosion starting to form, it’s time for a cleaning. In harsh climates or if you drive on dirt roads frequently, you might need to clean it more often.
What causes car battery corrosion?
Battery corrosion is typically caused by hydrogen gas escaping from the battery vents, mixing with sulfuric acid (which can leak slightly), and reacting with the metal terminals and clamps. This creates lead sulfate crystals.
Is battery corrosion dangerous?
Yes, battery corrosion can be dangerous. It’s corrosive battery acid and can cause skin irritation or eye damage. In severe cases, it can also create electrical shorts or fire hazards due to poor connections and heat buildup.
What happens if I don’t clean battery corrosion?
If left uncleaned, corrosion will continue to build up, hindering electrical flow. This can lead to slow starting, difficulty starting, reduced battery life, damage to battery cables, and potentially other electrical system issues in your car.
Can I use Coca-Cola to clean battery terminals?
While Coca-Cola is sometimes suggested due to its phosphoric acid, it’s not recommended. It’s sugary and sticky, can attract pests, and might not effectively neutralize the battery acid. A baking soda and water paste is much safer and more effective.
📑 Table of Contents
Why Cleaning Your Car Battery is Essential for Performance
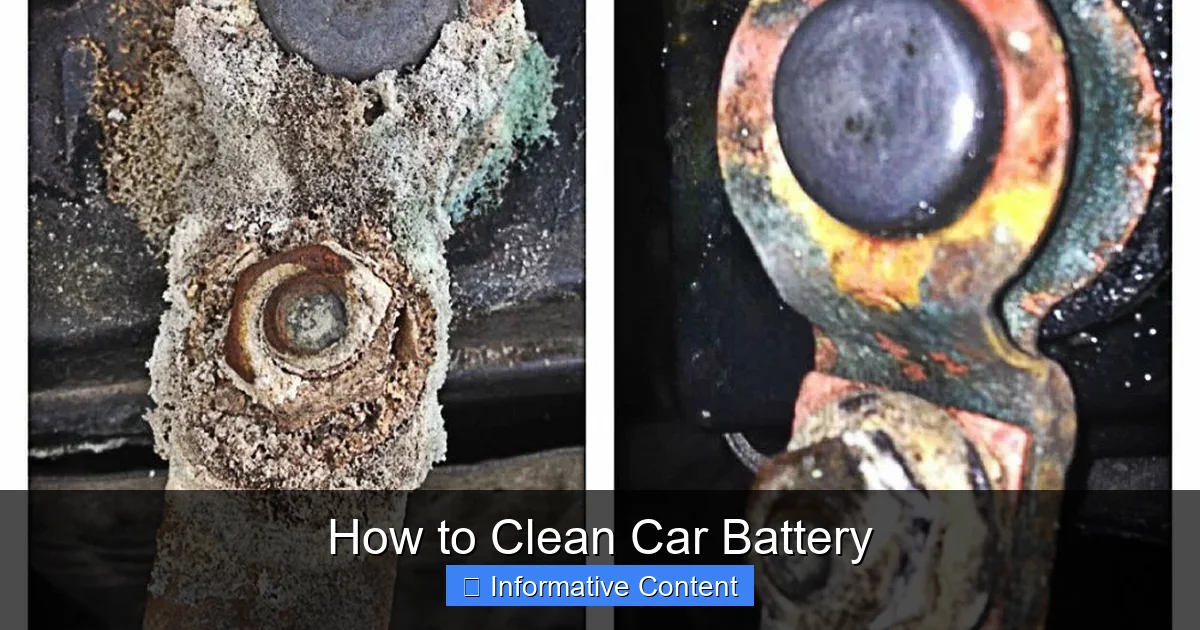
Before we grab our tools, let’s talk about why this seemingly small task is so incredibly important. That white, blue, or green powdery substance you see on your battery terminals isn’t just unsightly; it’s a sign of corrosion. This corrosion is typically lead sulfate, a byproduct of the chemical reactions happening inside your battery, especially when gases leak from the battery posts.
What Exactly Is Battery Corrosion?
Battery corrosion occurs when hydrogen gas escapes from the battery’s vents, mixes with the sulfuric acid (which sometimes seeps out slightly), and reacts with the metal of the terminals and clamps. This reaction creates lead sulfate crystals, which build up over time. It’s more common in older batteries or those that are overcharged or undercharged frequently.
The Nasty Effects of a Corroded Battery
Think of corrosion as a stubborn barrier between your battery and your car’s electrical system. Even a thin layer can significantly impact performance.
- Poor Electrical Conductivity: Corrosion acts as an insulator, making it harder for electricity to flow from the battery to your car’s starter and other components. This means your car struggles to start, especially in cold weather.
- Reduced Battery Life: When the electrical flow is hindered, your alternator has to work harder to charge the battery, and the battery itself isn’t able to receive a full charge. This constant strain shortens the battery’s overall lifespan.
- Damage to Electrical Components: Severe corrosion can spread to the battery cables, clamps, and even other under-hood electrical components, leading to expensive repairs if left unchecked.
- Safety Hazard: While less common, extreme corrosion can sometimes lead to overheating or even present a minor fire risk, especially if combined with loose connections.
Regularly knowing how to clean car battery terminals is not just about aesthetics; it’s about maintaining a healthy, reliable vehicle.
Safety First: Essential Precautions Before You Start
Working with car batteries involves electricity and corrosive chemicals, so safety should always be your top priority. Don’t skip these steps; they’re here to protect you.
Gather Your Personal Protective Equipment (PPE)
Before you even open your hood, make sure you have these items:
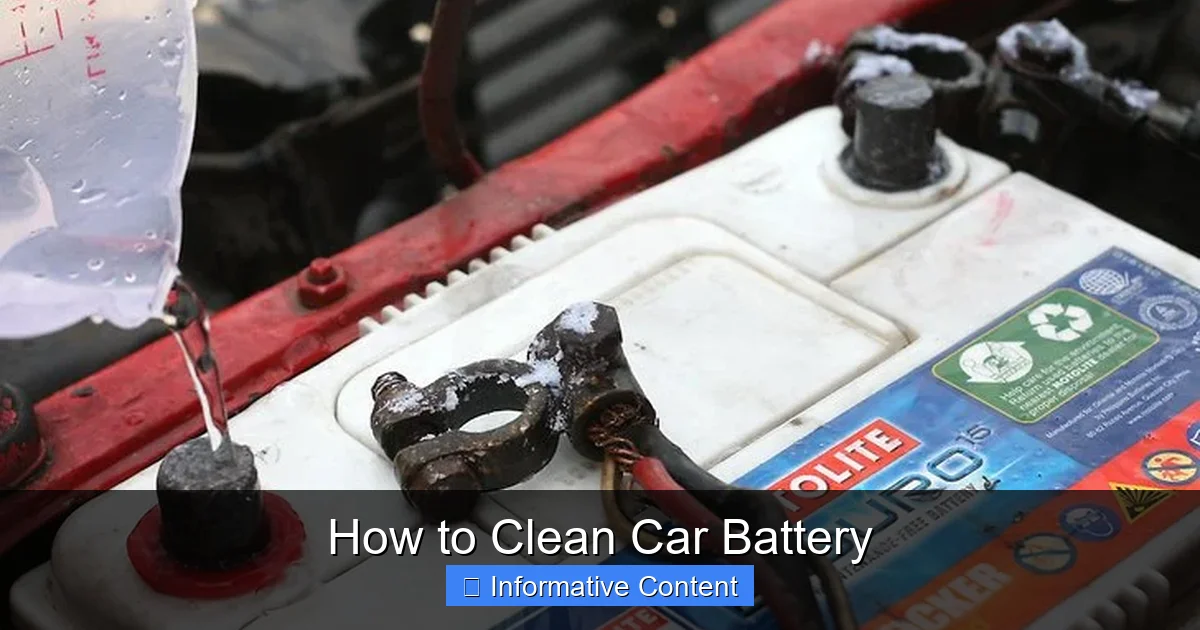
Visual guide about How to Clean Car Battery
Image source: carbatteryworld.com
- Safety Glasses or Goggles: Battery acid can splash, and you definitely don’t want it in your eyes. This is non-negotiable.
- Chemical-Resistant Gloves: Protect your hands from the corrosive acid and cleaning solutions. Household rubber gloves are usually sufficient for this task.
- Old Clothes: Wear something you don’t mind getting stained or damaged. Battery acid can eat through fabric.
Prepare Your Work Area and Your Car
Once you’re geared up, let’s get your car ready:
- Park Safely: Choose a well-ventilated area, preferably outdoors or in an open garage. Make sure the car is on a level surface.
- Turn Off the Engine and Accessories: Ensure your car is completely off, including the radio, lights, and any other electrical components.
- Engage the Parking Brake: This prevents the car from rolling unexpectedly.
- Remove Keys from Ignition: This eliminates any chance of accidentally turning on the car while you’re working.
- No Smoking or Open Flames: Batteries produce hydrogen gas, which is highly flammable. Keep all sources of ignition away from the battery.
- Remove Metal Jewelry: Rings, watches, and bracelets can conduct electricity and cause a short circuit or severe burns if they accidentally bridge the battery terminals.
Have an Emergency Plan
It’s always smart to be prepared for the unexpected:
- Baking Soda Nearby: A box of baking soda is your best friend if battery acid splashes on your skin or the car’s paint. It neutralizes the acid effectively.
- Water Source: Have a hose or a jug of water readily available for rinsing or in case of eye contact.
Taking these precautions might seem excessive, but they are crucial for a safe and successful car battery cleaning experience.
Gathering Your Tools and Materials
Good news! You probably have most of these items lying around your house or garage. You won’t need any fancy specialist tools for how to clean car battery terminals.
Essential Tools You’ll Need
- Battery Terminal Wrench or Socket Set: You’ll need this to loosen the nuts on the battery clamps. A 10mm or 13mm wrench is common, but check your car’s manual if unsure.
- Battery Terminal Brush: This is a small, inexpensive tool specifically designed for cleaning battery terminals and cable clamps. It usually has wire brushes on both ends – one to clean the battery posts and another to clean the inside of the cable clamps.
- Wire Brush (Optional, but Handy): For tougher corrosion on the battery tray or other areas.
- Old Rags or Shop Towels: For wiping, drying, and general cleanup.
- Bucket or Spray Bottle: For mixing and applying your cleaning solution.
Cleaning Solution and Protective Agents
- Baking Soda: This is your primary cleaning agent. It’s a mild alkali that effectively neutralizes battery acid.
- Water: For mixing with baking soda and for rinsing. Distilled water is ideal for rinsing to prevent mineral deposits, but tap water is fine for the cleaning solution.
- Petroleum Jelly (Vaseline) or Anti-Corrosion Spray/Grease: Once everything is clean, this will protect your terminals from future corrosion.
- Battery Terminal Cleaner Spray (Optional): Some people prefer a dedicated spray cleaner, which can be effective but isn’t strictly necessary if you have baking soda.
Having everything laid out before you start will make the process much smoother and more efficient.
The Step-by-Step Guide to Cleaning Your Car Battery
Okay, all safety gear on, tools ready, car parked safely. It’s time to learn the practical steps of how to clean car battery. Follow these instructions carefully.
Step 1: Disconnect the Battery Cables
This is arguably the most critical step to ensure your safety and prevent damage. Remember the order:
- Start with the Negative Terminal: Using your wrench, loosen the nut on the clamp connected to the negative (-) terminal. This terminal is usually marked with a minus sign and often has a black cable. Gently twist and pull the cable clamp off the terminal. Make sure the clamp doesn’t accidentally touch any metal parts of the car or the positive terminal. You might even want to wrap it in a rag or place it far away from the battery.
- Disconnect the Positive Terminal: Next, loosen the nut on the clamp connected to the positive (+) terminal. This terminal is usually marked with a plus sign and has a red cable. Once loosened, remove the clamp and ensure it also doesn’t touch any metal or the negative cable.
Disconnecting the negative cable first prevents a short circuit if your wrench accidentally touches a grounded part of the car while you’re working on the positive terminal. It’s a fundamental safety rule.
Step 2: Inspect the Battery for Damage
Once the cables are off, take a good look at your battery itself. Check for:
- Cracks or Leaks: Any cracks in the battery casing or visible acid leaks mean the battery needs to be replaced immediately. Do not attempt to clean it.
- Swelling: If the battery case looks swollen or bulging, it could indicate internal damage or overcharging, and the battery should be replaced.
- Strong Sulfur Smell: An overwhelming smell of rotten eggs could mean the battery is gassing excessively or has internal damage.
If you notice any of these serious issues, it’s time for a new battery, and a professional should handle its removal and replacement.
Step 3: Prepare Your Cleaning Solution
In your bucket or spray bottle, mix about two tablespoons of baking soda with one cup of water to create a thick paste or a strong solution. Adjust the consistency as needed. The baking soda will neutralize the acidic corrosion.
Step 4: Apply and Scrub the Corrosion Away
- Apply the Solution: Generously apply the baking soda paste or solution directly onto the corroded terminals and cable clamps. You’ll likely see it fizz and bubble; this is the baking soda reacting with and neutralizing the acid. Let it sit for a few minutes.
- Scrub the Terminals: Use your battery terminal brush (the cone-shaped end) to scrub the battery posts. Work in a circular motion until all the white, blue, or green crusty material is gone and the metal shines.
- Clean the Cable Clamps: Use the other end of your battery terminal brush (the wire brush designed for clamps) to clean the inside of the disconnected cable clamps. Ensure they are free of corrosion to allow for a good electrical connection.
- Clean the Battery Tray: Don’t forget the battery tray underneath. Corrosion can collect there too. Use your solution and a regular wire brush or an old toothbrush to scrub away any buildup.
Step 5: Rinse and Dry Thoroughly
- Rinse: Using clean water (distilled water is best, but tap water is fine), thoroughly rinse off all the baking soda residue and loosened corrosion from the battery terminals, cables, and tray. Be careful not to let too much water get into the battery cells themselves, though modern sealed batteries make this less of a concern.
- Dry: Use your old rags or shop towels to dry all the cleaned areas completely. A hairdryer on a cool setting can also speed up this process. It’s crucial that everything is bone dry before reconnecting to prevent new corrosion and ensure proper conductivity.
Step 6: Reconnect the Battery Cables
Now, it’s time to put everything back together. This time, the order is reversed:
- Connect the Positive Terminal First: Slide the red cable clamp onto the positive (+) terminal. Tighten the nut securely with your wrench. It should be snug, but don’t overtighten, as this can damage the terminal.
- Connect the Negative Terminal Last: Slide the black cable clamp onto the negative (-) terminal. Tighten the nut firmly.
Once both cables are securely reconnected, give them a gentle wiggle to ensure they are tight and won’t come loose. Loose connections can cause intermittent starting problems and further corrosion.
Step 7: Apply Corrosion Prevention
This final step is key to preventing that pesky corrosion from returning quickly. After connecting the cables:
- Petroleum Jelly: Apply a thin, even layer of petroleum jelly (like Vaseline) over the cleaned terminals and cable clamps. This creates a barrier against moisture and air, which are primary contributors to corrosion.
- Anti-Corrosion Spray/Washers: Alternatively, you can use a dedicated battery anti-corrosion spray or felt washers impregnated with anti-corrosion material. These are available at most auto parts stores and work similarly to create a protective barrier.
Preventing Future Corrosion: Tips for a Long-Lasting Battery
Learning how to clean car battery is great, but preventing corrosion in the first place is even better. Here are some simple habits and products that can keep your battery terminals sparkling clean for longer.
Regular Visual Inspections
Make it a habit to pop your hood and visually inspect your battery terminals every few months, or whenever you check your oil. Catching small signs of corrosion early makes cleanup much easier and prevents it from becoming a major problem.
Use Anti-Corrosion Products
- Battery Terminal Protectors: These are felt or fiber washers that sit under the cable clamps. They are often treated with an anti-corrosion solution and provide a physical barrier.
- Battery Terminal Grease/Spray: As mentioned, petroleum jelly, dielectric grease, or specialized anti-corrosion sprays create a protective seal around the terminals, preventing moisture and acid fumes from causing buildup. Reapply these periodically, especially after cleaning.
Ensure Proper Battery Maintenance
- Keep Your Battery Charged: A properly charged battery is less prone to gassing and corrosion. If your car sits for long periods, consider using a trickle charger or battery maintainer.
- Check Battery Housing: Ensure the battery is securely mounted in its tray. Vibrations can loosen terminals and even damage the battery, leading to leaks and corrosion.
- Inspect Battery Vents: For older, non-sealed batteries, ensure the vent caps are clear and properly seated.
When to Call a Professional
While cleaning your car battery is a DIY-friendly task, there are times when it’s best to call in a professional mechanic or a battery specialist.
Signs It’s Beyond a Simple Cleaning
- Severe Battery Damage: If you find cracks, leaks, excessive swelling, or an overwhelming sulfur smell during your inspection, do not attempt to clean it further. These are signs of a seriously damaged battery that could be dangerous.
- Extremely Stubborn or Systemic Corrosion: If the corrosion is so severe that it has eaten away at the cables, clamps, or has spread extensively to other components, it might indicate a deeper electrical issue or a battery that’s well past its prime.
- Uncertainty or Discomfort: If you’re ever unsure about any step, uncomfortable working around the battery, or lack the proper safety gear, it’s always safer to let a professional handle it.
- Persistent Starting Issues After Cleaning: If you’ve cleaned your battery thoroughly and you’re still experiencing starting problems, the issue is likely not corrosion but a failing battery, alternator, or starter motor, which requires professional diagnosis.
A professional can safely replace a damaged battery, diagnose underlying electrical problems, and ensure all connections are secure and safe. Don’t hesitate to seek expert help when necessary.
Conclusion
Congratulations! You’ve just learned how to clean car battery terminals like a pro. By following these steps and prioritizing safety, you’ve not only improved your car’s reliability and starting performance but also extended the life of your battery. It’s a simple yet incredibly effective bit of car maintenance that every car owner can master.
Remember, a little proactive care goes a long way. Regular inspections, timely cleaning, and applying those corrosion-preventative measures will keep your car battery healthy and ensure you’re never left stranded by a crusty terminal again. So, go forth with confidence, and enjoy the peace of mind that comes with a well-maintained vehicle!
Frequently Asked Questions
What is the white powdery substance on my car battery terminals?
The white, blue, or green powdery substance you see on your car battery terminals is typically lead sulfate, a common form of battery corrosion. It forms when hydrogen gas and traces of sulfuric acid from the battery react with the metal terminals and clamps. This buildup acts as an insulator, hindering the flow of electricity.
How long does it take to clean a car battery?
Cleaning a car battery is a relatively quick and easy task. Once you have your tools and safety gear ready, the actual cleaning process usually takes about 15 to 30 minutes from start to finish. This includes disconnecting, scrubbing, rinsing, drying, and reconnecting the battery.
Can corrosion indicate a bad car battery?
While corrosion itself doesn’t always mean a battery is bad, it can be a symptom of an aging or overcharging battery. Excessive corrosion, especially when accompanied by other signs like swelling or leaks, often indicates that the battery is failing and might need to be replaced soon.
Is it safe to clean a car battery with water?
Yes, it is safe to rinse a car battery with water after applying the baking soda solution, as long as you’re careful. Use clean water to wash away the neutralized corrosion and baking soda residue. Ensure all areas are thoroughly dried afterwards to prevent new corrosion and ensure proper electrical connections.
What’s the best way to prevent car battery corrosion?
The best way to prevent car battery corrosion is to regularly inspect your terminals and apply a protective barrier. After cleaning, apply a thin layer of petroleum jelly (Vaseline), dielectric grease, or a specialized anti-corrosion spray to the terminals and cable clamps. Battery terminal washers treated with anti-corrosion agents also help.
Do I need special tools to clean a car battery?
You don’t need many special tools to clean a car battery. Key items include a wrench to loosen terminal clamps, a battery terminal brush (which is specifically designed for the job), baking soda, water, and protective gear like safety glasses and gloves. Most of these can be found around the house or at any auto parts store.