Experiencing a dead car battery can be frustrating, but knowing how to charge a car battery with a charger can save you time and hassle. This comprehensive guide walks you through every step, from selecting the right equipment and prioritizing safety to properly connecting and monitoring your battery. By following these clear instructions, you’ll be able to confidently revive your car battery and ensure it’s ready for your next journey, all while understanding crucial safety precautions.
How to Charge a Car Battery with a Charger
Imagine this: You’re running late for an important appointment, you hop into your car, turn the key, and… nothing. Just that dreaded click or complete silence. A dead car battery is a common, frustrating experience, often striking at the most inconvenient times. While jump-starting is a quick fix, it’s not always the best long-term solution, especially if your battery frequently dies. Learning how to charge a car battery with a charger properly is a fundamental skill for any car owner, empowering you to maintain your vehicle’s health and avoid getting stranded.
This comprehensive guide will walk you through every step of the process, from understanding your battery and charger to safely connecting, monitoring, and disconnecting the equipment. We’ll demystify the technical jargon and provide clear, simple instructions so you can confidently bring your battery back to life. No need to call for roadside assistance every time; with the right tools and knowledge, you can tackle this task yourself, ensuring your car is always ready to go.
Key Takeaways
- Safety First: Always prioritize safety by wearing protective gear, working in a well-ventilated area, and avoiding any potential sources of sparks near the battery.
- Choose the Right Charger: Select a charger compatible with your car battery type (e.g., standard lead-acid, AGM, Gel) and an appropriate amperage for your needs (e.g., trickle, maintainer, fast charger).
- Inspect and Prepare: Before charging, inspect your battery for damage, clean corroded terminals thoroughly, and ensure the battery is in a stable, well-ventilated location.
- Proper Connection is Crucial: Connect the positive (+) charger clamp to the positive (+) battery terminal first, then the negative (-) charger clamp to a grounded, unpainted metal part of the car chassis away from the battery.
- Monitor the Charging Process: Set your charger according to the battery type and desired charge rate, then monitor the battery’s progress, especially during faster charging, to prevent overcharging.
- Disconnect Safely: Once charged, disconnect the charger in the reverse order of connection: negative (-) first from the chassis, then positive (+) from the battery.
- Understand Charge Times: Charging duration varies based on battery size, discharge level, and charger output; a general rule of thumb helps estimate, but smart chargers will indicate completion.
Quick Answers to Common Questions
How long does it take to charge a car battery with a charger?
The charging time depends on the battery’s size, how deeply discharged it is, and the amperage output of your charger. A deeply discharged battery with a 10-amp charger might take 6-12 hours, while a trickle charger (1-2 amps) could take 24 hours or more.
Can I overcharge a car battery with a charger?
Yes, especially with older manual chargers. Overcharging can damage the battery by causing excessive gassing, electrolyte loss, and internal plate damage. Smart chargers are designed to prevent overcharging by switching to a maintenance “float” mode once the battery is full.
Do I need to disconnect the car battery from the car before charging?
While generally not strictly necessary for modern cars and smart chargers, disconnecting the battery’s negative terminal from the car can eliminate the risk of damage to the car’s sensitive electronics during charging. Always consult your car’s owner manual.
What voltage should a fully charged car battery read?
A fully charged 12-volt car battery should read approximately 12.6 to 12.8 volts when the charger is disconnected and the battery has been allowed to rest for a few hours.
Can a car battery charger revive a completely dead battery?
Most standard chargers cannot revive a battery that is completely dead (below 3-4 volts) because they won’t recognize it as a 12-volt battery. Some advanced chargers have a “recondition” or “desulfation” mode that might attempt to revive very deeply discharged batteries, but success is not guaranteed.
📑 Table of Contents
Understanding Your Car Battery and Charger
Before you even think about connecting anything, it’s crucial to understand what kind of battery your car has and what kind of charger you’ll need. This knowledge forms the bedrock of safely and effectively charging a car battery with a charger.
Types of Car Batteries
Most vehicles today use 12-volt lead-acid batteries, but even within this category, there are distinctions:
- Standard Lead-Acid (Wet Cell/Flooded): These are the most common and typically have removable caps, allowing you to check and top up electrolyte levels with distilled water.
- AGM (Absorbed Glass Mat): These batteries are sealed, maintenance-free, spill-proof, and tolerate vibration well. They require a charger specifically designed for AGM batteries to prevent damage from overcharging.
- Gel Cell: Similar to AGM, Gel batteries are sealed and maintenance-free, using a gelled electrolyte. They are sensitive to overcharging and need a charger with specific Gel charging modes.
- Lithium-Ion (LiFePO4): Increasingly found in high-performance or newer vehicles, these require a dedicated lithium-ion compatible charger. Using a standard lead-acid charger can be dangerous.
Always check your battery’s label to identify its type. This will dictate the settings on your charger.
Types of Battery Chargers
Just as batteries vary, so do chargers. Choosing the right one is key to safely and successfully charging a car battery with a charger.
- Trickle Chargers: These deliver a low, steady current (typically 1-2 amps) over a long period. They are ideal for maintaining a battery’s charge during long storage periods, preventing self-discharge without overcharging.
- Battery Maintainers: Similar to trickle chargers but often more advanced, maintainers have smart circuitry that monitors the battery’s voltage and cycles on and off as needed to keep it at an optimal charge level. They are excellent for seasonal vehicles.
- Standard or Manual Chargers: These offer various amperage settings (e.g., 2A, 10A, 20A) and may require more monitoring as they can potentially overcharge a battery if left unattended too long.
- Smart Chargers (Automatic Chargers): These are the most user-friendly. They automatically detect battery type, voltage, and condition, adjusting the charge rate as needed. They also typically have a “float” or maintenance mode to prevent overcharging once the battery is full. Many also include features for desulfation and reconditioning.
- Jump Starters/Portable Chargers: While primarily designed to provide a quick boost to start a car, many modern jump starters also have a basic charging function to slowly top up a battery over several hours.
For most home users, a smart charger that can handle multiple battery types and has a maintenance mode is the best investment for learning how to charge a car battery with a charger safely and effectively.
Safety First! Essential Precautions
Working with car batteries involves electricity and corrosive chemicals, so safety is paramount. Ignoring safety precautions can lead to serious injury or damage. Before you even touch your battery or charger, review these critical safety measures.
Personal Protective Equipment (PPE)
- Safety Glasses or Goggles: Battery acid can cause severe eye damage. Always wear eye protection.
- Gloves: Wear acid-resistant gloves to protect your hands from battery acid.
- Old Clothes: Battery acid can also ruin clothing, so wear something you don’t mind getting stained.
Work Environment
- Ventilation: Batteries produce hydrogen gas when charging, which is highly flammable and explosive. Always work in a well-ventilated area to prevent gas buildup. Never charge a battery in an enclosed space like a small garage with the door shut.
- No Sparks or Flames: Keep all sources of ignition (cigarettes, open flames, sparks from tools) far away from the battery. Avoid striking metal tools against the battery or anything nearby that could create a spark.
- Stable Surface: Place the battery on a stable, non-conductive surface, away from anything flammable.
Emergency Preparedness
- Baking Soda: Have baking soda readily available. It can neutralize spilled battery acid.
- Water: A supply of fresh water is crucial for rinsing eyes or skin if contact with acid occurs.
- Read Charger Manual: Always read your specific charger’s manual thoroughly before use. Each model might have unique instructions or safety warnings.
Preparing Your Battery and Charger
With safety precautions in mind, the next step in learning how to charge a car battery with a charger is to prepare both the battery and the charger for the process. This ensures an efficient and safe charge.
Inspecting the Battery
- Visual Check: Look for any cracks, bulges, or leaks on the battery casing. If you see significant damage, it might be unsafe to charge and should be replaced.
- Fluid Levels (for Standard Lead-Acid Batteries): If your battery has removable caps, carefully twist them off. Check the electrolyte level in each cell. If it’s low, add distilled water (never tap water) until the plates are covered, but don’t overfill. Replace the caps securely. This step is not applicable for sealed batteries like AGM or Gel.
- Clean Terminals: Corroded terminals can impede the charging current. Use a wire brush and a battery terminal cleaner (or a mixture of baking soda and water) to clean any white or bluish-green buildup from the positive and negative terminals. Ensure they are dry before proceeding.
Setting Up the Charger
- Placement: Place the battery charger on a stable surface, as far away from the battery as the cables allow, but still within a safe distance. This helps reduce the risk of sparks igniting hydrogen gas.
- Select Settings: If your charger is not fully automatic, you’ll need to select the correct voltage (usually 12V for cars) and battery type (e.g., standard, AGM, Gel). Choose an appropriate amperage setting. A lower amperage (e.g., 2A-10A) is generally safer and better for the battery’s longevity, even if it takes longer. Higher amperage settings (e.g., 20A or more) are “fast charge” options, which should be used with caution and only for short periods.
- Ensure Charger is OFF: Make sure the charger is unplugged from the wall outlet or switched off before connecting any clamps to the battery.
The Step-by-Step Process to Charge a Car Battery
Now that you’re prepared, it’s time for the core process of how to charge a car battery with a charger. Follow these steps carefully for a safe and effective charge.
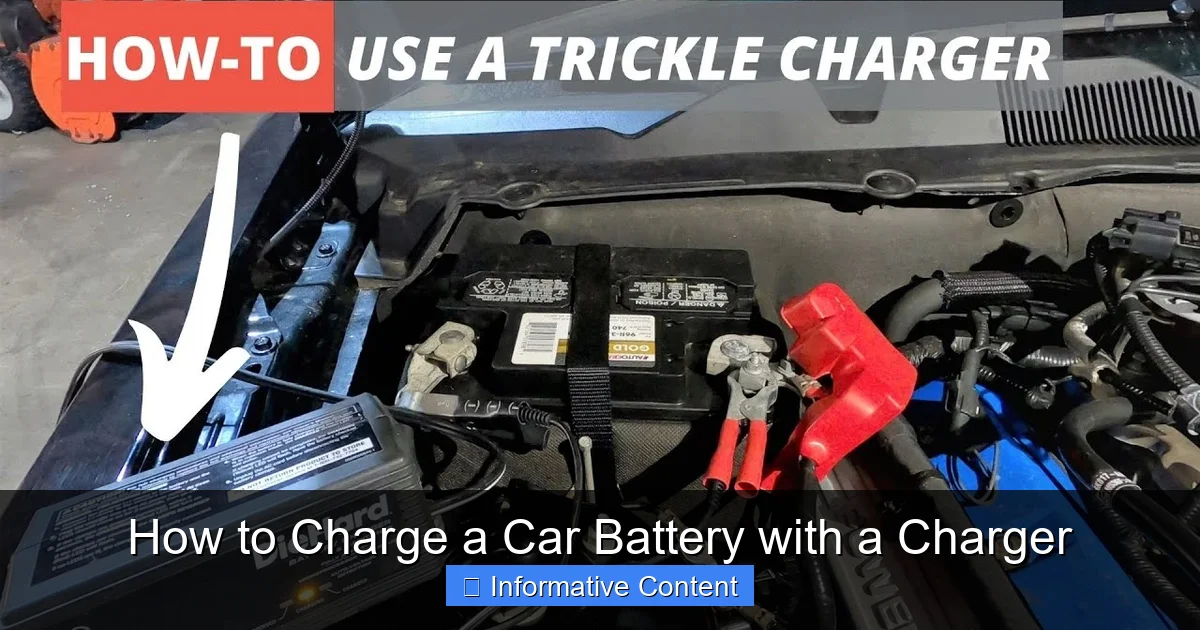
1. Connect the Positive Cable
Locate the positive (+) terminal on your car battery. It’s usually larger and marked with a plus sign, often covered with a red cap or boot. Connect the red positive (+) clamp from the charger firmly to the positive (+) terminal of the battery. Ensure a good, solid connection.

Visual guide about How to Charge a Car Battery with a Charger
Image source: carbatterygeek.co.uk
2. Connect the Negative Cable
This step is critical for safety. Do NOT connect the black negative (-) clamp directly to the negative (-) terminal of the battery, especially if the battery is still in the car. This can cause a spark, potentially igniting flammable hydrogen gas. Instead, connect the black negative (-) clamp to an unpainted metal part of the car chassis or engine block, away from the battery and the fuel system. This provides a ground connection. If the battery is out of the car, connect the negative (-) clamp directly to the negative (-) terminal of the battery, taking extra care to avoid sparks.
3. Plug in and Turn On the Charger
Once both clamps are securely connected, plug the charger into a wall outlet (120V AC). Then, switch the charger on. If your charger has settings, double-check that they are correct for your battery type and desired charge rate. Most smart chargers will begin their diagnostic and charging process automatically.
4. Monitor the Charging Process
The charging time will vary significantly based on your battery’s size, its current state of discharge, and the amperage output of your charger. A deeply discharged battery might take 12-24 hours or even longer to fully charge at a low amperage. A smart charger will typically have indicator lights or a display to show charging progress or when the battery is fully charged. If you’re using a manual charger, you’ll need to monitor the process more closely, perhaps using a voltmeter to check the battery voltage periodically. A fully charged 12V battery should read around 12.6-12.8 volts when the charger is disconnected and the battery has rested for a few hours. Avoid overcharging, which can damage the battery.
5. Disconnect the Charger Safely
Once the battery is fully charged, or if you need to stop charging, follow the disconnection steps in reverse order:
- First, turn off the battery charger and unplug it from the wall outlet.
- Next, disconnect the black negative (-) clamp from the car chassis or the battery’s negative terminal.
- Finally, disconnect the red positive (+) clamp from the battery’s positive terminal.
Carefully remove your PPE and store your charger properly.
Troubleshooting Common Issues and Advanced Tips
Even when you know how to charge a car battery with a charger, sometimes things don’t go as planned. Here are some common issues and advanced tips to help you maintain your battery.
Common Charging Issues
- Charger Not Turning On/Recognizing Battery: Check that the charger is properly plugged in and that the connections to the battery terminals are clean and secure. Some smart chargers won’t initiate charging if the battery voltage is extremely low (e.g., below 3-4V). In such cases, a very brief jump start or a specialized reconditioning mode on some advanced chargers might be needed to “wake up” the battery.
- Battery Not Holding a Charge: If your battery charges up but quickly loses power again, it might be old and nearing the end of its life. Car batteries typically last 3-5 years. Cold weather can also significantly impact a battery’s performance. A failing alternator could also be the culprit, as it’s responsible for charging the battery while the car is running.
- Slow Charging: Ensure your charger’s amperage setting is appropriate. A low amperage will naturally take longer. Also, verify that your battery terminals are completely clean and that the connections are solid.
Advanced Tips for Battery Longevity
- Regular Maintenance Charging: For vehicles stored for extended periods (e.g., classic cars, motorcycles, RVs), using a battery maintainer is invaluable. It prevents the battery from slowly discharging, which can lead to sulfation and permanent damage.
- Check Alternator and Starter: If your battery repeatedly dies even after charging, have your car’s charging system (alternator) and starting system (starter motor) tested by a professional. A faulty alternator won’t properly recharge your battery while driving.
- Test Battery Health: Periodically test your battery’s health with a dedicated battery tester. These devices can assess the battery’s cranking amps and overall condition, giving you an early warning before it completely fails.
- Keep it Clean: Regularly clean battery terminals and the top of the battery case. Dirt and moisture can create a conductive path, leading to parasitic drains.
Charging a car battery with a charger is a straightforward process when approached with caution and the right knowledge. By understanding your battery type, selecting an appropriate charger, following strict safety protocols, and connecting the cables correctly, you can confidently revive a dead battery and extend its lifespan. Remember that a well-maintained battery is key to reliable vehicle operation, and knowing these steps makes you a more self-sufficient and prepared car owner.
So, the next time your car refuses to start, you’ll be equipped not just to jump-start it, but to provide it with a proper, healthy charge. This simple skill can save you time, money, and a lot of headaches on the road. Drive safely, and keep those batteries charged!
🎥 Related Video: Best battery charging hack for dead batteries!!!!
📺 10 Minute Fix
Charging a dead battery is easy. Connect them in parallel then connect the charger to the know good battery. The charger will …
Frequently Asked Questions
What type of charger is best for car batteries?
A smart (automatic) charger is generally the best choice for car batteries. These chargers can detect the battery type, voltage, and condition, then adjust the charge rate accordingly, preventing overcharging and often offering reconditioning features.
Is it safe to charge a car battery overnight?
It can be safe to charge a car battery overnight if you are using a smart or automatic charger that has a “float” or maintenance mode. Manual chargers, however, should not be left unattended overnight as they can overcharge and damage the battery.
What are the signs of a bad car battery that won’t hold a charge?
Signs of a bad battery include slow engine cranking, dim headlights when starting, a rotten egg smell (indicating acid leaks or overcharging), a swollen battery case, or frequent need for jump-starts even after charging.
Should I add water to my car battery before charging?
If you have a standard “wet cell” or “flooded” lead-acid battery with removable caps, you should check the electrolyte levels. If low, add distilled water to cover the plates before charging. Do not add water to sealed batteries (AGM, Gel).
Can a battery charger damage my car’s electronics?
While modern smart chargers are generally safe, there’s always a slight risk, especially with older, non-regulated chargers or if a connection error occurs. To completely eliminate this risk, you can disconnect the battery’s negative terminal from the car before charging, as advised in your car’s owner manual.
How often should I charge my car battery if I don’t drive often?
If you don’t drive your car frequently, it’s a good idea to connect it to a battery maintainer or trickle charger periodically, or at least once a month. This prevents the battery from discharging and sulfating, extending its lifespan.