Prioritize safety by always wearing protective gear and ensuring proper ventilation when connecting a car battery charger. Begin by securely attaching the red (positive) clamp to the battery’s positive terminal. Then, connect the black (negative) clamp to the battery’s negative terminal or, for added safety, to an unpainted metal part of the car chassis away from the battery, before finally plugging in the charger to power. Following these straightforward steps ensures a safe and effective charge every time.
We’ve all experienced that sinking feeling. You hop into your car, turn the key, and instead of the reassuring rumble of the engine, you’re met with a weak click, or worse, absolute silence. A dead car battery is a frustratingly common problem, often striking at the most inconvenient times. Whether it’s after leaving your lights on, a long period of inactivity, or just an aging power source, dealing with a flat battery can leave you feeling stranded and unsure of your next move.
While calling for roadside assistance is always an option, knowing how to connect charger to car battery yourself can be a real lifesaver. It empowers you to tackle the problem independently, saving you time, money, and a good deal of stress. However, it’s not just about slapping some clamps on; doing it incorrectly can be dangerous, risking sparks, battery damage, or even personal injury. That’s why understanding the right steps and crucial safety measures is paramount.
This comprehensive guide is designed to walk you through the process step-by-step, just like a friend showing you the ropes. We’ll cover everything from understanding your battery and charger types to making the connections safely, monitoring the charge, and disconnecting properly. By the end, you’ll be confident in your ability to connect a charger to your car battery, ensuring your vehicle is ready to hit the road again with ease and peace of mind.
Key Takeaways
- Prioritize Safety: Always wear eye protection and gloves; ensure good ventilation.
- Identify Terminals: Correctly locate positive (+) and negative (-) battery posts.
- Connect Positive First: Attach the red (+) clamp securely to the positive terminal.
- Connect Negative Safely: Attach the black (-) clamp to an unpainted chassis point.
- Set Charger Properly: Select the correct voltage and charging mode before plugging in.
- Disconnect Safely: Remove the black (-) clamp first, then the red (+) clamp.
- Consult Manual: Always refer to your specific car charger’s instruction manual.
Quick Answers to Common Questions
Which car battery terminal should I connect first: positive or negative?
Always connect the positive (red) clamp of your charger to the positive (+) terminal on your car battery first. This is a crucial step for learning how to connect charger to car battery safely!
Do I need to disconnect the car battery from the car before charging it?
No, generally you don’t need to disconnect the battery from the car, especially with modern smart chargers. Just ensure your car’s ignition is off and all accessories are unplugged.
What happens if I connect the charger clamps to the wrong battery terminals?
Connecting them incorrectly (reversed polarity) can cause sparks, damage your charger, or even harm your car’s electrical system. Many modern chargers have built-in reverse polarity protection for safety.
Where should I connect the negative (black) charger clamp?
After connecting the positive, attach the negative (black) clamp to a clean, unpainted metal part of your car’s chassis or engine block, away from the battery itself. This grounds the connection and reduces spark risk.
Is it safe to just leave the charger on the battery overnight?
If you have a smart or “trickle” charger, absolutely! These chargers monitor the battery’s charge and stop/start as needed, making it safe to leave them connected for extended periods.
📑 Table of Contents
Understanding Your Car Battery and Charger Types
Before we dive into the nitty-gritty of how to connect charger to car battery, let’s get acquainted with the stars of our show: your car battery and the various types of chargers available. Knowing what you’re working with is the first step towards a safe and successful charge.
A Quick Look at Your Car Battery
Most modern cars use a 12-volt lead-acid battery. These batteries are designed to provide a burst of high current to start your engine and then be recharged by your car’s alternator. They consist of multiple cells, each producing about 2 volts, linked together to give you the familiar 12 volts. Crucially, every car battery has two terminals:
- Positive Terminal (+): Usually marked with a plus sign and often covered with a red cap or a red cable. This is where the electrical current flows out when powering the car.
- Negative Terminal (-): Marked with a minus sign and typically connected to a black cable, which often leads to the car’s chassis (ground). This is where the current returns.
Identifying these terminals correctly is perhaps the most important part of learning how to connect charger to car battery, as reversing the polarity can cause significant damage to your battery, charger, and even your car’s electronics.
Different Types of Car Battery Chargers
Not all battery chargers are created equal. Understanding the differences will help you choose the right one for your needs and ensure you know how to operate it safely.
-
Standard (Manual) Chargers:
These are the older generation of chargers. They typically offer a few different amperage settings (e.g., 2A for a slow charge, 10A for a medium charge, 20A for a fast charge). While effective, manual chargers require you to monitor the charging process closely. They don’t automatically shut off, meaning there’s a risk of overcharging if left unattended for too long. Overcharging can damage the battery and, in extreme cases, cause it to overheat and emit corrosive gases.
-
Smart (Automatic) Chargers:
These are the recommended choice for most users today. Smart chargers are microprocessor-controlled and can “read” your battery’s state. They feature multi-stage charging, which means they gradually increase and then decrease the charging current as the battery fills up. Once the battery is fully charged, they automatically switch to a “float” or “maintenance” mode, supplying a trickle charge to keep the battery topped off without overcharging. This makes them much safer and easier to use, especially if you’re not entirely sure how to connect charger to car battery and want minimal fuss.
-
Trickle Chargers/Battery Maintainers:
These are specialized smart chargers that deliver a very low amperage charge (typically less than 2 amps). Their primary purpose isn’t to recharge a dead battery quickly, but rather to maintain a battery’s charge over extended periods of inactivity. If you have a car, motorcycle, or RV that sits for weeks or months, a battery maintainer is perfect for preventing self-discharge and ensuring your battery is ready when you are. They are designed to be connected indefinitely.
-
Jump Starters (Briefly):
It’s important to distinguish these from chargers. A jump starter provides a quick burst of power to start a dead engine, similar to jump-starting with another car. It does not actually charge the battery. While incredibly useful for emergencies, it’s not designed for the sustained charging we’re discussing here.
For most situations, especially for those learning how to connect charger to car battery, a smart or automatic charger is your best bet due to its safety features and ease of use. They significantly reduce the risk of user error and battery damage.
| Charger Type | Key Features | Ideal Use Case | Safety & Ease of Use |
|---|---|---|---|
| Manual/Standard Charger | Basic settings (e.g., 2A, 10A, 20A), requires monitoring, no automatic shut-off. | Occasional charging, full discharge recovery (with care). | Lower safety (risk of overcharging), requires user knowledge. |
| Smart/Automatic Charger | Microprocessor controlled, multi-stage charging, automatic shut-off, float/maintenance mode. | Regular charging, preventing overcharging, extending battery life. | High safety (prevents overcharging), very easy to use (set it and forget it). |
| Trickle Charger/Maintainer | Low amperage (e.g., 0.75A – 2A), designed for long-term connection. | Maintaining charge during long periods of storage (seasonal vehicles). | High safety (prevents overcharging/undercharging), very easy to use for maintenance. |
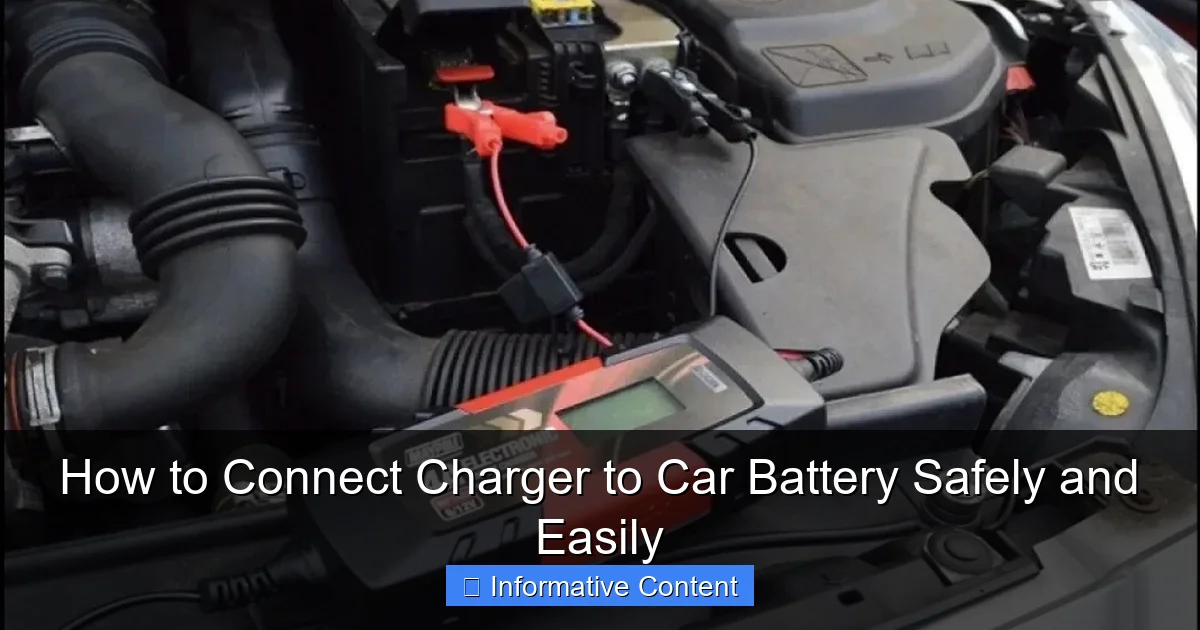
Essential Safety Precautions Before You Start
Safety first! This isn’t just a catchy phrase; it’s a critical mindset when you’re dealing with car batteries and electricity. Ignoring safety precautions when trying to figure out how to connect charger to car battery can lead to serious hazards, from electric shock to battery explosions. Take these steps seriously.
Visual guide about connect charger to car battery
Image source: hips.hearstapps.com
Gather Your Gear
Before you even open your car’s hood, make sure you have the right tools and protective equipment:
- Safety Glasses: Non-negotiable! Batteries contain sulfuric acid, which is highly corrosive. Splashes can cause permanent eye damage.
- Gloves: Protect your hands from acid, dirt, and electrical currents.
- Wire Brush or Battery Terminal Cleaner: Essential for removing corrosion from battery terminals.
- Wrench (Optional): If you need to remove battery hold-downs or loosen terminal clamps to clean them thoroughly.
- Your Battery Charger: Of course! Make sure it’s in good working order, with no frayed cables or damaged clamps.
- Baking Soda and Water Mixture: Keep this handy. It neutralizes battery acid in case of a spill.
Choose a Safe Environment
Where you choose to work is almost as important as how to connect charger to car battery itself.
- Ventilation is Key: When a battery charges, it can release hydrogen gas, which is highly flammable and explosive. Always work in a well-ventilated area, like outdoors or an open garage. Never charge a battery in an enclosed space.
- No Sparks, No Flames: Keep cigarettes, lighters, and anything that can create a spark away from the battery. This includes tools that might accidentally short-circuit.
- Flat, Stable Surface: Ensure your car is parked on a flat, stable surface, with the parking brake engaged, to prevent it from rolling.
- Away from Fuel: Make sure the charger and cables are kept clear of fuel lines or any flammable materials in the engine bay.
Check Your Battery’s Health
A quick visual inspection of your battery can reveal potential issues that might make charging unsafe or ineffective.
- Look for Damage: Inspect the battery case for cracks, bulges, or leaks. If you see any of these, especially fluid leaking, do NOT attempt to charge it. A damaged battery is extremely dangerous and should be replaced by a professional.
- Corrosion Check: Look at the terminals. White or greenish powdery buildup (corrosion) is common. While unsightly, it can also impede the charging process. You’ll need to clean this before connecting the charger.
- Fluid Levels (for unsealed batteries): If you have an older, non-sealed battery with removable caps (less common in modern cars), check the electrolyte levels. If low, top up with distilled water (never tap water) to the recommended level before charging. Sealed, maintenance-free batteries do not require this step.
By taking these essential safety steps, you significantly reduce any risks associated with charging your car battery. Now, let’s move on to the actual connection process.
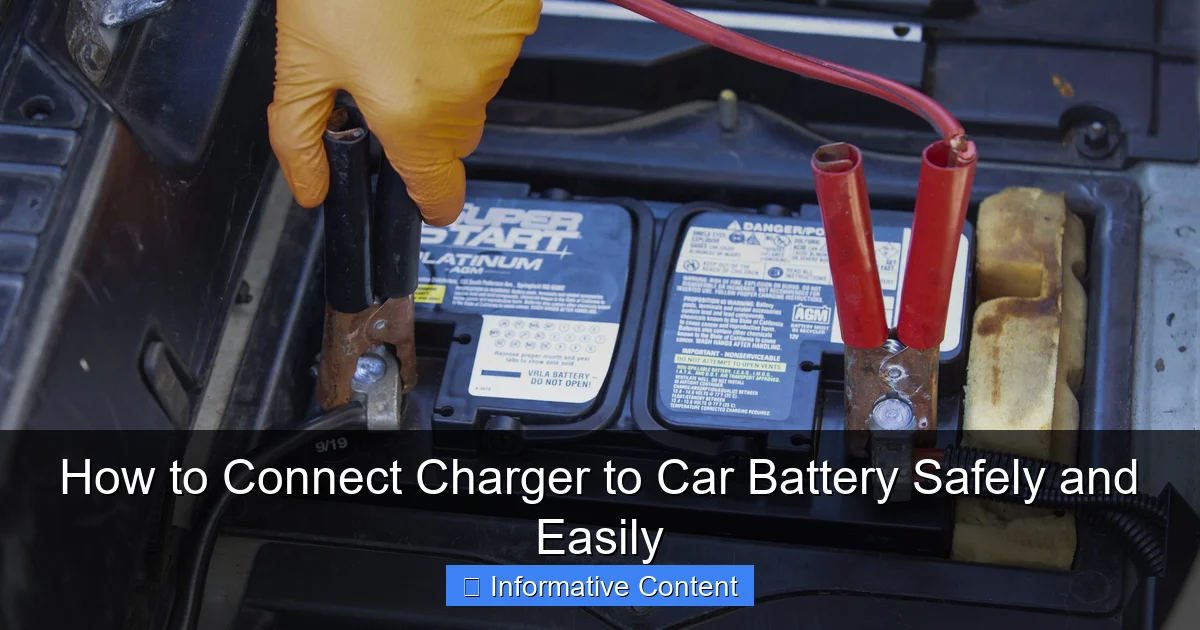
Step-by-Step Guide: How to Connect Charger to Car Battery
Alright, you’ve got your gear, you’re in a safe spot, and your battery looks good. It’s time to learn the precise steps on how to connect charger to car battery. Pay close attention to the order of operations, as this is crucial for safety.
Visual guide about connect charger to car battery
Image source: thepowerfacts.com
Prepare the Battery and Charger
- Turn Off Everything: Ensure your car’s engine is off, and all accessories (lights, radio, climate control) are turned off. This prevents any sudden surges or damage to electronics.
- Locate the Battery: Most car batteries are under the hood, but some vehicles place them in the trunk or even under the back seat. Consult your owner’s manual if you can’t find it.
- Clean the Terminals: If you noticed corrosion during your safety check, now’s the time to clean it. Use a wire brush or a specialized battery terminal cleaner to scrub away any buildup from both the positive and negative terminals. A clean connection ensures efficient current flow.
- Position the Charger: Place your battery charger on a stable surface, as far away from the battery as the cables allow. This helps minimize the risk of sparks near the battery’s vent caps, where flammable hydrogen gas might accumulate. Make sure the charger is unplugged from the wall outlet and turned OFF.
The Critical Connection: Positive to Positive
This is the first actual connection you’ll make, and it’s straightforward:
Connect the red (+) positive clamp from your charger to the positive (+) terminal on your car battery.
- Make sure you get a firm, secure connection. The clamp should not be wobbly or easily dislodged.
- Double-check that you’re attaching it to the red cable and the terminal marked with a plus sign.
This step establishes the positive electrical path. Remember, when learning how to connect charger to car battery, always start with the positive connection.
The Negative Connection: A Grounded Approach
This is arguably the most critical step for safety when connecting a charger to a battery that is still in the car. It’s where many people make a mistake.
Do NOT connect the black (-) negative clamp directly to the negative (-) terminal of the battery if the battery is still in the vehicle.
Why? When you make the final connection, there’s a small chance of a spark. If that spark occurs directly over the battery, it could ignite any hydrogen gas that might have accumulated, leading to an explosion. Instead, we use a grounding point.
Connect the black (-) negative clamp from your charger to an unpainted, grounded metal part of your car’s chassis, at least a foot or more away from the battery and any fuel lines.
- Look for a solid metal bolt, engine hoist bracket, or frame component. Ensure it’s clean and free of paint, rust, or grease for a good electrical connection.
- The goal is to provide a good ground connection away from the potential explosive gases of the battery.
- Exception: If you have a smart charger specifically designed for in-vehicle charging and its manual instructs you to connect the negative directly to the battery’s negative terminal, you can follow that. Also, if the battery is completely removed from the car and is on a workbench, you can typically connect the negative clamp directly to the negative terminal. But for most scenarios with the battery in the car, the chassis ground method is safer. This detail is an important nuance when understanding how to connect charger to car battery safely.
Powering Up the Charger
Once both clamps are securely attached to their respective points:
- Plug It In: Now, you can safely plug your charger into a standard wall outlet.
- Turn On and Select Settings: Turn the charger ON. If you have a manual charger, select the appropriate amperage setting (e.g., 2A for a slow charge, 10A for a faster charge). If you have a smart charger, it will often automatically detect the battery type and state, and you might just need to press a start button or select a mode. Always refer to your charger’s manual for specific operating instructions.
- Monitor Initial Signs: Listen for any unusual sounds and check for indicator lights. Most smart chargers will show a “charging” indicator.
You have successfully learned how to connect charger to car battery! Now, let’s talk about the charging process itself.
Charging Process and Disconnecting Safely
With the charger connected and running, the next phase involves monitoring the process and knowing exactly when and how to disconnect everything safely. This part is just as vital as the initial connection when learning how to connect charger to car battery.
Monitoring the Charge
Depending on your charger type, monitoring can be a passive or active process:
- Smart Chargers: These are largely “set it and forget it.” They will typically have indicator lights that show the charging status (e.g., “charging,” “charged,” “maintenance mode”). Some even have digital displays showing voltage or percentage of charge. You don’t need to constantly hover over them, but it’s good to periodically check that everything appears normal.
- Manual Chargers: With manual chargers, you need to be more vigilant. You might observe a voltage meter slowly rising. It’s crucial not to overcharge, as this can severely damage your battery.
How long does it take? This is a common question, and the answer varies widely:
- Battery Size: Larger batteries (e.g., for trucks) take longer than smaller ones (e.g., for compact cars).
- Discharge Level: A completely dead battery will take significantly longer than one that’s just a bit low.
- Charger Amperage: A 2-amp “trickle” charge could take 24-48 hours or more for a deeply discharged battery, while a 10-amp charger might do the job in 6-12 hours.
- Battery Health: An old or failing battery might never take a full charge.
As a general rule, a typical car battery (around 60 Amp-hours) that’s moderately discharged might take 4-8 hours with a 10-amp smart charger to reach a full charge. Always refer to your charger’s manual for estimated charging times based on its amperage and your battery’s capacity.
When the Battery is Fully Charged
Knowing when to stop is key:
- Smart Charger Indication: The easiest way. Your smart charger will typically display a “fully charged” light, “float mode” indicator, or a green light.
- Voltage Reading: A fully charged 12-volt lead-acid battery should read around 12.6 to 12.8 volts (or slightly higher if it’s just come off the charger, then it will settle). You can check this with a multimeter after disconnecting the charger and letting the battery rest for an hour.
- Specific Gravity (for unsealed batteries): For batteries with removable caps, a hydrometer can measure the specific gravity of the electrolyte. A reading of 1.265 to 1.280 indicates a full charge. This method is more advanced and less commonly used today.
The Disconnection Dance: Reverse Order for Safety
Disconnecting the charger is just as important as connecting it, and it follows a specific, safe sequence:
- Turn OFF and Unplug the Charger: Before touching any clamps, first turn off the charger’s power switch, then unplug it from the wall outlet. This ensures no electricity is flowing through the clamps when you remove them.
- Disconnect the Negative (-) Clamp: Carefully remove the black (-) negative clamp from the chassis ground point on your car. Again, this is the first clamp to be removed to prevent any accidental sparks near the battery itself.
- Disconnect the Positive (+) Clamp: Finally, remove the red (+) positive clamp from the positive (+) battery terminal.
- Stow Charger and Cables: Store your charger and cables neatly and safely for future use.
Congratulations, you’ve not only mastered how to connect charger to car battery, but also how to safely disconnect it!
Troubleshooting Common Issues and Battery Maintenance Tips
Even with the best intentions and knowledge of how to connect charger to car battery, sometimes things don’t go as planned. Here are some common issues you might encounter and valuable tips to keep your battery healthy and avoid future problems.
Charger Not Working?
You’ve followed all the steps, but your charger just isn’t showing signs of life or charging the battery. What gives?
- No Power to Charger: Sounds simple, but check if the charger is firmly plugged into a working wall outlet. Test the outlet with another appliance if unsure. Check the charger’s fuse, if it has one.
- Bad Connection: Are the clamps making solid contact? Corrosion on battery terminals or the chassis ground point can prevent a good electrical path. Clean them thoroughly and re-attach the clamps.
- Charger Settings: For manual chargers, ensure you’ve selected the correct voltage (e.g., 12V) and amperage for your battery.
- Completely Dead Battery: Some smart chargers have safety features that prevent them from starting a charge if the battery voltage is extremely low (e.g., below 2-3 volts). They might interpret it as a faulty battery. In such cases, you might need a specialized charger with a “repair” or “boost” mode, or try to “wake up” the battery with a brief jump-start from another vehicle before connecting the charger.
- Faulty Charger: If none of the above work, and you’ve confirmed the battery isn’t completely destroyed, your charger itself might be faulty.
Battery Still Dead After Charging?
You connected the charger, let it run, disconnected it, and… still a dead car. Don’t despair, but it likely points to a bigger issue.
- Faulty Battery: Batteries don’t last forever. If your battery is old (typically 3-5 years) or has been severely discharged multiple times, it might have developed internal damage (like sulfation or a bad cell) that prevents it from holding a charge. In this case, it needs replacement. You can have it tested at an auto parts store.
- Parasitic Drain: Something in your car could be drawing power even when the engine is off. This is called a parasitic drain. It could be a faulty interior light switch, a glove box light staying on, an aftermarket accessory wired incorrectly, or even a short circuit. Finding a parasitic drain often requires a multimeter and some diagnostic skills or a trip to a mechanic.
- Alternator or Starter Issue: If your battery charges up fine but then dies again after a short drive, your car’s alternator might not be recharging it while the engine is running. Conversely, if the car just won’t crank strongly even with a fully charged battery, your starter motor could be failing. These are mechanical issues that require professional diagnosis and repair.
Maximizing Your Battery’s Lifespan
Prevention is always better than cure! Here are some tips to extend the life of your car battery and reduce how often you need to remember how to connect charger to car battery:
- Keep it Clean: Regularly inspect and clean your battery terminals to prevent corrosion buildup, which can hinder charging and starting.
- Check Fluid Levels (if applicable): For older, non-sealed batteries, periodically check the electrolyte levels and top up with distilled water as needed.
- Avoid Deep Discharges: Try not to let your battery go completely flat. If your car sits for long periods, consider connecting a battery maintainer.
- Regular Driving: Short, frequent trips often don’t allow your alternator enough time to fully recharge the battery. Take your car for longer drives occasionally to ensure the battery gets a good top-off.
- Insulate in Extreme Weather: Extreme hot or cold weather can reduce battery life. In very cold climates, a battery blanket can help, and in hot climates, ensuring good ventilation around the battery is beneficial.
- Test Regularly: Have your battery load-tested by a professional annually, especially as it approaches three years old. This can help you identify a weakening battery before it leaves you stranded.
Conclusion
Learning how to connect charger to car battery is a practical skill that every car owner can benefit from. It grants you independence, saves you money, and allows you to react quickly when that familiar “click-click-click” greets you instead of a roar. We’ve covered the crucial steps, from understanding your equipment and prioritizing safety to making the correct connections, monitoring the charge, and finally, disconnecting everything in the right order.
Remember, safety is not optional. Always wear your protective gear, work in a well-ventilated area, and follow the sequence of connections and disconnections carefully. Opting for a smart, automatic charger can significantly simplify the process and minimize risks, making it even easier to handle this common automotive task.
While this guide equips you with the knowledge to charge your battery, don’t forget that a recurring dead battery might indicate a deeper issue with your battery or car’s electrical system. Knowing when to charge and when to seek professional help is also part of being a responsible car owner. With these insights, you’re now well-prepared to keep your car’s heart beating strong and avoid those dreaded dead battery moments. Happy driving!
🎥 Related Video: How to charge 12v car battery
📺 GLC HOW?
Frequently Asked Questions
What is the correct order to connect a charger to a car battery?
First, ensure your car is off and the charger is unplugged from the wall outlet. Connect the red positive (+) clamp of the charger to the positive (+) terminal of the car battery. Next, connect the black negative (-) clamp to an unpainted metal part of the car’s frame, away from the battery itself, or directly to the negative terminal if using a modern spark-proof charger.
What safety precautions should I take when connecting a car battery charger?
Always wear safety glasses and gloves to protect against acid splashes or electrical sparks. Ensure you are in a well-ventilated area to dissipate any hydrogen gas produced during charging, which is highly flammable. Avoid smoking or open flames near the battery.
How do I properly disconnect the car battery charger after use?
To safely disconnect the car battery charger, reverse the connection order. First, unplug the charger from the AC power outlet. Then, remove the black negative (-) clamp from the car’s frame or the negative terminal, followed by the red positive (+) clamp from the positive battery terminal.
Can I connect the charger directly to the car battery while it’s still in the vehicle?
Yes, you can typically connect the charger to the car battery while it’s still installed in the vehicle. Just make sure the vehicle’s ignition is off and all accessories are disconnected to prevent electrical damage or draining. Always refer to your car’s owner manual for specific recommendations or warnings.
My car battery is completely dead; will a standard charger still work?
If your car battery is completely dead (below a certain voltage), many standard chargers may struggle to detect it and begin charging. You might need a charger with a “repair” or “desulfation” mode, or one specifically designed for deeply discharged batteries. Alternatively, a jump start might be needed first to bring the voltage up slightly before connecting a standard charger.
Where should the negative clamp of the car battery charger be connected if not directly to the battery?
When charging a car battery that is still in the vehicle, it’s often recommended to connect the negative (-) clamp of the charger to an unpainted metal part of the car’s engine block or frame, away from the battery. This helps prevent sparks near the battery, which could ignite hydrogen gas. However, if your charger has a spark-proof feature, or if the battery is outside the car, direct connection to the negative terminal is acceptable.