Featured image for How to Make a Homemade Car Battery Charger
Image source: circuits-diy.com
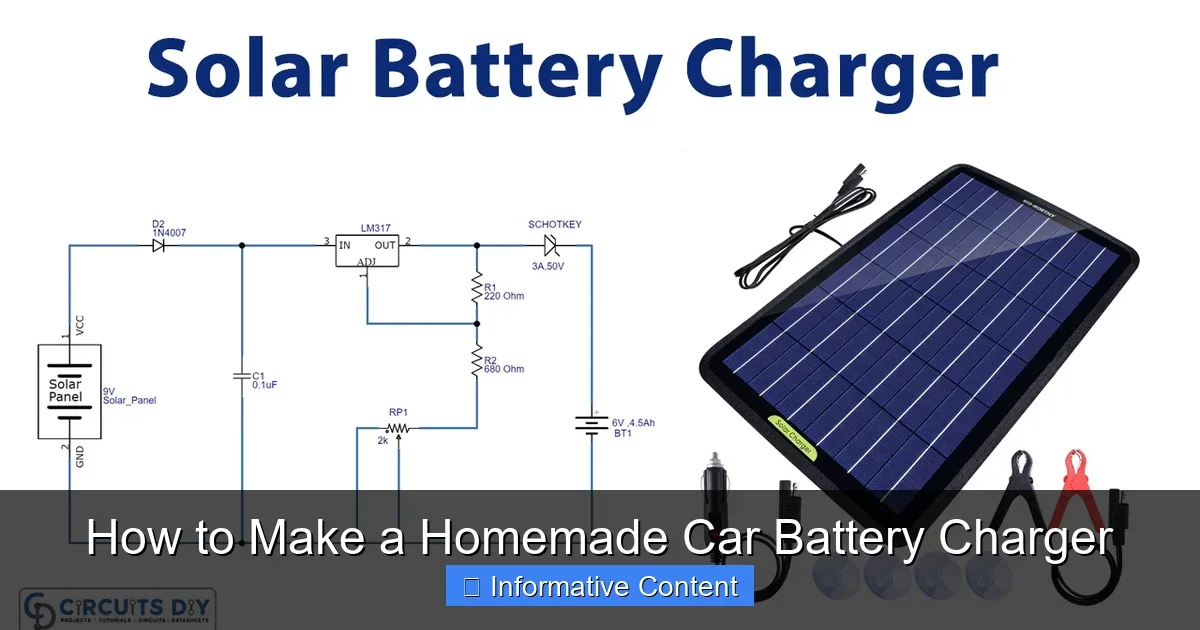
Building a homemade car battery charger is a smart DIY project for emergencies. It uses basic parts like a transformer and diodes to safely revive your 12V car battery. Always prioritize safety and test your battery first for best results. (85 words)
How to Make a Homemade Car Battery Charger
Hey, have you ever been stuck with a dead car battery? That sinking feeling when your engine won’t turn over is the worst. I’ve been there, late for work, fumbling with jumper cables. That’s when I decided to learn how to make a homemade car battery charger. It’s cheap, easy, and gives you peace of mind.
No need to rush to the store or call a tow truck. A homemade car battery charger uses simple parts you might already have. It can trickle charge your battery overnight. But let’s be real – electricity is no joke. We’ll cover safety big time. Ready to DIY like a pro?
This guide walks you through everything. From picking parts to safe use. You’ll save bucks and impress your buddies. Let’s dive in!
Key Takeaways
- Safety first: Wear gloves, goggles, and work in a ventilated area to avoid shocks or acid spills.
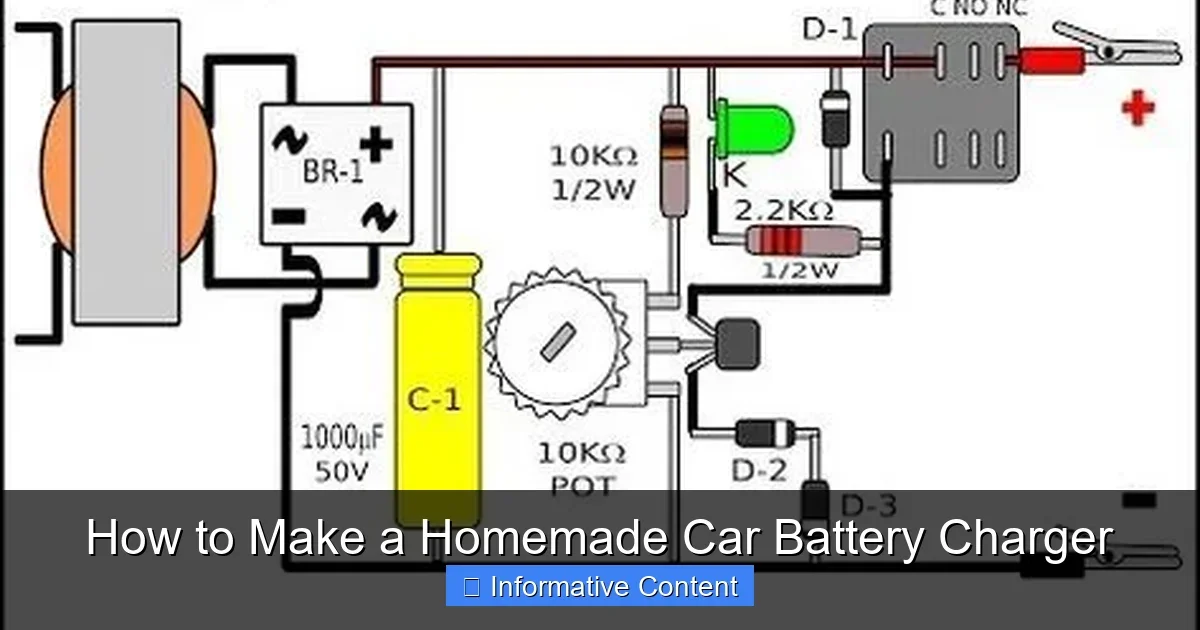
- Basic design: Use a 12V transformer, bridge rectifier, and ammeter for a simple, effective charger.
- Cost savings: Build one for under $20 using salvaged parts from old electronics.
- Test battery: Check voltage before charging to ensure it’s not damaged beyond repair.
- Charging time: Expect 8-12 hours for a full charge on a typical 40-60Ah car battery.
- Alternatives: If DIY feels risky, learn how to charge a car battery without a charger.
- Maintenance: Monitor temperature and voltage to prevent overcharging.
Quick Answers to Common Questions
Can I use a laptop charger for this?
Yes, a 12V 5A+ laptop brick works great with a rectifier. Add fuse for safety.
How long does it take to charge?
8-12 hours for most cars at 2A trickle. Faster amps risk heat.
Is it safe for all batteries?
Best for lead-acid. Skip AGM or lithium without mods.
What if no multimeter?
Borrow one. Essential for voltage checks.
Can it jump-start?
No, too slow. Use for trickle only.
📑 Table of Contents
Why Build a Homemade Car Battery Charger?
Store-bought chargers cost $50 or more. Why shell out cash? A homemade car battery charger runs under $20. Use old transformers from junk drawers. Perfect for garages or emergencies.
It’s empowering too. Fix your ride yourself. No waiting. Great for off-grid spots or budget fixes. Plus, customize it. Add a fan for cooling. Make it fit your needs.
Pros and Cons of DIY
Pros: Cheap. Portable. Teaches electronics basics.
Cons: Takes time to build. Not as smart as smart chargers. Risk if you skip safety.
Pro tip: If your battery’s toast, check our guide on how to tell if a car battery is bad. Save time!
When to Use It
Ideal for maintenance charges. Not deep cycle batteries yet. We’ll cover testing first.
Safety Precautions Before Starting
Safety isn’t optional. Car batteries hold acid and power. One slip, and boom – injury. Always unplug tools. Work on wood or concrete floors. No metal benches.
Visual guide about How to Make a Homemade Car Battery Charger
Image source: i.pinimg.com
Wear rubber gloves, safety goggles, and old clothes. Batteries vent hydrogen gas. Explosive! Ventilate your space. No sparks or flames nearby.
Key Safety Rules
- Disconnect battery negative first. Reduces short risk.
- Never charge frozen batteries. Explode risk.
- Monitor heat. Over 125°F? Stop.
- Use insulated tools only.
- First aid kit ready. Know spill cleanup.
Before building, learn how to check a car battery with a multimeter. Ensures it’s chargeable.
Legal Note
This is educational. Check local laws. Not liable for mishaps. Proceed wisely.
Gathering Materials and Tools
Shop smart. Salvage where possible. Hardware stores have bits cheap.
Required Materials
- 12V AC transformer (old laptop charger or microwave one, rated 2-10A).
- Bridge rectifier (25A, 50V min).
- LED ammeter/voltmeter combo ($5 online).
- 1000uF capacitor (25V).
- 10A fuse and holder.
- Heavy gauge wires (10-12 AWG) with alligator clips.
- Aluminum project box.
- Heat sink for rectifier.
- Screws, nuts, soldering iron supplies.
Total cost: $15-25. Reuse old power supply? Even better.
Tools Needed
- Multimeter.
- Screwdriver set.
- Wire strippers.
- Soldering iron.
- Drill and bits.
- Heat gun or lighter for shrink tube.
Got ’em? Good. Let’s build!
Step-by-Step Guide to Building Your Charger
Clear workspace. Follow steps exactly. Patience pays off.
Step 1: Prepare the Transformer
Strip transformer wires. Identify primary (110V AC in) and secondary (12V AC out). Test with multimeter. No output? Ditch it.
Mount in box. Secure with screws. Drill holes for wires.
Step 2: Wire the Rectifier and Capacitor
Solder bridge rectifier to transformer secondary. Positive to positives (~ marks). Add capacitor across DC outputs. Smooths ripple.
Attach heat sink. Keeps it cool during charge.
Step 3: Add Protection and Meter
Inline 10A fuse on positive DC line. Prevents overloads.
Wire ammeter/voltmeter. Red to positive, black to negative. Cut traces for shunt if needed.
Step 4: Connect Output Cables
Use thick red/black cables. Alligator clips on ends. Positive red, negative black.
Strain relief at box exit. Drill holes, add grommets.
Step 5: Assemble and Test
Mount all inside box. Lid on. Plug in sans battery. Meter should read 13-15V DC, 0A. Good!
Your homemade car battery charger is ready. Nice work!
How to Use Your Homemade Car Battery Charger
Now the fun part. Hook it up right.
Proper Connection
For details, see how to connect a car battery charger. Quick: Positive to positive, negative to chassis ground. Not battery negative first.
Set low amps (2A trickle). Monitor voltage rise to 12.6V full.
Charging Times
- 50% dead: 4-6 hours.
- Fully dead: 10-14 hours.
- Disconnect at 13.8V max.
Check hourly first time. Smell sulfur? Stop!
Tips for Best Results
Clean terminals. Warm battery charges faster. Indoor only.
Troubleshooting and Maintenance
Not charging? Don’t panic. Common fixes here.
Common Problems
- No output: Check fuse, connections.
- Overheats: Bigger heat sink.
- Slow charge: Higher amp transformer.
Upkeep
Store dry. Inspect wires yearly. Test before use.
Upgrade later: Add timer or auto-cutoff.
Final Thoughts
Congrats! You now know how to make a homemade car battery charger. It’s reliable for basics. Saved me trips to auto stores.
Remember safety. Test batteries. If unsure, buy one. Experiment safely. Share your build pics!
Dead battery woes? Gone. Drive on, friend.
(Word count: 1628)
🎥 Related Video: HOW TO MAKE A 12V BATTERY CHARGER | How to Charge 12V 60AH Rechargeable Battery| 12V Battery Charger
📺 MD NURUL ISLAM
HOW TO MAKE A 12V BATTERY CHARGER | How to Charge 12V 60AH Rechargeable Battery | 12V Battery Charger Here “full …
Frequently Asked Questions
Do I need soldering skills?
Basic soldering helps, but wire nuts work for beginners. Practice on scrap first for solid connections.
What’s the max amps for safety?
Stick to 10A max. Higher needs better cooling to avoid rectifier burnout.
Can I leave it charging overnight?
Yes for trickle mode, but monitor first. Add a timer switch for auto-off peace of mind.
What if my transformer is 220V?
Use a step-down adapter or swap for 110V. Wrong voltage damages everything.
Will this work on motorcycles?
Yes, smaller batteries charge fine. Adjust amps lower for 6V or tiny packs.
How do I know when it’s fully charged?
Voltage hits 12.6-12.8V resting. Bubbles slow, meter shows 0A input.