Hooking up a car battery charger is a straightforward process when you prioritize safety and follow the correct steps. Always wear protective gear, ensure good ventilation, and make connections in the right order: positive (red) clamp to the positive terminal, then negative (black) clamp to a grounded metal part of the car (or the negative terminal if the battery is removed). Finally, plug in the charger and turn it on. Disconnect in reverse order, always unplugging the charger and turning it off first to ensure a safe operation.
How to Hook Up Car Battery Charger
Picture this: You rush out to your car, ready to start your day, turn the key, and… nothing. Or perhaps just a sluggish groan from under the hood. A dead car battery is an incredibly common and frustrating experience, often striking at the most inconvenient times. While jump-starting your car is one solution, it’s not always feasible or the best long-term fix. Often, the best course of action is to give your battery a proper charge with a car battery charger.
Knowing how to hook up a car battery charger correctly can save you a tow, an expensive roadside assistance call, and a lot of hassle. It’s a valuable skill that empowers you to take control of your vehicle’s maintenance. But like any task involving electricity and car components, there’s a right way and a wrong way to do it. The wrong way can lead to damaged equipment, a dangerous electrical shock, or even a battery explosion. The right way, however, is safe, straightforward, and incredibly effective.
This comprehensive guide will walk you through every step of how to hook up a car battery charger safely and efficiently. We’ll cover everything from understanding your battery and charger to crucial safety precautions, the exact connection sequence, and what to do once your battery is charged. So, grab your safety gear, and let’s get your car back to life!
Key Takeaways
- Safety First: Always wear protective eyewear and gloves. Ensure good ventilation to prevent the buildup of explosive hydrogen gas.
- Clean Terminals: Before connecting, clean battery terminals thoroughly to ensure a good electrical connection and efficient charging.
- Correct Connection Order: Connect the red positive (+) clamp to the positive (+) battery terminal first. Then, connect the black negative (-) clamp to an unpainted metal part of the engine block or car frame, away from the battery.
- Power On Last: Only plug the charger into the electrical outlet and turn it on *after* all battery connections are secure to avoid sparks.
- Monitor Charging: Select the correct charging mode for your battery type and voltage. Monitor the charger’s progress and the battery’s condition during the charging process.
- Safe Disconnection: Always turn off and unplug the charger *first* before disconnecting the clamps. Disconnect the black negative (-) clamp first, followed by the red positive (+) clamp.
- Proper Charger Type: Use a charger appropriate for your battery type (e.g., lead-acid, AGM, Gel) and vehicle’s voltage (typically 12V). Smart chargers are recommended for optimal battery health.
Quick Answers to Common Questions
How long does it typically take to charge a car battery?
The charging time varies significantly depending on the battery’s discharge level, its size, and the charger’s output. A smart charger can take anywhere from 4 to 24 hours for a deeply discharged battery, while a trickle charger could take several days.
Can I leave a car battery charger hooked up overnight?
Yes, if you are using a modern “smart” charger or battery maintainer. These chargers automatically switch to a maintenance mode once the battery is full, preventing overcharging and damage. Older, non-smart chargers should not be left unattended for extended periods as they can overcharge the battery.
What if I connect the charger clamps backward?
Connecting the clamps backward (reverse polarity) can be dangerous. Most modern smart chargers have reverse polarity protection that will prevent damage to the charger and battery, often indicated by a warning light or alarm. However, older chargers may not have this protection, potentially causing sparks, damage to the battery or charger, or even an explosion.
Do I need to disconnect the car battery from the vehicle to charge it?
No, you generally do not need to disconnect the battery from the vehicle to charge it. Charging it in the car is usually safe and convenient, provided you follow the correct negative clamp grounding procedure (to a metal part of the car’s frame/engine, away from the battery).
What should I do if the battery charger sparks when I connect it?
If sparks occur when connecting the charger, immediately stop and re-evaluate your connections. Ensure the charger is turned off and unplugged before making any adjustments. Sparks are often caused by poor connections, reverse polarity, or attempting to connect the final clamp directly to the battery terminal (which is why grounding away from the battery is recommended for the negative clamp when the battery is in the car).
📑 Table of Contents
Understanding Your Car Battery and Charger
Before you even think about how to hook up a car battery charger, it’s essential to understand the basics of what you’re working with. Not all batteries are the same, and neither are all chargers.
Types of Car Batteries
Most modern cars use 12-volt lead-acid batteries. Within this category, you might encounter a few variations:
- Flooded/Wet Cell Batteries: These are the most common and traditional car batteries. They contain a liquid electrolyte solution and may require occasional topping off with distilled water.
- AGM (Absorbed Glass Mat) Batteries: These batteries use glass mats to absorb the electrolyte, making them spill-proof and more resistant to vibration. They often offer better performance and a longer lifespan.
- Gel Cell Batteries: Similar to AGM, these use a gel-like electrolyte. They are very resistant to vibration and leaks but require specific charging parameters.
It’s crucial to know your battery type because some chargers have specific settings for AGM or Gel batteries. Using the wrong setting can damage these battery types.
Types of Car Battery Chargers
Just as there are different batteries, there are also various types of chargers:
- Trickle Chargers: These deliver a low, steady current (usually 1-2 amps) over a long period. They are great for maintaining a charge on vehicles stored for extended periods but are too slow for a deeply discharged battery.
- Smart Chargers/Battery Maintainers: These are the most common and recommended type. They automatically monitor the battery’s voltage and adjust the charging current. Once the battery is fully charged, they switch to a maintenance mode, preventing overcharging. Many have settings for different battery types (e.g., AGM, Gel).
- Rapid Chargers: These deliver a higher current (10-20 amps or more) to quickly charge a depleted battery. While faster, they can potentially reduce battery lifespan if used too frequently or improperly.
- Jump Starter/Charger Combos: These are powerful units that can provide a quick burst of power to jump-start a car, as well as offering charging capabilities.
For general purposes and optimal battery health, a smart charger or battery maintainer is usually the best choice. Always check your charger’s manual for specific instructions and capabilities.
Prioritizing Safety Before You Begin
Visual guide about How to Hook Up Car Battery Charger
Image source: wikihow.com
Safety is paramount when you hook up a car battery charger. Car batteries contain corrosive acid and produce flammable hydrogen gas, which can explode if ignited. Electrical currents also pose a risk of shock. Don’t skip these crucial safety steps!
Gather Your Personal Protective Equipment (PPE)
- Safety Glasses or Goggles: Essential to protect your eyes from battery acid splashes or sparks.
- Heavy-Duty Gloves: Protect your hands from acid and provide some electrical insulation.
- Old Clothes: Battery acid can permanently damage clothing.
Ensure Proper Ventilation
Always work in a well-ventilated area. If you’re in a garage, open the garage door and any windows. Hydrogen gas can build up around the battery during charging, creating an explosive atmosphere.
Eliminate Sources of Ignition
No smoking, open flames, or sparks near the battery. This includes anything that could create a spark, such as metal tools dropping onto the battery terminals. Remove any jewelry that could accidentally bridge a connection and cause a short circuit.
Check the Battery’s Condition
Before you hook up a car battery charger, inspect the battery itself.
- Look for cracks, bulges, or leaks. A damaged battery might not be safe to charge.
- If it’s a non-sealed, flooded lead-acid battery, check the electrolyte levels. If low, add distilled water to just cover the plates before charging. Never add tap water.
- If the battery feels hot or is emitting a strong, sulfurous odor, do not charge it. It could be internally damaged and extremely dangerous.
Preparing Your Battery and Workspace
Once safety is addressed, it’s time to prepare your battery and charger for connection. A little prep work goes a long way.
Clean Battery Terminals
Corrosion (a white or bluish-green powdery substance) on battery terminals can impede the flow of electricity, making charging less efficient or even impossible.
- Disconnect the battery terminals if you plan to clean them thoroughly. (Remember, negative first, then positive).
- Use a wire brush or a specialized battery terminal brush to scrub away corrosion from both the terminals and the cable clamps.
- You can also mix a paste of baking soda and water to neutralize acid corrosion, applying it with an old toothbrush. Rinse with clean water and dry thoroughly.
- Reconnect your car’s cables (positive first, then negative) if you initially disconnected them.
Inspect Charger Cables and Clamps
Check the charger’s cables for any frays, cuts, or exposed wires. Ensure the clamps are clean and free of rust or debris that could hinder a good connection. Never use a damaged charger.
Decide: In-Vehicle or Removed Battery?
You generally have two options when you hook up a car battery charger:
- Charging In-Vehicle: This is the most common and easiest method. You simply connect the charger to the battery while it’s still in the car. This is safe as long as you follow the correct grounding procedure.
- Charging a Removed Battery: If you’ve removed the battery from the car (e.g., for storage, deep cleaning, or specific charging requirements), you’ll connect the charger directly to the battery’s terminals. Place the battery on a non-conductive surface, such as wood or plastic, in a well-ventilated area away from any flammable materials.
The Step-by-Step Guide to Hooking Up Your Car Battery Charger
Now for the main event: connecting your car battery charger. Remember, the sequence of connections is critical for safety.
Step 1: Position the Charger and Your Car
Park your car on a flat, dry surface and engage the parking brake. Turn off all accessories, lights, and the ignition. Ensure the charger is placed on a stable, non-conductive surface near the battery, but not directly on top of it. Make sure the charger is unplugged from the wall outlet and turned off before making any connections.
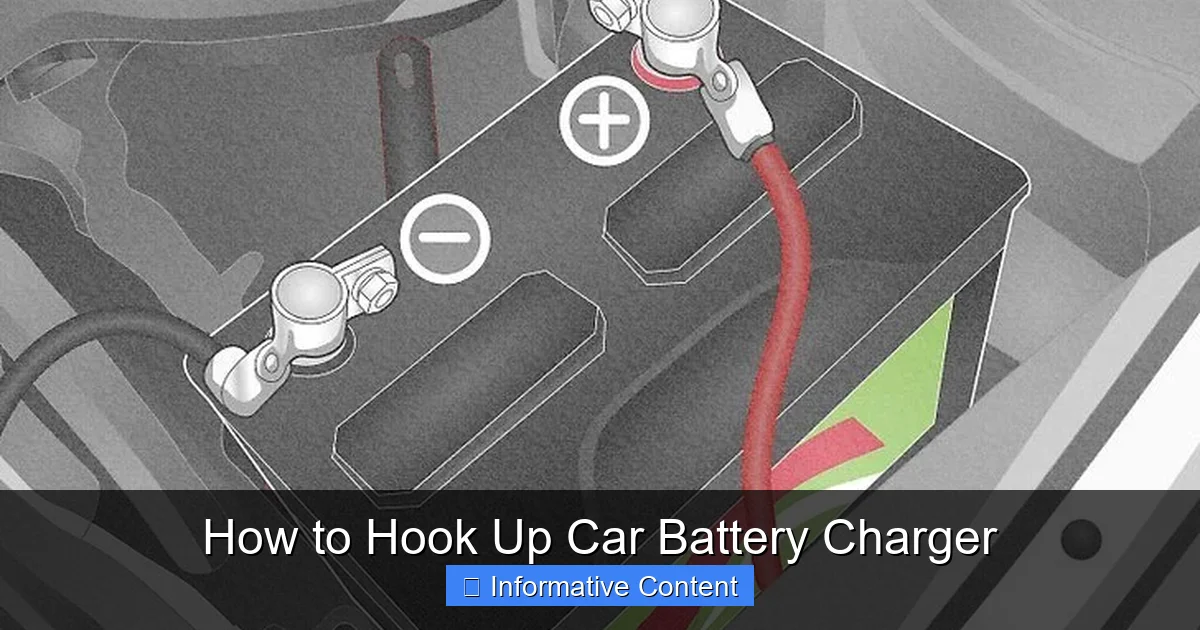
Step 2: Connect the Red Positive (+) Clamp
Locate the positive (+) battery terminal. It’s usually marked with a plus sign, a red cover, or a red cable.
- Take the red (positive) clamp from your charger.
- Firmly attach the red clamp to the positive (+) battery terminal. Ensure it makes a solid, metal-to-metal connection and won’t easily slip off.
Step 3: Connect the Black Negative (-) Clamp (Crucial Step!)
This step differs slightly depending on whether the battery is in the car or removed.
For Batteries in the Vehicle (Recommended Method):
- Locate an unpainted, metal part of the car’s frame or engine block, away from the battery and fuel lines. This provides a ground connection.
- Attach the black (negative) clamp to this ground point. This is done to minimize the risk of a spark occurring directly over the battery, where hydrogen gas might be present.
For Batteries Removed from the Vehicle:
- Attach the black (negative) clamp directly to the negative (-) battery terminal. This terminal is usually marked with a minus sign or a black cable.
Why the difference? When the battery is in the car, grounding away from the battery itself diverts any potential spark away from the battery’s volatile gasses. When removed, this risk is minimized, and direct connection is fine.
Step 4: Plug in the Charger and Select Settings
With both clamps securely connected, it’s now safe to plug your charger into a standard electrical outlet.
- Once plugged in, turn the charger on.
- Select the appropriate voltage (usually 12V for a car battery).
- Choose the correct battery type setting (e.g., flooded, AGM, Gel) if your charger has this option.
- Set the amperage if your charger offers different charging rates. For most applications, a smart charger will automatically determine the best rate. If manually setting, a slower charge (e.g., 2-4 amps) is generally better for battery health than a rapid charge.
Congratulations! You’ve successfully learned how to hook up a car battery charger. Now, let the charging begin!
Monitoring the Charging Process and What to Expect
Once your car battery charger is hooked up, don’t just walk away and forget about it. It’s a good idea to monitor the process, especially if you’re using an older, non-smart charger.
Charger Indicators
Most modern smart chargers will have indicator lights or a digital display showing the charging status (e.g., charging, fully charged, fault). Refer to your charger’s manual to understand what these indicators mean.
Charging Duration
How long it takes to charge a car battery depends on several factors:
- Battery Size (Ah): Larger batteries take longer.
- Discharge Level: A deeply discharged battery will take significantly longer than one that’s only slightly low.
- Charger Output (Amps): A 10-amp charger will charge faster than a 2-amp charger.
As a general rule of thumb, a completely dead 12V car battery can take anywhere from 4 to 24 hours to fully charge with a typical smart charger. A trickle charger could take days. Your smart charger should automatically shut off or switch to maintenance mode when done.
Troubleshooting Common Issues
- Charger Not Turning On: Check if it’s securely plugged in and the outlet has power. Ensure clamps are firmly connected.
- Battery Not Charging: Ensure connections are clean and tight. The battery might be too old or severely damaged to accept a charge. In this case, you might need a new battery.
- Charger Getting Hot: A little warmth is normal, but excessive heat could indicate a problem with the charger or battery. Disconnect and investigate.
Disconnecting Your Charger Safely and Post-Charge Tips
Just as crucial as connecting correctly is disconnecting safely. Reversing the connection process minimizes the risk of sparks.
Step 1: Turn Off and Unplug the Charger
Before touching any clamps, turn the charger off first. Then, unplug it from the electrical outlet. This eliminates any power flowing through the clamps.
Step 2: Disconnect the Black Negative (-) Clamp
Carefully remove the black (negative) clamp from the car’s ground point (or the battery’s negative terminal if you charged it removed from the car).
Step 3: Disconnect the Red Positive (+) Clamp
Now, remove the red (positive) clamp from the positive (+) battery terminal.
Step 4: Store Your Charger
Clean any dirt or debris from your charger and its cables. Wrap the cables neatly and store the charger in a dry, safe place for future use.
Post-Charge Tips
- Test the Battery: If possible, test your battery after charging to ensure it holds a charge. Many auto parts stores offer free battery testing.
- Start Your Car: Once disconnected, try starting your car. It should crank normally.
- Check for Underlying Issues: If your battery repeatedly dies, even after a full charge, there might be an underlying issue with your car’s charging system (alternator) or a parasitic draw. Have it checked by a mechanic.
- Regular Maintenance: For vehicles stored for long periods, consider using a battery maintainer to keep the battery topped off.
Learning how to hook up a car battery charger is a fundamental skill for any car owner. By following these detailed steps, prioritizing safety, and understanding your equipment, you can confidently revive a dead battery and keep your vehicle running smoothly. Remember, patience and adherence to the correct procedures are key to a safe and successful charge. Drive safely!
Frequently Asked Questions
What are the different types of car battery chargers?
Car battery chargers come in various types, including trickle chargers (slow, steady charge for maintenance), smart chargers/maintainers (automatic, safe for extended use, best for overall battery health), and rapid chargers (quick charging but can impact battery lifespan if overused). It’s important to choose one that matches your battery type and needs.
When should I charge my car battery?
You should charge your car battery if you notice slow cranking, dimming lights when starting, or if the car has been sitting unused for an extended period. Regular charging can extend battery life, especially if you take frequent short trips that don’t allow the alternator to fully recharge the battery.
Is it safe to charge a car battery indoors?
It is generally safe to charge a car battery indoors, provided you have excellent ventilation to prevent the buildup of explosive hydrogen gas. A garage with open doors and windows is suitable. Avoid enclosed spaces like small basements without proper airflow. Always prioritize safety and keep ignition sources away.
Can a battery charger fix a completely dead car battery?
A battery charger can often revive a completely dead car battery, assuming the battery is not physically damaged or suffering from internal short circuits. However, if a battery is very old or deeply discharged below a certain voltage threshold, it may not accept a charge or may not hold a charge for long, indicating it needs replacement.
How do I know when my car battery is fully charged?
Most modern smart chargers have indicator lights or a digital display that will show when the battery is fully charged, often switching from a “charging” status to “charged” or “maintenance.” For older chargers, you can use a voltmeter; a fully charged 12V car battery should read around 12.6 to 12.8 volts after resting for a few hours post-charge.
What maintenance should I do on my car battery?
Regular maintenance includes keeping the battery terminals clean and free of corrosion, ensuring the battery hold-down is secure, and for non-sealed batteries, checking electrolyte levels and topping up with distilled water if needed. Periodically checking the battery’s voltage and charging it when low can also significantly extend its lifespan.