Discover how to check a car battery with a voltmeter quickly and effectively. This comprehensive guide equips you with the knowledge to safely use a voltmeter, interpret crucial resting and charging voltage readings, and understand your battery’s health. Mastering this simple DIY skill can help you prevent unexpected car troubles and ensure your vehicle is always ready to go.
Key Takeaways
- Regular Checks Prevent Breakdowns: Proactively checking your car battery voltage with a voltmeter can help identify issues early, saving you from inconvenient and costly breakdowns.
- Your Voltmeter is Key: A digital multimeter, set to DC voltage, is an affordable and essential tool for accurately assessing your car battery’s state of charge and charging system health.
- Safety First: Always prioritize safety by wearing eye protection and gloves, removing jewelry, and ensuring the car is off before touching the battery terminals.
- Resting Voltage Tells a Story: A fully charged, healthy 12-volt car battery should read between 12.6 and 12.8 volts after resting for several hours. Readings below 12.4 volts indicate a need for charging or further investigation.
- Check the Charging System Too: With the engine running, a healthy charging system (alternator) should deliver 13.8 to 14.8 volts to the battery, ensuring it’s being properly recharged.
- Interpret Readings Wisely: Understand what different voltage ranges signify – from optimal health to needing a charge or replacement – to make informed maintenance decisions.
Quick Answers to Common Questions
What voltage indicates a fully charged car battery?
A fully charged 12-volt car battery should read between 12.6 and 12.8 volts when resting after the car has been off for several hours.
Can I use an analog voltmeter?
Yes, you can use an analog voltmeter, but digital multimeters are generally easier to read accurately for beginners, providing a precise numerical display.
What is a parasitic draw?
A parasitic draw occurs when an electrical component in your car continues to draw power from the battery even when the vehicle is turned off, slowly draining it over time.
Why should I wear safety glasses?
Wearing safety glasses is crucial because car batteries contain corrosive sulfuric acid, which can splash and cause severe eye injury if contact is made.
What’s the ideal charging voltage for a car battery?
When the engine is running, the ideal charging voltage for a car battery should be between 13.8 and 14.8 volts, indicating that the alternator is properly recharging the battery.
📑 Table of Contents
How to Check a Car Battery with a Voltmeter
That familiar click-click-click when you turn the key, or worse, the unnerving silence, often points to one common culprit: a dead car battery. It’s a frustrating experience that always seems to happen at the most inconvenient times. But what if you could foresee these issues, taking proactive steps before they leave you stranded? Learning how to check a car battery with a voltmeter is a straightforward, empowering skill that can save you a significant amount of hassle, time, and money.
Many drivers mistakenly believe that checking a car battery requires specialized tools or professional expertise. The truth is, with a simple digital voltmeter (also known as a multimeter) and a few minutes of your time, you can gain valuable insights into your car’s electrical health. This essential DIY diagnostic can tell you if your battery is holding a charge, if your charging system is working correctly, and when it might be time to consider a replacement.
This comprehensive guide will walk you through every step, from preparing safely to understanding what those numbers on your voltmeter mean. By the end, you’ll be confident in your ability to assess your car battery’s condition, helping you maintain a reliable vehicle and avoid unexpected breakdowns. Let’s get started on becoming your own car battery expert!
Why Your Car Battery’s Health Is Crucial
Your car battery isn’t just there to start your engine; it’s the cornerstone of your vehicle’s entire electrical system. It provides the initial burst of power needed to crank the engine, and once the engine is running, the alternator takes over, powering all electrical components and recharging the battery. A healthy battery ensures consistent starting power and stable operation for everything from your headlights to your infotainment system.
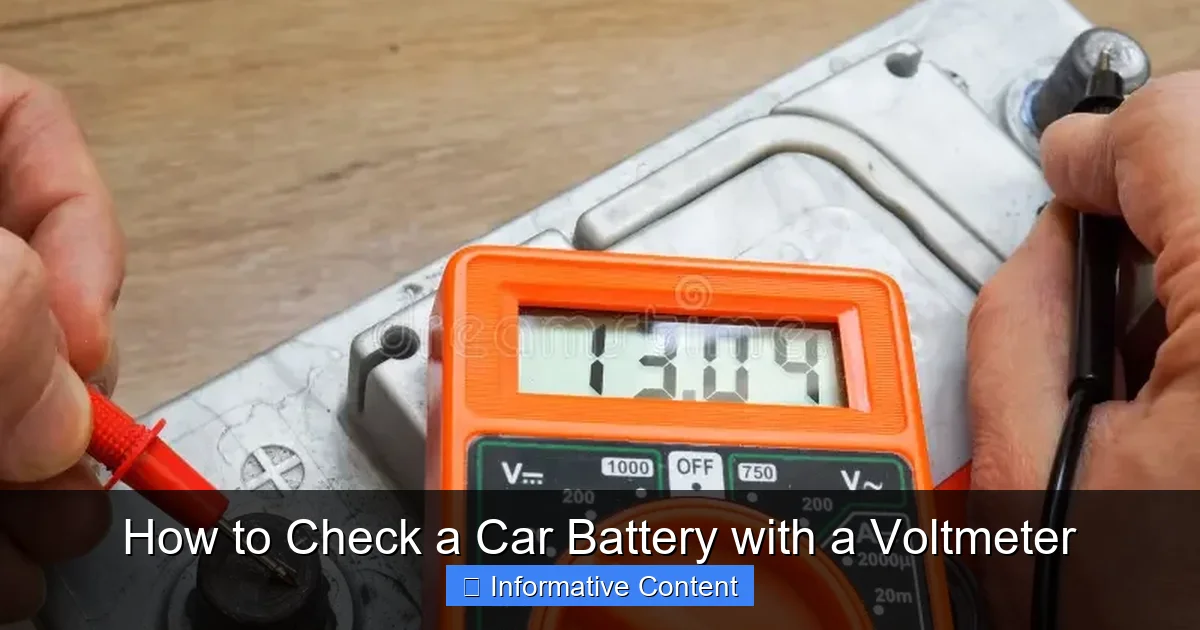
Visual guide about How to Check a Car Battery with a Voltmeter
Image source: thumbs.dreamstime.com
Car batteries, like all components, have a finite lifespan, typically lasting between 3 to 5 years. This lifespan can be shortened by factors such as extreme temperatures, frequent short drives (which don’t allow the battery to fully recharge), or even leaving electrical accessories on while the engine is off. Regularly checking your car battery with a voltmeter allows you to monitor its condition over time, spotting a decline before it leads to a complete failure.
Common Signs of a Weak Battery
- Slow Engine Crank: If your engine turns over sluggishly, especially during cold starts, it’s a primary indicator.
- Dim Lights or Electrical Issues: Headlights that dim when the car idles, or issues with power windows and radio, can point to low battery voltage.
- Battery Warning Light: A dashboard warning light (often shaped like a battery) means your charging system or battery needs attention.
- Corrosion: White or greenish buildup on the battery terminals can impede electrical flow and signal an issue.
- Age: If your battery is nearing or past its typical lifespan, it’s wise to check it more frequently.
Getting to Know Your Voltmeter
The voltmeter is the hero of our story. Simply put, it’s a device that measures electrical potential difference, or voltage, between two points. For car battery checks, you’ll be using the DC (Direct Current) voltage function on a multimeter, which is a versatile tool capable of measuring voltage, current, and resistance.
While both analog (needle and dial) and digital multimeters exist, a digital one is highly recommended for its ease of use and precise readings. They are inexpensive and widely available at most hardware or automotive stores.
Key Voltmeter Components
- Digital Display: Clearly shows your voltage reading.
- Rotary Dial: Used to select the measurement function. Look for the “V” with a straight line (or “VDC”) for direct current voltage.
- Probes: Two wires, typically red (+) and black (-), that connect to the battery terminals.
- Input Jacks: Where the probes plug in. The black probe goes into “COM” (common), and the red probe goes into the “VΩmA” or “V” jack.
Setting Up Your Voltmeter for a Car Battery
To measure your car’s 12-volt battery, turn the rotary dial to the DC Voltage setting. If your multimeter has an auto-ranging function, it will automatically select the correct range. If it’s a manual-ranging device, select the 20V DC range. This setting is high enough for a 12-volt battery but provides sufficient resolution for accurate readings.
Safety First: Preparing for the Test
Working with car batteries involves both electrical current and corrosive chemicals, so safety is paramount. Taking a few simple precautions will help ensure a safe and accurate testing process.
Essential Safety Gear
- Safety Glasses: Always wear eye protection. Battery acid can splash and cause severe eye injury.
- Gloves: Use work gloves or chemical-resistant gloves to protect your hands from dirt and potential battery acid.
- Remove Jewelry: Take off any metal rings, watches, or bracelets. These can create a dangerous short circuit if they accidentally touch both battery terminals.
- Ventilation: Work in a well-ventilated area. Batteries can emit hydrogen gas, which is highly flammable. Avoid open flames or sparks nearby.
Preparing Your Vehicle and Battery
- Turn Off the Car: Ensure your car’s engine is completely off, and the ignition key is removed.
- Turn Off Accessories: Switch off all lights, radio, air conditioning, and any other electrical accessories. This ensures an accurate “resting voltage” reading without any parasitic drain or load.
- Locate the Battery: Most car batteries are under the hood, but some vehicles place them in the trunk or under a rear seat.
- Identify Terminals: Locate the positive (+) and negative (-) terminals. The positive terminal usually has a plus sign and often a red cap. The negative terminal has a minus sign and typically a black cap or no cap.
- Clean Terminals (If Needed): If you notice any corrosion (a white, powdery, or greenish substance) on the terminals, carefully clean it with a wire brush and a battery terminal cleaner (or a baking soda and water paste). Rinse and dry thoroughly before testing, as corrosion can interfere with accurate readings.
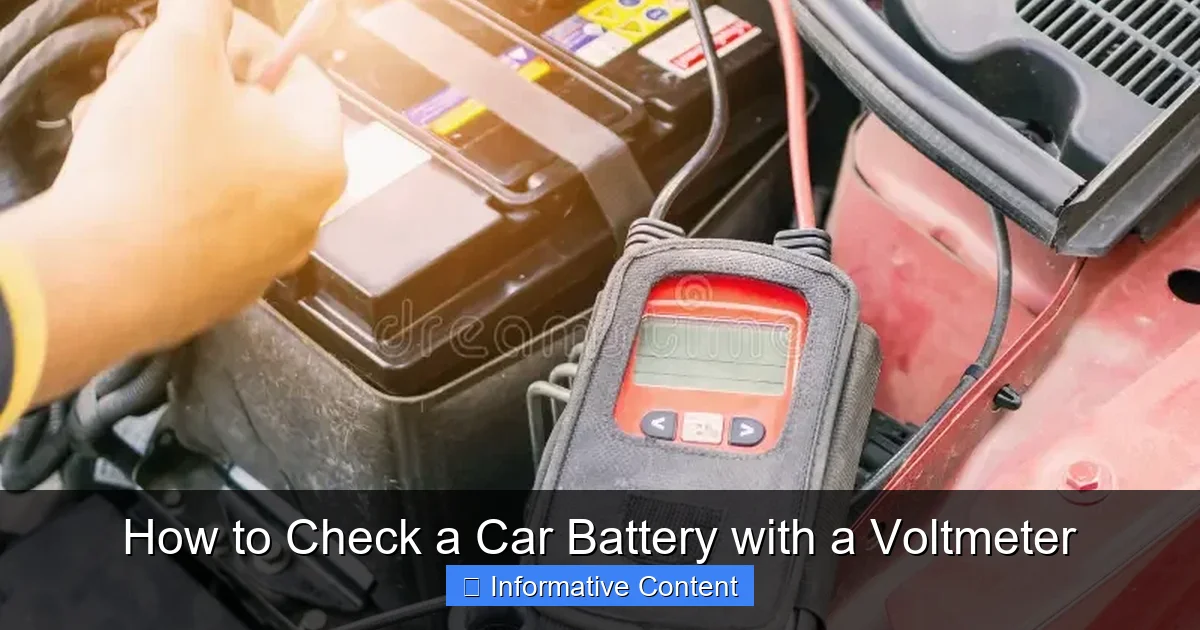
Step-by-Step Guide: How to Check a Car Battery with a Voltmeter
With safety measures in place and your voltmeter ready, let’s proceed with the actual tests. We’ll perform two key checks to assess your battery’s health and your car’s charging system.
1. Measuring Resting Voltage (Battery’s State of Charge)
This test reveals the charge level of your battery when it’s not under any load. For the most accurate “surface charge” free reading, your car should have been off for at least 3-4 hours, or ideally, overnight. This allows the battery’s voltage to stabilize.
- Set Your Voltmeter: Turn your multimeter’s dial to the DC Voltage (VDC) setting. If manual-ranging, select the 20V range.
- Connect the Probes:
- Carefully touch the red (positive) probe to the positive (+) battery terminal.
- Carefully touch the black (negative) probe to the negative (-) battery terminal.
Ensure firm contact. Avoid letting the probes touch any other metal components of the car simultaneously.
- Read the Display: The voltage reading will instantly appear on your voltmeter’s screen. Note this number.
Interpreting Resting Voltage Readings (12-Volt Battery)
- 12.6 – 12.8 Volts: Your battery is fully charged and in excellent health.
- 12.4 – 12.5 Volts: The battery is approximately 75% charged. It’s functional but might need a charge soon, especially in colder climates.
- 12.0 – 12.3 Volts: The battery is around 50% charged. This indicates it needs charging. At this level, it might struggle to start your car.
- Below 12.0 Volts: The battery is significantly discharged (below 25%). It will very likely fail to start your car and requires immediate charging. Repeatedly falling to this level suggests a deeper issue or an aging battery.
- 10.5 Volts or Lower: The battery is almost completely discharged or has a dead cell. It’s unlikely to start your car and probably needs replacement.
Quick Tip: A healthy battery will self-discharge slowly. Significant drops over a short period could indicate a parasitic draw (something in the car draining power) or a failing battery.
2. Testing the Charging System (Alternator Performance)
After checking the resting voltage, it’s vital to ensure your car’s charging system, primarily the alternator, is working correctly. A good battery will still fail if it’s not being recharged properly.
- Start the Engine: With the voltmeter still connected to the battery terminals, start your car. Let the engine idle for a minute or two to stabilize.
- Observe Voltage at Idle: Read the voltage on your voltmeter while the engine is running.
- Increase RPMs (Optional but Recommended): Gently rev the engine to about 2000 RPM for a few seconds while observing the voltmeter. The voltage should remain stable or increase slightly.
- Apply Electrical Load (Optional): Turn on your headlights, radio, and A/C fan to high. This puts a load on the charging system. Observe the voltage again. It should remain within the healthy range.
Interpreting Charging System Readings
- 13.8 – 14.8 Volts: This is the ideal range for a healthy charging system. It means your alternator is generating sufficient voltage to power the car and recharge the battery.
- Below 13.8 Volts: If the voltage consistently stays below 13.8 volts with the engine running, especially with accessories on, your alternator might be undercharging the battery. This will lead to a continually drained battery.
- Above 14.8 Volts: If the voltage consistently reads above 14.8 volts, your alternator might be overcharging. Overcharging can severely damage a battery by boiling off its electrolyte and shortening its lifespan.
Both undercharging and overcharging indicate a problem with your alternator or voltage regulator, requiring professional inspection.
Understanding Your Readings and Next Steps
Your voltmeter has provided crucial information; now it’s time to translate those numbers into action. Here’s what different scenarios might mean:
Scenario 1: Optimal Health
- Readings: Resting voltage of 12.6-12.8V; charging voltage of 13.8-14.8V.
- Diagnosis: Excellent! Your battery is strong, and your charging system is functioning perfectly.
- Next Steps: Continue routine checks, especially as the battery ages or before long trips. Keep terminals clean.
Scenario 2: Low Resting Voltage, Good Charging Voltage
- Readings: Resting voltage below 12.4V; charging voltage between 13.8-14.8V.
- Diagnosis: Your battery is discharged, but the alternator is likely working. Causes could be lights left on, frequent short drives, or a parasitic draw.
- Next Steps: Charge the battery fully with a smart charger. Re-test resting voltage after a few hours. If it holds a charge, monitor it. If it quickly discharges again, investigate for parasitic draws or consider battery replacement.
Scenario 3: Low Resting Voltage, Low Charging Voltage
- Readings: Resting voltage below 12.4V; charging voltage consistently below 13.8V with engine running.
- Diagnosis: This strongly suggests your alternator or voltage regulator is failing and not properly recharging the battery.
- Next Steps: Seek professional help immediately. A mechanic can accurately diagnose and repair or replace the faulty component. Driving with a failing alternator can cause repeated breakdowns.
Scenario 4: Low Resting Voltage, High Charging Voltage
- Readings: Resting voltage below 12.4V; charging voltage consistently above 14.8V with engine running.
- Diagnosis: Your alternator is overcharging the battery, which is dangerous and can severely damage the battery by “cooking” it.
- Next Steps: Stop driving the car if possible. Have your charging system inspected by a professional immediately to prevent further damage or safety hazards.
Scenario 5: Very Low Resting Voltage (Below 10.5V)
- Readings: Resting voltage 10.5V or lower.
- Diagnosis: The battery is deeply discharged or has one or more dead cells. Deep discharge can permanently harm a battery.
- Next Steps: Attempt to charge the battery. If it doesn’t accept a charge, or charges but quickly drops voltage again, the battery is likely irrecoverable and needs replacement.
When to Seek Professional Help
While mastering how to check a car battery with a voltmeter is an invaluable DIY skill, it’s crucial to recognize its limitations and know when to consult a professional mechanic.
- Persistent Issues: If your battery repeatedly tests low even after charging, or if it drains quickly after a full charge, a more in-depth diagnostic, such as a battery load test, is needed. A load tester can simulate starting conditions and reveal a battery’s true capacity.
- Alternator Problems: If your voltmeter points to an alternator issue (undercharging or overcharging), a mechanic has specialized tools to accurately diagnose the problem and perform complex repairs or replacements.
- Visible Battery Damage: Any signs of battery fluid leaks, a swollen battery case, or a strong sulfur smell indicate a seriously compromised battery. These situations can be dangerous and require professional handling.
- Unexplained Electrical Problems: If you’re experiencing baffling electrical glitches beyond simple battery voltage, such as flickering lights or intermittent power loss, a comprehensive electrical system check by a qualified technician is recommended.
- Difficult Battery Access: Some modern vehicles have batteries located in challenging-to-reach spots. If you’re uncomfortable accessing it, or risk damaging other components, it’s best to let a professional handle it.
Your voltmeter is a fantastic first-line diagnostic tool, but it doesn’t replace the expert analysis and specialized equipment a professional mechanic can provide for complex issues.
Conclusion
You’ve now successfully learned how to check a car battery with a voltmeter, equipping yourself with a powerful and practical skill for vehicle maintenance. By understanding how to properly use your voltmeter, prioritize safety, and correctly interpret both resting and charging voltage readings, you’re empowered to proactively monitor your car battery’s health and your car’s charging system.
Integrating this simple, quick, and cost-effective test into your regular maintenance routine can help you prevent unexpected breakdowns, extend the life of your battery, and identify potential issues with your charging system before they become costly repairs. Take confidence in knowing the state of your car’s electrical heart, and enjoy the peace of mind that comes with a reliable, well-maintained vehicle, ready for every journey ahead!
Frequently Asked Questions
How often should I check my car battery?
It’s a good practice to check your car battery’s voltage every 3-6 months, especially before long trips or during extreme weather conditions (hot or cold). More frequent checks are advisable if your battery is older than three years or if you notice any signs of weakness.
Can a deeply discharged battery be saved?
Sometimes, a deeply discharged battery can be saved by using a smart battery charger that has a reconditioning mode. However, deep discharges can cause permanent internal damage, significantly shortening the battery’s lifespan or making it unable to hold a charge effectively.
What causes battery corrosion?
Battery corrosion (a white, powdery, or greenish substance) is typically caused by hydrogen gas escaping from the battery terminals, which reacts with the metal. It can also be a sign of overcharging or a battery that is nearing the end of its life, as small amounts of electrolyte may leak.
Is it okay to test the battery immediately after driving?
It’s best to wait at least 3-4 hours, or ideally overnight, after driving before testing your battery’s resting voltage. Driving “surface charges” the battery, which can give an inaccurately high reading. Allowing it to rest provides a true indication of its state of charge.
Can a bad battery damage my alternator?
Yes, a bad or failing battery can put an excessive strain on your alternator. If the battery isn’t holding a charge properly, the alternator has to work harder constantly to try and keep it charged, which can lead to premature wear and tear or even failure of the alternator itself.
What’s the difference between a voltmeter and a battery load tester?
A voltmeter measures the battery’s electrical potential (voltage) without putting it under stress, providing an idea of its state of charge. A battery load tester, on the other hand, applies a controlled electrical load to the battery to simulate starting conditions, revealing if the battery can maintain sufficient voltage under stress, which is a more comprehensive test of its capacity and health.