Safely disconnecting your car battery is a crucial skill for any car owner, preventing electrical shorts and protecting your vehicle’s sensitive electronics. Always prioritize safety by wearing protective gear and working in a well-ventilated area. Remember to disconnect the negative terminal first, followed by the positive, to minimize risk. This guide will walk you through each step, ensuring you know how to properly disconnect a car battery every time.
How to Properly Disconnect a Car Battery
Have you ever faced a dead battery, needed to perform some car maintenance, or wanted to reset your car’s computer? Knowing how to properly disconnect a car battery isn’t just a useful skill; it’s an essential one for any car owner. It’s an important step that can prevent electrical shocks, short circuits, and damage to your vehicle’s sensitive electronic components. While it might seem daunting at first, with the right knowledge and a bit of caution, you’ll find it’s a straightforward process.
Many people hesitate to tackle battery disconnection, fearing they might mess something up or even hurt themselves. That’s a completely understandable concern! The good news is that by following a few simple, well-established steps, you can confidently and safely perform this task. We’re here to guide you through every detail, ensuring you understand not just *what* to do, but *why* you’re doing it. By the end of this article, you’ll be well-equipped to properly disconnect a car battery whenever the need arises, feeling empowered and secure in your automotive know-how.
Whether you’re replacing a faulty battery, installing new accessories, troubleshooting an electrical issue, or preparing your car for long-term storage, knowing how to properly disconnect a car battery is foundational. This comprehensive guide will walk you through the necessary precautions, the tools you’ll need, and the step-by-step process. We’ll also cover common mistakes to avoid and provide tips for ensuring everything goes smoothly. Let’s get started on becoming more confident under the hood!
Key Takeaways
- Safety First: Always wear safety glasses, gloves, and avoid metal jewelry. Work in a well-ventilated area away from sparks or flames.
- Tools You Need: Gather an appropriate wrench (typically 10mm or 13mm), a wire brush, battery terminal cleaner, and a terminal puller if terminals are stuck.
- Always Negative First: When learning how to properly disconnect a car battery, the absolute rule is to *always* disconnect the negative (-) terminal first. This prevents accidental shorts and potential damage.
- Then Positive: After the negative terminal is safely disconnected and secured, proceed to disconnect the positive (+) terminal.
- Secure Cables: Once disconnected, ensure the cables are tucked away and cannot accidentally touch the battery terminals or any metal part of the car body.
- Reconnecting Order: When reconnecting, the order is reversed: positive (+) terminal first, then negative (-) terminal last.
- Understand Why: Disconnecting the battery prevents electrical shorts during repairs, resets the car’s computer, and protects sensitive electronics during welding or long-term storage.
Quick Answers to Common Questions
What happens if I disconnect the positive terminal first?
If you disconnect the positive terminal first, and your wrench accidentally touches a grounded metal part of the car (like the engine block), you will create a direct short circuit. This can cause severe sparks, damage to the battery or electrical system, and potentially even an explosion due to rapid gas buildup.
What tools do I need to disconnect a car battery?
You’ll typically need a wrench (usually 10mm or 13mm for terminal nuts), safety glasses, and gloves. A wire brush and battery terminal cleaner are also helpful for removing corrosion.
How long should I leave the battery disconnected to reset the car’s computer?
For most vehicles, leaving the battery disconnected for about 15 to 30 minutes is sufficient to clear the car’s computer memory and reset its systems.
Can I disconnect the battery while the car is running?
No, you should never disconnect a car battery while the engine is running. Doing so can cause significant damage to the alternator and other sensitive electronic components due to voltage spikes.
Is it okay to touch the battery terminals with my bare hands?
It is generally not recommended to touch battery terminals with bare hands due to the presence of corrosive battery acid and the risk of accidental electrical shock if the battery is charged and you bridge the terminals or ground yourself.
📑 Table of Contents
Why Disconnecting Your Car Battery is Important
Disconnecting a car battery isn’t just about getting ready for a repair; it serves several critical purposes that protect both you and your vehicle. Understanding these reasons will reinforce the importance of learning how to properly disconnect a car battery.
Preventing Electrical Shocks and Short Circuits
The most immediate and obvious reason to disconnect your battery is safety. Car batteries store a significant amount of electrical energy, and accidentally touching a live positive terminal to a grounded metal part of your car (which acts as the negative return path) can cause a severe short circuit. This can lead to sparks, burns, and even an explosion of the battery due to rapid gas buildup. By knowing how to properly disconnect a car battery, especially by following the correct order, you virtually eliminate this risk.
Protecting Vehicle Electronics
Modern cars are packed with sophisticated electronic control units (ECUs), infotainment systems, and other sensitive components. When you perform repairs, especially those involving electrical systems or welding, voltage spikes or stray currents can easily fry these expensive parts. Disconnecting the battery acts as a safeguard, isolating these components from potential damage. It’s like unplugging your computer before working on its internal hardware.
Resetting the Car’s Computer
Sometimes, a persistent “Check Engine” light or an odd electrical glitch can be resolved by simply resetting the car’s computer. Disconnecting the battery for a short period (usually 15-30 minutes) can often achieve this. It’s a common troubleshooting step before diving into more complex diagnostics. Knowing how to properly disconnect a car battery quickly can save you a trip to the mechanic for minor issues.
Performing Maintenance and Repairs Safely
Any time you’re working on components connected to the electrical system, such as the starter, alternator, or even replacing headlights, disconnecting the battery is a non-negotiable safety measure. It ensures there’s no power flowing through the system, preventing accidental activation of components or unforeseen electrical issues while your hands are in the engine bay.
Gathering Your Tools and Safety Gear
Visual guide about How to Properly Disconnect a Car Battery
Image source: wikihow.com
Before you even think about touching your car battery, preparation is key. Having the right tools and, more importantly, the correct safety gear will make the process of how to properly disconnect a car battery much safer and smoother. Don’s skip this step!
Essential Tools
- Wrench Set: You’ll typically need an open-end or box-end wrench, or a socket wrench, to loosen the battery terminal nuts. Most car battery terminals use a 10mm or 13mm size, but it’s good to have a small set on hand.
- Wire Brush and Terminal Cleaner: Over time, battery terminals can accumulate corrosion, which looks like a white or bluish-green powdery substance. A wire brush (specifically a battery terminal brush) and some battery terminal cleaner spray will help remove this, ensuring a clean connection.
- Battery Terminal Puller (Optional but Recommended): If your battery terminals are severely corroded or stuck, a terminal puller can help remove them without damaging the battery posts.
- Battery Post Cleaner (Optional): A specialized tool to clean the battery posts themselves, ensuring optimal contact when reconnecting.
Crucial Safety Gear
- Safety Glasses or Goggles: Battery acid can splash, and sparks can fly. Eye protection is paramount.
- Rubber Gloves or Mechanic Gloves: Protect your hands from battery acid, dirt, and grime. Acid can cause chemical burns.
- Old Clothes: Battery acid can damage clothing. Wear something you don’t mind getting dirty or potentially ruined.
- Avoid Metal Jewelry: Rings, watches, and bracelets can conduct electricity, leading to burns if they accidentally bridge a circuit. It’s best to remove them.
- Baking Soda and Water Mixture: Keep a paste of baking soda and water nearby. If battery acid gets on your skin or clothes, this mixture can neutralize it.
- Well-Ventilated Area: Batteries can produce hydrogen gas, which is highly flammable. Work in an open space away from open flames, sparks, or anything that could ignite gas buildup.
The Step-by-Step Process: How to Properly Disconnect a Car Battery
Now that you’re prepped with your tools and safety gear, let’s dive into the core of how to properly disconnect a car battery. Follow these steps carefully, and you’ll do it right every time.
1. Park Safely and Prepare Your Vehicle
Before anything else, ensure your car is parked on a flat, level surface. Turn off the engine and remove the keys from the ignition to ensure no accidental power draws or system activations. Engage the parking brake firmly. Open the hood and locate your car battery. Sometimes it’s right in the engine bay; other times it might be in the trunk or under a rear seat, often under a plastic cover. If you have a battery cover, remove it.
2. Locate and Identify Battery Terminals
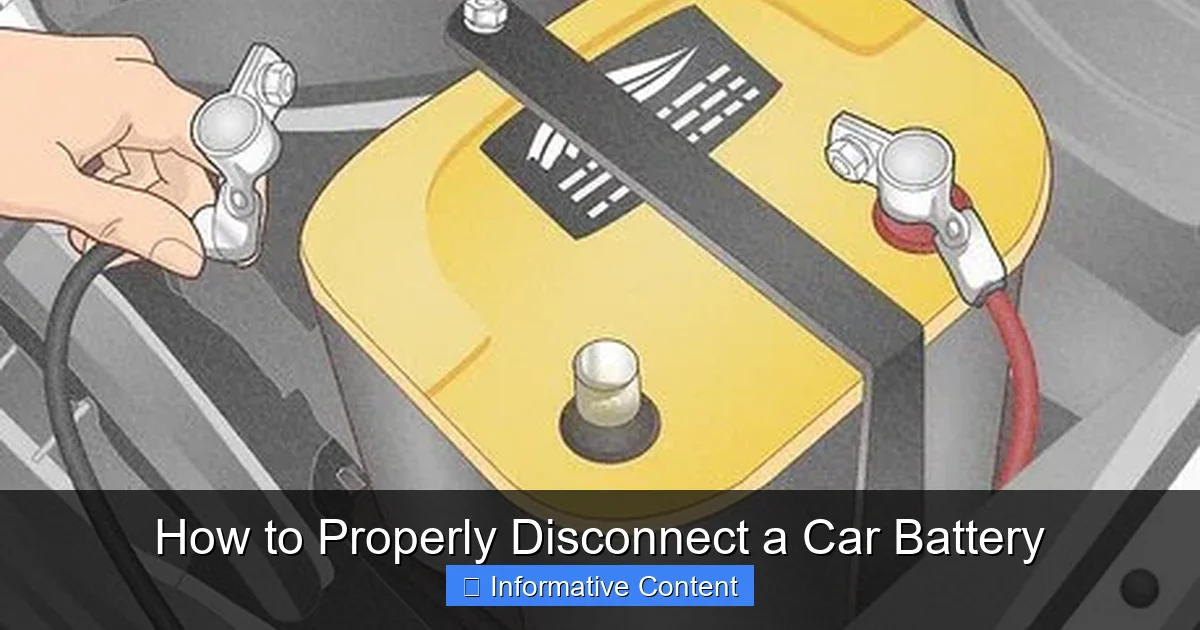
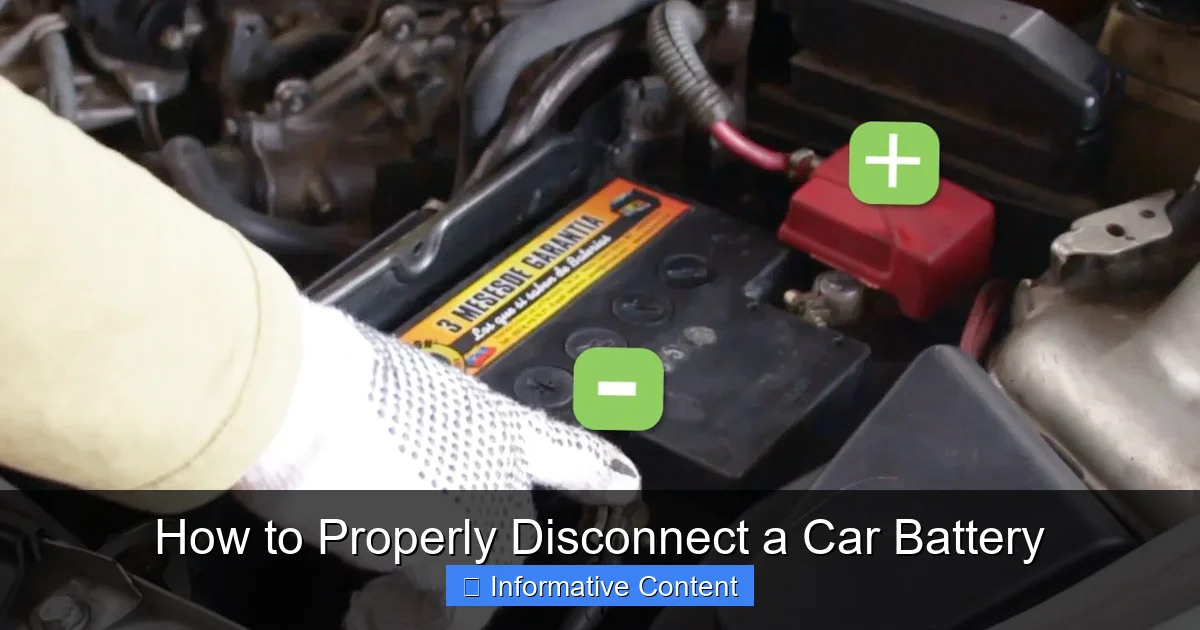
Look at the top of your battery. You’ll see two large terminals where cables are connected. One will be marked with a plus sign (+) for positive, and the other with a minus sign (-) for negative. The positive terminal usually has a red cable attached, and the negative terminal typically has a black cable. These markings are crucial for knowing how to properly disconnect a car battery.
3. Clean Corroded Terminals (If Necessary)
If you see white, blue, or green powdery corrosion on the terminals or cable clamps, it’s a good idea to clean them before disconnection. This makes it easier to loosen the nuts and ensures better electrical contact later. Spray some battery terminal cleaner on the corrosion, let it fizz, then scrub it off with your wire brush. Rinse with water if the cleaner directs it, and dry thoroughly.
4. Disconnect the Negative Terminal FIRST! (The Golden Rule)
This is the most critical step when learning how to properly disconnect a car battery.
- Using your wrench (usually 10mm or 13mm), loosen the nut on the negative (-) terminal clamp. You don’t need to remove the nut entirely, just loosen it enough so the clamp can be wiggled free from the battery post.
- Once loose, carefully twist and pull the negative cable clamp off the negative battery post.
- Crucially, ensure this disconnected cable cannot accidentally fall back and touch the negative battery post or any other metal part of the car. You can tuck it away, cover it with a rubber glove, or use a non-conductive strap to secure it. This step minimizes the risk of a short circuit.
Why negative first? If you accidentally touch your wrench from the negative terminal to the car body while loosening it, nothing will happen because the negative terminal is already grounded to the car body. However, if you started with the positive and your wrench touched both the positive terminal and the car body, it would create a direct short, causing sparks, potential damage, and even a battery explosion. This is why knowing how to properly disconnect a car battery means negative first!
5. Disconnect the Positive Terminal
With the negative cable safely out of the way, you can now proceed with the positive terminal.
- Using your wrench, loosen the nut on the positive (+) terminal clamp.
- Carefully remove the positive cable clamp from the positive battery post.
- Just like the negative cable, secure this cable so it cannot accidentally touch anything.
6. Remove the Battery (If Necessary)
If your goal is to remove the battery entirely (e.g., for replacement or cleaning the battery tray), you’ll typically find a battery hold-down clamp or strap at the base of the battery.
- Loosen or remove the fasteners holding this clamp in place.
- Carefully lift the battery out of its tray. Batteries are heavy, so lift with your legs, not your back, or get help if needed.
- Inspect the battery tray for corrosion and clean it thoroughly if present, using a baking soda and water paste to neutralize any acid.
Common Pitfalls and How to Avoid Them
Even with a clear guide on how to properly disconnect a car battery, certain mistakes are common. Being aware of them can help you avoid problems.
Ignoring Safety Gear
This is a recipe for disaster. Battery acid is corrosive, and sparks can cause eye injuries or burns. Always wear safety glasses and gloves, and remove metal jewelry. Your safety is non-negotiable.
Disconnecting the Positive Terminal First
As emphasized, this is the most dangerous mistake. Always, *always* disconnect the negative terminal first. It’s the golden rule for a reason.
Letting Cables Touch
Once disconnected, ensure the positive and negative cables cannot touch each other or any metal part of the car body. An accidental contact can create a short, even with one terminal disconnected from the battery, if the other is still attached. Secure them away from the battery posts.
Not Securing the Battery
If you remove the hold-down clamp but don’t take the battery out immediately, or if you replace it without securing it, the battery can shift while driving, potentially causing damage or short circuits. Always ensure the battery is firmly secured in its tray.
Over-tightening Terminals Upon Reconnection
When you eventually reconnect your battery, resist the urge to overtighten the terminal clamps. This can strip the threads or even crack the battery casing. The clamps should be snug and tight enough so that they don’t wiggle, but not excessively forced.
When to Disconnect and When Not To
Knowing how to properly disconnect a car battery is one thing, but knowing *when* to do it is equally important.
When to Disconnect:
- Battery Replacement: The most obvious reason.
- Electrical Repairs: Any work on the starter, alternator, wiring, stereo, or other electrical components.
- Resetting the ECU: For troubleshooting persistent “Check Engine” lights or minor electronic glitches.
- Long-Term Storage: If you’re storing your car for several weeks or months, disconnecting the battery prevents parasitic drains from completely depleting it.
- Welding on the Vehicle: Absolutely crucial to protect sensitive electronics from welding currents.
When NOT to Disconnect:
- Quick Diagnostic Scans: If a mechanic is just plugging in an OBD-II scanner, there’s usually no need to disconnect.
- Minor Non-Electrical Work: If you’re changing oil, rotating tires, or performing other purely mechanical tasks that don’t involve the electrical system, disconnection isn’t necessary.
- When You Don’t Have Radio/Navigation Codes: Some older vehicles or specific aftermarket units require a security code to reactivate the radio or navigation system after battery disconnection. Ensure you have these codes if applicable, or be prepared to deal with the consequences.
- Modern Car Electrical Systems: Some newer vehicles have complex electrical systems that require a specific procedure or a “memory saver” device to prevent losing critical data (like adaptive shift points or power window settings) when the battery is disconnected. Consult your owner’s manual if unsure.
Reconnecting Your Car Battery (Briefly)
Once your work is done, you’ll need to reconnect the battery. The process is essentially the reverse of disconnection, but with one critical change in order.
The Reconnection Order
1. Place the Battery Back (if removed): Ensure it’s clean and secured in its tray with the hold-down clamp.
2. Connect the Positive Terminal FIRST: Attach the red (positive) cable clamp to the positive (+) battery post. Tighten the nut securely with your wrench.
3. Connect the Negative Terminal LAST: Attach the black (negative) cable clamp to the negative (-) battery post. Tighten the nut securely.
4. Apply Anti-Corrosion Spray (Optional): Once both terminals are securely connected, you can spray an anti-corrosion protectant over the terminals to prevent future buildup.
5. Replace Battery Cover: If your battery had a cover, put it back on.
6. Start Your Car: Start the engine and check for any dashboard warning lights. You may need to reset your radio presets, clock, or power windows, as these might have lost their memory.
Conclusion
Learning how to properly disconnect a car battery is an invaluable skill that enhances your confidence and safety when working on your vehicle. By prioritizing safety, gathering the right tools, and meticulously following the steps – especially the golden rule of “negative first, then positive” – you can perform this task without incident. Remember, automotive maintenance is a journey of continuous learning, and mastering basic procedures like this is a significant step toward becoming a more capable and self-reliant car owner. So, next time you need to tackle a battery-related task, you’ll be ready to get under the hood with knowledge and peace of mind!
🎥 Related Video: How to Disconnect and Reconnect the Car Battery
📺 FIX MY CAR
Thank You for your Donation: https://www.paypal.com/donate/?hosted_button_id=TQ2UTNS5WDC46 SUBSCRIBE So We Can …
Frequently Asked Questions
What are the main risks of improperly disconnecting a car battery?
The main risks include creating a dangerous short circuit that can cause sparks, burns, or even a battery explosion. There’s also the risk of damaging your car’s sensitive electronic components due to voltage spikes or incorrect procedures, and exposure to corrosive battery acid.
Do I need to wear safety glasses when disconnecting a battery?
Yes, absolutely. Safety glasses or goggles are crucial. Battery acid can splash, and sparks can fly, potentially causing severe eye injuries. It’s a non-negotiable piece of safety equipment.
Will disconnecting my car battery erase my radio presets and clock settings?
In most older vehicles, yes, disconnecting the battery will reset your radio presets, clock, and potentially trip meter. Newer cars might retain some settings, or you might need a security code for your radio. Check your car’s owner’s manual.
Can disconnecting the battery fix a “Check Engine” light?
Sometimes, yes. Disconnecting the battery for 15-30 minutes can clear the car’s computer memory, which may turn off a “Check Engine” light if the underlying issue was a minor, intermittent glitch. However, if the problem persists, the light will likely return, indicating a more serious issue that needs professional diagnosis.
What is battery terminal corrosion and how do I deal with it?
Battery terminal corrosion is a white, blue, or greenish powdery substance that builds up on battery terminals and cables, often due to acid leakage. You can deal with it by spraying battery terminal cleaner and scrubbing it off with a wire brush before disconnecting, which also improves electrical contact.
Is there any special procedure for disconnecting a hybrid or electric car battery?
Yes, hybrid and electric vehicles have high-voltage battery systems that require specialized training and equipment for safe disconnection. Never attempt to disconnect a hybrid or EV battery without professional expertise, as it can be extremely dangerous and even life-threatening.