A dying car battery can leave you stranded, but learning how to check a car battery with a multimeter empowers you to monitor its health proactively. This comprehensive guide will walk you through every step, from understanding your multimeter and essential safety precautions to performing static and cranking voltage tests, and ultimately, interpreting the readings to know if your battery needs charging or replacing. It’s a simple, cost-effective skill that can save you time and hassle.
There’s hardly a more frustrating experience for a car owner than turning the key or pushing the start button only to be met with silence or a sluggish, grinding sound. Often, the culprit is a dead or dying car battery. It’s a common issue, but one that’s often preventable if you know how to keep an eye on your battery’s health. Instead of waiting for the inevitable, what if you could easily diagnose a weakening battery right in your driveway?
That’s where a simple tool, the multimeter, comes into play. Learning how to check a car battery with a multimeter is one of the most practical and empowering skills any car owner can acquire. It’s not just for mechanics anymore; with a few basic steps and a little know-how, you can confidently assess your battery’s condition, potentially saving yourself a tow, a late arrival, and the expense of an emergency replacement. This comprehensive guide will walk you through everything you need to know, from understanding your tools to interpreting the results, ensuring you’re never caught off guard by a failing battery again.
Key Takeaways
- Regular Checks Prevent Stranding: Proactively checking your car battery’s voltage with a multimeter can alert you to a weakening battery before it leaves you stranded, saving you time and stress.
- Safety First is Paramount: Always wear protective gear (gloves, eye protection) and ensure your vehicle is off and in park/neutral with the parking brake engaged before touching the battery. Disconnecting the negative terminal first prevents accidental short circuits.
- Multimeter Basics: Set your digital multimeter to the DCV (Direct Current Voltage) setting, typically 20V, to accurately measure your car battery’s voltage. Ensure probes are correctly inserted (red for VΩmA, black for COM).
- Static Voltage Test (Engine Off): A healthy, fully charged car battery should read between 12.6 and 12.8 volts when the engine has been off for at least 12 hours. Readings below 12.4V suggest a need for charging.
- Cranking Voltage Test (Engine Starting): This test reveals the battery’s ability to hold voltage under load. A good battery should not drop below 9.6-10V during the initial cranking phase. A significant drop indicates a weak battery.
- Interpreting Readings: Understand that voltage drops below 12.4V (static) or 9.6V (cranking) often signal a failing battery that might need replacement, especially if it’s over 3-5 years old.
- Proactive Maintenance: Beyond just checking voltage, keep battery terminals clean and connections tight. Regular checks are a key part of extending battery life and ensuring reliable vehicle starts.
Quick Answers to Common Questions
What is the ideal voltage for a fully charged car battery?
A healthy, fully charged 12-volt car battery should read between 12.6 to 12.8 volts when measured with a multimeter after resting for at least 12 hours.
Can I check a car battery with a multimeter while the engine is running?
While you *can* measure voltage with the engine running, this tests the alternator’s output (charging voltage, typically 13.7-14.7V), not the battery’s static health. For battery health, turn the engine off.
What does it mean if my battery reads below 12.0V?
A reading below 12.0V indicates a significantly discharged battery, possibly less than 25% charged. It needs immediate charging and could be permanently damaged if deeply discharged for too long.
Is it safe to touch the multimeter probes to the battery terminals?
Yes, it is safe as long as you connect the red probe to the positive terminal and the black probe to the negative terminal, and ensure neither probe touches any other metal part of the car or each other simultaneously to avoid a short circuit.
How often should I check my car battery with a multimeter?
It’s a good practice to check your car battery with a multimeter at least twice a year, ideally before winter and before summer, or anytime you notice symptoms of a weak battery.
📑 Table of Contents
Why Checking Your Car Battery Is Essential
Your car battery is the heart of your vehicle’s electrical system, responsible for starting the engine and powering all electrical components when the engine isn’t running. Over time, batteries degrade due to age, extreme temperatures, and repeated discharge/recharge cycles. Ignoring its health can lead to unexpected breakdowns, especially in inconvenient situations.
Symptoms of a Weakening Battery
Before a complete failure, your car battery often gives subtle hints that it’s struggling. Recognizing these can prompt you to perform a check:
- Slow Engine Crank: The engine turns over more slowly than usual when you try to start it.
- Dim Headlights or Interior Lights: Especially noticeable when trying to start the car.
- Warning Lights: A battery or charging system warning light illuminates on your dashboard.
- Clicking Sound: A rapid clicking noise when turning the key, indicating insufficient power to engage the starter motor.
- Corrosion on Terminals: White, powdery substance around the battery terminals can impede current flow.
- Older Battery: Car batteries typically last 3-5 years. If yours is older, it’s wise to check it regularly.
Benefits of Proactive Battery Checks
By learning how to check a car battery with a multimeter, you gain several advantages:
- Preventative Maintenance: Catch problems early, allowing you to charge or replace the battery on your schedule, not your battery’s.
- Cost Savings: Avoid emergency service calls and potentially extend the life of your battery through timely charging.
- Peace of Mind: Drive with confidence, knowing your battery is in good health, especially before long trips or in cold weather.
- Empowerment: Develop a valuable DIY skill that puts you in control of your vehicle’s maintenance.
Getting to Know Your Multimeter
Before you dive into checking your car battery, let’s get acquainted with the tool of the trade: the multimeter. This versatile device measures voltage, current, and resistance, but for our purposes, we’ll focus on voltage.
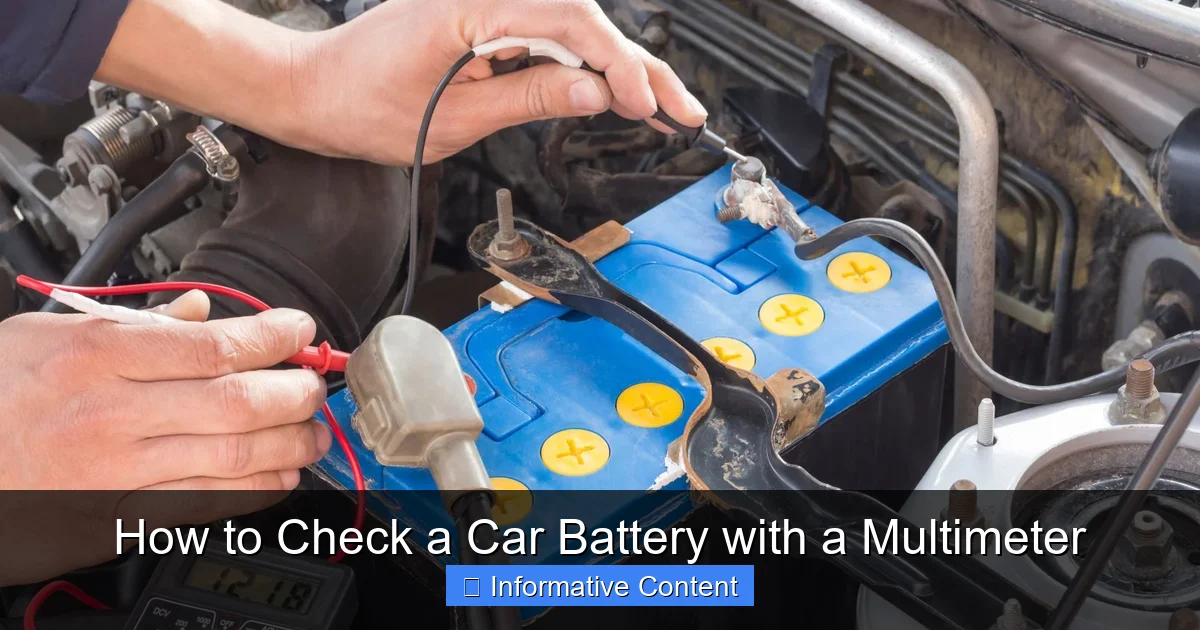
Visual guide about How to Check a Car Battery with a Multimeter
Image source: tontio.com
Types of Multimeters
You’ll primarily encounter two types:
- Analog Multimeters: These have a needle that points to values on a scale. They are less common for automotive battery checks today and can be harder to read for beginners.
- Digital Multimeters (DMMs): These are by far the most popular and recommended for car battery testing. They feature a digital display that shows precise numerical readings, making them much easier to use. You can find a decent DMM for as little as $20-$30 at any hardware store or online.
Key Multimeter Settings and Components
A typical digital multimeter will have:
- Display Screen: Where your readings appear.
- Rotary Dial: Used to select the measurement type (voltage, current, resistance) and range.
- Input Jacks: Usually three or four, for connecting the test probes.
- COM (Common): This is where the black test lead always connects.
- VΩmA (Voltage, Ohms, Milliamps): This is where the red test lead connects for voltage measurements.
- Test Probes (Leads): One red, one black, with sharp metal tips for making contact.
Setting Up Your Multimeter for Battery Testing
To measure car battery voltage, you’ll need to set your multimeter to measure DC (Direct Current) Voltage. Look for a “V” with a straight line (or sometimes “DCV” or “VDC”). Since a car battery is a 12-volt system, you’ll need a range that can accommodate this. Most multimeters have a “20V” setting under the DCV section, which is perfect for this task. If your multimeter has an auto-ranging feature, you might just select “VDC” and it will automatically choose the correct range.
Once you’ve selected the appropriate setting, insert the black lead into the “COM” jack and the red lead into the “VΩmA” jack. You’re now ready to learn how to check a car battery with a multimeter!
Safety Precautions Before You Begin
Working with car batteries involves electricity and corrosive chemicals, so safety is paramount. Do not skip this section.
Essential Safety Gear
- Safety Glasses or Goggles: Battery acid can cause severe eye damage. Protect your eyes.
- Protective Gloves: Heavy-duty rubber gloves are ideal to protect your hands from acid and electrical shocks.
- Old Clothes: Battery acid can also ruin clothing.
Vehicle Preparation
- Engine Off: Ensure your car’s engine is completely off and has been off for at least a few hours (ideally 12-24 hours) for a static voltage test. This allows the battery to “rest” and provides a more accurate baseline reading.
- Parking Brake On: Engage the parking brake to prevent the vehicle from accidentally moving.
- Vehicle in Park or Neutral: If applicable, ensure the transmission is in the correct position.
- Remove Keys from Ignition: This prevents accidental starting of the vehicle, which could be dangerous during the test.
- Ventilation: Work in a well-ventilated area. Batteries can emit hydrogen gas, which is flammable.
- No Smoking/Open Flames: Absolutely no smoking or open flames near the battery due to the risk of igniting hydrogen gas.
Battery Terminal Safety
- Identify Terminals: The positive terminal is usually marked with a “+” sign and often has a red cover. The negative terminal is marked with a “-” sign and typically has a black cover.
- Avoid Short Circuits: Never allow the multimeter probes or any metal tools to simultaneously touch both the positive and negative terminals, or the positive terminal and any metal part of the car’s body (which is grounded to the negative terminal). This can create a dangerous short circuit.
- Clean Terminals (If Necessary): If you see a white, powdery or greenish substance (corrosion) on the battery terminals, gently clean it with a wire brush and a battery terminal cleaner solution (or a mixture of baking soda and water). Rinse and dry thoroughly. This ensures good electrical contact for accurate readings.
Step-by-Step: Testing Static Voltage
This is the most common and easiest test to perform when learning how to check a car battery with a multimeter. It measures the battery’s resting voltage without any load.
1. Locate and Access Your Battery
Most car batteries are under the hood, but some vehicles place them in the trunk, under the rear seat, or even in the fender well. Consult your owner’s manual if you can’t find it immediately. Once located, remove any plastic covers that might be protecting the terminals.
2. Prepare Your Multimeter
As discussed, set your digital multimeter to measure DC voltage (V with a straight line or DCV) and select the 20V range. Insert the black lead into “COM” and the red lead into “VΩmA”.
3. Connect the Multimeter Probes
- Carefully touch the tip of the **red (positive) probe** to the **positive (+) battery terminal**.
- Then, touch the tip of the **black (negative) probe** to the **negative (-) battery terminal**.
Ensure both probes make good, firm contact with the metal terminals, not just the plastic covers or corrosion. Do not let the probes touch any other metal part of the car simultaneously.
4. Read the Display
Look at the multimeter’s digital display. It will show a voltage reading. Record this number.
5. Interpret the Static Voltage Reading
Here’s what your reading means for a standard 12-volt car battery:
- 12.6V – 12.8V: The battery is fully charged and in good health.
- 12.4V – 12.6V: The battery is well-charged but not at peak. It’s roughly 75% charged. This is usually fine, but if it consistently sits here, consider a trickle charger.
- 12.0V – 12.4V: The battery is partially discharged (around 25-50% charged). It needs charging soon. This might cause slow cranking.
- Below 12.0V: The battery is significantly discharged (less than 25% charged) and likely needs a full charge and potentially further testing. Below 11.8V, it’s considered deeply discharged and may be permanently damaged.
If your static voltage is consistently below 12.4V even after a long drive, it’s a strong indicator that your battery is losing its ability to hold a charge. This is a critical piece of information when you learn how to check a car battery with a multimeter.
Advanced Test: Checking Cranking Voltage (Under Load)
While the static voltage test gives you a good baseline, it doesn’t tell you how well the battery performs under load—that is, when it’s actively trying to start your engine. The cranking voltage test does exactly that.
Why This Test Is Important
A battery might show a good static voltage (e.g., 12.6V), but its internal resistance could be high due to age or damage. Under the heavy load of the starter motor, a weak battery’s voltage will drop significantly, preventing the engine from starting. This test is crucial for a complete understanding of your battery’s health.
Performing the Cranking Voltage Test
Warning: This test involves briefly starting the car. Ensure the car is in a well-ventilated area, parking brake is engaged, and the car is in park/neutral. Have a helper if possible, or position your multimeter in a way you can see it from the driver’s seat.
- Set Up Multimeter: Keep your multimeter set to DCV 20V, with probes connected as before (black to COM, red to VΩmA).
- Connect to Battery: Connect the red probe to the positive (+) terminal and the black probe to the negative (-) terminal, just as you did for the static test. Ensure good contact.
- Observe While Cranking: Have your helper attempt to start the car (or if alone, position the multimeter so you can see it through the windshield or use a multimeter with a “Min/Max” hold function).
- Record the Lowest Reading: As the engine cranks, the voltage will momentarily drop. Note the *lowest* voltage reading displayed on the multimeter during this cranking period. The engine doesn’t need to fully start; just a brief crank (2-3 seconds) is sufficient for this test.
Interpreting Cranking Voltage Readings
- 10V or Above: Generally, a healthy battery will maintain a voltage of 10V or higher during cranking. Some experts suggest 9.6V as the minimum. This indicates the battery can handle the load.
- Below 9.6V: If the voltage drops significantly below 9.6V during cranking, it indicates a weak battery that is struggling to deliver the necessary power. This battery is likely nearing the end of its life and should be replaced, even if its static voltage reading seemed acceptable.
Combining the static and cranking voltage readings provides a much clearer picture of your car battery’s overall condition and helps you decide on the next steps.
What Your Readings Mean & Next Steps
Now that you know how to check a car battery with a multimeter and have your readings, let’s put it all together and figure out what to do next.
Summary of Voltage Readings and Their Meaning
| Voltage Reading (Static) | Voltage Reading (Cranking) | Interpretation | Recommended Action |
|---|---|---|---|
| 12.6V – 12.8V | 10V or above | Battery is fully charged and healthy. | No action needed; continue monitoring. |
| 12.4V – 12.6V | 10V or above | Battery is charged but not at peak (75%+). | Monitor closely; consider a trickle charge if below 12.5V. |
| 12.0V – 12.4V | 9.6V – 10V | Battery is partially discharged (25-50%). | Fully charge the battery. Re-test after charging. |
| Below 12.0V | Below 9.6V | Battery is significantly discharged or weak/failing. | Fully charge the battery. If it doesn’t hold a charge or fails the cranking test again, replace it. |
| Significantly lower than 12.0V (e.g., 10V-11V) | N/A (won’t crank) | Deeply discharged or dead battery. | Attempt to charge. If it won’t take or hold a charge, replace immediately. |
Beyond Voltage: Other Considerations
- Age of Battery: If your battery is 3-5 years old or more, even borderline readings suggest it’s nearing its end.
- Battery Type: Most passenger vehicles use lead-acid batteries (flooded, AGM, or Gel). The voltage ranges provided are general for 12V lead-acid batteries.
- Temperature: Cold weather significantly impacts battery performance. A battery that barely starts in warm weather might fail completely when temperatures drop.
- Corrosion: Persistent corrosion on terminals can prevent proper charging and starting. Keep them clean.
- Listen to Your Car: If your car shows other symptoms of a dying battery (slow crank, dim lights), even if the multimeter reading isn’t drastically low, it’s wise to investigate further or replace the battery.
When to Charge, When to Replace
If your battery shows a low static voltage but is relatively new and healthy otherwise, a good charge might be all it needs. Use a reliable car battery charger and follow its instructions. After a full charge, re-test the battery.
However, if your battery is old, repeatedly shows low voltage even after charging, or fails the cranking test (dropping significantly below 9.6V), it’s time for a replacement. A failing battery can also put strain on your alternator, so addressing it promptly is important.
Knowing how to check a car battery with a multimeter is the first step; understanding these interpretations and making an informed decision is the crucial next step in maintaining your vehicle’s reliability.
Conclusion
Taking control of your car’s maintenance can seem daunting, but armed with a simple tool like a multimeter and the knowledge of how to check a car battery with a multimeter, you’ve unlocked a vital skill. This guide has walked you through everything from the basic principles of your multimeter and essential safety precautions to performing both static and cranking voltage tests, and most importantly, interpreting those readings to make informed decisions about your battery’s health.
Regularly checking your car battery isn’t just about avoiding a breakdown; it’s about proactive maintenance, saving money, and gaining peace of mind. So, grab your multimeter, follow these steps, and keep your vehicle starting reliably for years to come. Your future self, avoiding a stressful situation on a cold morning, will thank you.
🎥 Related Video: How to Test a Car Battery with a Multimeter
📺 ChrisFix
How to check a car battery using a multimeter. Does your car not start, do you have dim headlights or interior lights, does the …
Frequently Asked Questions
What kind of multimeter do I need for a car battery?
A basic digital multimeter (DMM) is ideal for checking a car battery. Look for one that can measure DC (Direct Current) voltage, specifically up to 20V, which is sufficient for a 12-volt car battery system. They are affordable and user-friendly.
What do the red and black leads on a multimeter mean?
The red lead is for positive connections, and the black lead is for negative or common connections. When checking a car battery, the red lead connects to the battery’s positive (+) terminal, and the black lead connects to the negative (-) terminal.
Can a multimeter tell me if my battery is “dead”?
Yes, to a good extent. If your multimeter reads significantly below 12.0 volts (e.g., 10-11 volts or lower) even after attempting a charge, it’s a strong indicator that your battery is dead or deeply discharged beyond recovery. A fully dead battery will show near 0 volts.
Why does my battery show good voltage but won’t start the car?
This can happen if the battery has a good static voltage but lacks the necessary “cold cranking amps” (CCA) to deliver a burst of power under load. Performing a cranking voltage test (where voltage doesn’t drop significantly below 9.6V) helps diagnose this, or you may need a specialized battery load tester for a more definitive answer.
What if I accidentally connect the multimeter probes in reverse?
Most modern digital multimeters are protected against reverse polarity and will simply display a negative sign before the voltage reading (e.g., -12.6V). While generally not damaging to the multimeter, it’s always best to connect positive to positive and negative to negative to avoid confusion and ensure correct readings.
Does checking my battery with a multimeter drain it?
No, checking your car battery with a multimeter draws a negligible amount of current and will not significantly drain your battery. It’s a non-invasive way to assess its voltage and overall health without affecting its charge.